
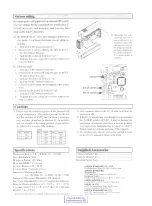


Installation of the “FC-30”
Parts List
Screws (M3 x 6B)
................................................. 2
Screws (M3 x 6B)
................................................. 6
Mounting Plate A ...................................................... 1
Mounting Plate B ..................................................... 1
Mounting Plate C ..................................................... 1
Installation
1. Turn the transceiver’s power off, and disconnect all cables from the transceiver.
2. Screw the mounting plate “
A
” to the
FC-30
using the supplied screws (figure 1).
3. Remove the four rubber lugs and its four screws (figure 2), then screw the mounting plate “
B
” and “
C
” so that
its holes on the
FT-897
using the supplied screws (figure 3).
4. To install the
FC-30
, position the
FC-30
so that the mounting plate “
A
” on the side fit into the mounting plate
“
B
” on the FT-897 (figure 3), then screw the mounting plate “
C
” (on the
FT-897
) to the
FC-30
using the
supplied screws (figure 1).
Do not install the supplied FC-30 Mounting Screws if you are not installing the FC-30! Also, do not use
an improper screw for mounting the FC-30! An improper screw may cause a "short circuit" to the
internal circuitry, causing serious damage!
Figure 2
Plate A
Plate B
Plate C
Figure 1
Figure 3
Plate A
Plate B
Plate C


