background image

2

Windsor High Efficiency Wood Stove

30005126

cautiON

After  reading  these  instructions,  if  you  have  any  doubt 

about your ability to complete your installation in a profes-

sional like manner you should obtain the services of an 

installer versed in all aspects as to the correct and safe in-

stallation. Do not use temporary makeshift compromises 

during installation.

before installation of your appliance

1.  Check with the building inspector’s office for compli-

ance with local codes; a permit may be required.

2.  This  appliance  requires  a  masonry  or  prefabricated 

chimney listed to ULC S629 (Canada) and UL103HT 

(U.S.). Sized correctly.

3.  A 6” (152 mm) diameter flue is required for proper per-

formance.

4.  Always  connect  this  unit  to  a  chimney  and 

NEvER


vent to another room or inside a building.

5. 

dO NOt

 connect this unit to any duct work to which 

another appliance is connected such as a furnace.

6. 

dO NOt

 connect this unit to a chimney flue serving 

another appliance.

7.  The connector pipe and chimney should be inspected 

periodically and cleaned if necessary.

8.  Remember  the  clearance  distances  when  you  place 

furniture  or  other  objects  within  the  area. 

dO  NOt


store  wood,  flammable  liquids  or  other  combustible 

materials too close to the unit.

  Refer to certification label on back of your unit for 

required clearances.

9.  Contact your local municipal or provincial fire authority 

for information on how to handle a chimney fire. Have 

a clearly understood plan to handle a chimney fire. In 

the event of a chimney fire, turn air control to closed 

position and 

call tHE fiRE dEpaRtMENt.

10.

dO NOt

 tamper with combustion air control beyond 

normal adjustment.

11. 

dO NOt

 install these units in a mobile home or trailer. 

These units are NOT mobile home approved.

Operation

Why the correct flue size is important - 6”

Draft is the force which moves air from the appliance up 

through the chimney. The amount of draft in your chimney 

depends on the length of the chimney, local geography. 

Nearby  obstructions,  and  other  factors.  Too  much  draft 

may cause excessive temperatures in the appliance. An 

uncontrolled burn or a glowing red part or chimney connec-

tor indicates excessive draft. Inadequate draft may cause 

back puffing into the room and “plugging” of the chimney 

and/or cause the appliance to leak smoke into the room 

through appliance and chimney connector joints.

Today’s solid fuel appliances are much more efficient than 

in the past. The units are designed to give you controlled 

combustion, as well as maximum heat transfer, using less 

fuel to do so.
The design of your new appliance is such that the exhaust 

“smoke” is now at lower temperatures than in the past, 

therefore requiring proper chimney size to give adequate 

draft. If your chimney is too large, the heating appliance 

will have a difficult time to raise the “chimney flue” temper-

ature to give adequate draft, therefore causing a smoke 

back up, poor burn or both.

Should you experience such a problem call in a local 

chimney expert.

With the door closed, the rate of burning is regulated by 

the amount of air allowed to enter the unit through the air 

control. With experience you will be able to set the control 

for heat and burning time desired.
Once the required chimney draft is obtained, operate only 

with  doors  closed  and  open  doors  slowly  when  re-fuel-

ing.  (This  will  reduce  or  eliminate  smoke  from  entering 

the room).
Attempts to achieve higher output rates that exceed heat-

er design specifications can result in permanent damage 

to the heater. The recommended wood load is level with 

the top of the firebricks.
Overloading may prevent sufficient air entering the heater 

to properly fuel the fire.
Operate this heater only with the door closed.

dO NOt buRN gaRbagE OR flaMMablE fluidS.
dO NOt uSE cHEMicalS OR fluidS tO StaRt tHE 

fiRE.

tHiS HEatER iS EXtREMEly HOt WHilE iN Op-

ERatiON. 

SERiOuS buRNS caN RESult fROM cONtact.

kEEp  cHildREN,  clOtHiNg  aNd  fuRNituRE 

aWay.

alWayS pROvidE a SOuRcE Of fRESH aiR iNtO 

tHE ROOM WHERE tHE uNit iS iNStallEd. fail-

uRE tO dO SO May RESult iN aiR StaRvatiON 

Of  OtHER  fuEl  buRNiNg  appliaNcES  aNd 

tHE pOSSiblE dEvElOpMENt Of HaZaRdOuS 

cONditiONS.

Optional blower:

 Model S31105

120 V, 60 Hz, 0.75 Amps, 2000 rpm

daNgER: 

Risk of Electric Shock.

Disconnect power before servicing unit. 

iMpORtaNt:

  For optimum heater performance at 

“low” burn rate, operate the fan at low speed.

Summary of Contents for Windsor WR270007

Page 1: ...trictions and installation inspection requirements in your area This stove is listed by OMNI Test Laboratories of Port land Oregon to meet UL1482 for the US and ULC 627 for Canada Do Not Discard This Manual Retain for Future Use 6 Flue required 30005126 4 13 Rev 4 This manual describes the installation and operation of the Model WR270007 non catalytic wood heater This heater meets US Environmental...

Page 2: ...An uncontrolled burn or a glowing red part or chimney connec tor indicates excessive draft Inadequate draft may cause back puffing into the room and plugging of the chimney and or cause the appliance to leak smoke into the room through appliance and chimney connector joints Today s solid fuel appliances are much more efficient than in the past The units are designed to give you controlled combusti...

Page 3: ... S16040 in baffle ST1006 Figure 2 Brick Placement CAUTION DO NOT open fire door to a point where it would be in contact with the combustible sidewall Optional Fan An optional heat exchange blower is avail able for this wood burning appliance To order please see the local dealer where you purchased your appliance Contact your local building inspector prior to installa tion A permit may be required ...

Page 4: ...structions Operation Do not use a grate or elevate fire Build wood fire directly on hearth When the stove is used for the first time the solvents in the paint will smoke off Wood This heater is designed to burn natural wood only High er efficiency and lower emissions generally result when burning air dried seasoned hardwood as compared to softwood or to green or freshly cut hardwood Only use dry s...

Page 5: ...fuel being careful not to overload Inlet Air Control Settings Desired Inlet Approx Burn Setting Air Setting BTU Output Low Closed Fully 10 370 Med Low 1 4 Open 12 420 Med High 3 4 Open 15 676 High Fully Open 29 301 Never use gasoline gasoline type latern fuel kero sene charcoal lighter fluid or similar liquids to start or freshen up a fire in this heater Keep all such liquids well away from the he...

Page 6: ...n how to handle a chimney fire Have a clearly understood plan to handle a chimney fire WARNING Things to remember in case of chimney fire 1 Close draft control 2 Call the fire depart ment Ash Disposal This unit features a convenient ash lip for easy removal of ash During constant use ashes should be removed every few days or whenever ashes get to three to four inches deep in the firebox Remove ash...

Page 7: ...ver the glass at the be ginning of a fire Your stove has been built with an air wash system that will help keep the glass clear when the firebox has reached a good operating temperature and has a good draft Cold firebox temperature and poor draft cause sooting of the glass Once the firebox temperature and the draft increases the soot will burn off 8 What is draft Draft is the ability of the chimne...

Page 8: ... will significantly re duce chimney draw and may cause a chimney fire 10 Should I close or open the air control fully when shutting down the stove When shutting down the stove fully open the air con trol This allows the chimney temperatures to remain as high as possible for as long as possible Cold chim ney temperatures create creosote NOTE this sheet is intended as an aid and does not supersede a...

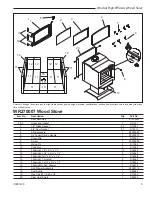
Page 9: ...0069 6 Air Control Spring Handle 1 90000070 7 Glass Clip 7 S37034 8 Screw 7 90000286 9 Hinge Pin 2 S11005 10 Push Nut 2 S11090 11 Firebrick Lt 9 x 4M zn x 1Z v 12 S16040 12 Firebrick Lt 1 4 x 4M zn x 1Z v 4 S16043 13 Firebrick Lt 4Z x x 4M zn x 1 4 1 S16046 14 Firebrick Lt Angled 2 S16042 15 Firebrick Lt 4M zn x 2C v x 1Z v 1 S16224 16 Firebrick for Ash Drawer 1 S16214 17 Ash Drawer Assembly 1 900...

Page 10: ...ranty If in doubt contact your nearest authorized Vermont Castings Group supplier or Vermont Castings Group Customer Service Department 10 Vermont Castings Group will not be responsible for Down drafts or spillage caused by environmental conditions such as near by trees buildings rooftops hills mountains or ineffective chimney design Inadequate ventilation excessive offsets or negative air pressur...

Page 11: ...11 Windsor High Efficiency Wood Stove 30005126 Vermont Castings Group 149 Cleveland Drive Paris Kentucky 40361 www vermontcastingsgroup com ...

Page 12: ...o le Mod le WR27007 non catalytique Ce po le respecte les limites d mission pour les po les bois fix es par l agence Am ricaine de protection de l environnement Dans des conditions sp cifiques ce po le d gage entre 11 492 et 18 920 BTU l heure AVIS DE S CURIT Si le po le n est pas correctement install utilis et entretenu il y a risque d incendie Pour votre s curit veuillez suivre les directives d ...

Page 13: ...air au del de son r glage normal 11 N INSTALLEZ PAS cet appareil dans une maison mo bile ou dans une remorque Ces appareils ne sont pas con us pour tre utilis s dans les maisons mobiles Fonctionnement pr caution Pourquoi un conduit d vacuation de 6 po 152 mm Le tirage est le d placement de l air dans le conduit d vacuation et la chemin e vers l exterieur L efficacit du tirage d pend de la longueur...

Page 14: ... que toutes les briques sont en place 5 Installez le tuyau fum e L INT RIEUR du collier de la chemin e sur le dessus du po le poru relier le po le et la chemin e 6 N UTILISEZ PAS de chenets dans votre po le 34 7 BRICK PLACE 2 Briques compl tes D flecteur Assurez vous de bien installer deux briques entieres dans le d flecteur tel que montre ci dessus S16040 ST1006 Figure 2 Installez des briques Tuy...

Page 15: ...porte et de 203 mm 8 po des autres c t s Aux tats Unis le rev tement doit couvrir les tuyaux fum e horizontaux et d passer de 51 mm 2 po de chaque c t Un plancher en c ramique jointoy e install conform ment au code du b timent local est consid re comme un quivalent durable Chemin e Consultez les instructions du fabricant de la chemin e et des connecteurs de la chemin e Communiquez avec les autorit...

Page 16: ...ter la temp rature 500 degr s F 260 370 degr s C pendant au moins 45 minutes Il faut que la peinture vieillisse lentement vitez les feux vifs pendant le vieillissement de la pein ture Pendant le m rissement de la peinture cette derni re deviendra collante Une fois qu elle est m rie la peinture restera dure Il est normal de voir des endroits mats sur les surfaces peintes de votre po le les endroits...

Page 17: ... 2 Enlevez les vis et la bordure de fixation voir sch ma des pi ces 3 Retirez la vitre 4 Enlevez le vieux joint et nettoyez la vitre 5 Installez le joint neuf en commen ant par le bas et en suivant les bords Assurez vous que la gorge du joint s ajuste bien sur la vitre 6 Coupez la longueur voulue et aboutez soigneuse ment les extr mit s 7 Remettez la vitre en place en vous assurant de ne pas trop ...

Page 18: ...acxe elle doit d abord rester dans son contenant jusqu ce qu elle soit compl tement refroidie Aucun autre rebut ne doit tre mis dans le contenant IMPORTANT Conseils qui valent la peine d tre r p t s 1 Quelle est la bonne mani re d allumer un feu a R unissez le petit bois d allumage et le papier N utilisez que des journaux ou du papier qui n a pas t enduit ou sur lequel on a coll ou appliqu des mat...

Page 19: ...uvais tirage provoqueront des d p ts de suie sur le verre Une fois que la temp rature de la chambre combustion et le tirage augmentant la sule br lers 8 Qu entend on par tirage Le tirage peut tre exprim comme tant la capacit de la chemin e vacuer les sous produits de toule combustion normale 9 Pourquoi a t on un mauvais tirage Les facteurs les plus courants d un mauvais tirage sont a La pression a...

Page 20: ...os sible de feux de chemin e 10 Dois je fermer ou ouvrir la commmande d admission d air au complet lorsque je ferme le po le Lorsque vous fermez le po le ouvrez la commande d admission d air au complet Cela permet la temp rature de la chemin e de rester aussi lev e que pos sible et le plus longtemps possible Lorsque la temp rature de la chemin e baisse il risque de se former de la cr osote dans la...

Page 21: ...itre 7 S37034 8 Vis 7 90000286 9 Hinge Pin 2 S11005 10 Push Nut 2 S11090 11 Brique 9 x 4M zn x 1Z v 12 S16040 12 Brique 7Z v x 4M zn x 1Z v 4 S16043 13 Brique 4Z x x 4M zn x 1Z v 1 S16046 14 Brique coup e en angle 2 S16042 15 Brique 4M zn x 2C v x 1Z v 1 S16224 16 Brique pour le cendrier 1 S16214 17 L assemblage de troir de cendre 1 90000110 18 Bavette du po le 1 S25082 19 Vis bavette 2 S11463 20 ...

Page 22: ...22 Windsor High Efficiency Wood Stove 30005126 ...

Page 23: ...onnementaux tels que les arbres proximit les difices les toits les collines lesmontagnes ou une concep tion de chemin e inad quate de la ventilation inad quate des d volements excessifs ou de la pression d air n gative caus s par des syst mes m caniques tels que les foyers les s cheuses les ventilateurs etc 11 Cette garantie est nulle si l appareil a t mis en marche dans des atmosph res contamin e...

Page 24: ...Vermont Castings Group 149 Cleveland Drive Paris Kentucky 40361 www vermontcastingsgroup com ...

Reviews: