background image

EN 

NL


ES 

V-drive

  2020-05 

Uso del V-Drive 

3.1.4 

Instalación de la batería 

1.

Colocar la batería en la bandeja como se muestra en la foto.

2. Asegurar la batería empujándola totalmente hacia dentro. Se

oirá un clic.

3.2  Desmontaje del V-Drive para su transporte 

1.

Apagar el V-Drive.

2.

Desconectar el módulo V-Drive del panel de control 

(§3.1.3, 11).

3.

Retirar la cinta de levantamiento del mango (§3.1.3, 12).

4.

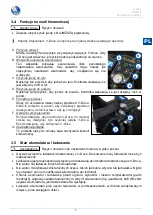
Retirar la batería de la bandeja tirando del asa de la batería y
presionando  simultáneamente  el  botón  «PUSH»  en  la  parte
inferior de la batería (13).

5.

Tirar hacia arriba de la correa 

(§3.1.2, 6) para desbloquear la

barra telescópica (§3.1.3, 8). Sujetar el V-Drive y empujar la silla
de ruedas hacia delante para que la barra telescópica salga de
las garras de soporte. Retirar el módulo V-Drive de la silla de
ruedas.

6.

Colocar todos los objetos en la bolsa de viaje suministrada para evitar que se dañen.

7.

Si  fuera  necesario  o  deseado,  ahora  se  puede  plegar  la  silla  de  ruedas  para  su
transporte.

3.3  Manejo del V-Drive cuando no está en uso 

Cuando se quiera empujar la silla de ruedas manualmente y no se quiera 
usar el V-Drive, mantener el módulo V-Drive fuera del suelo levantando 
el lazo rojo de la cinta de levantamiento y colocándolo en el mango.  

La  batería  suministrada  con  el  V-Drive  está  clasificada  como  segura  para  su  transporte 
aéreo de conformidad con la provisión especial A67 de IATA. 


11 

13 

10 

12 

Summary of Contents for V-drive

Page 1: ...N U E L D U T I L I S A T I O N G E B R U I K S A A N W I J Z I N G G E B R A U C H S A N W E I S U N G M A N U A L E D I I S T R U Z I O N I M A N U A L D E I N S T R U C C I O N E S I N S T R U K C J A O B S Ł U G I N Á V O D K O B S L U Z E ...

Page 2: ...mpleando sistemas electrónicos sin el permiso escrito del editor Wszelkie prawa zastrzeżone łącznie z tłumaczeniem Żadna część niniejszej instrukcji nie może być powielana w jakiejkolwiek formie drukowanej fotokopii mikrofilmu ani innej bez pisemnej zgody wydawcy nie może być również przetwarzana kopiowana ani rozprowadzana za pomocą systemów elektronicznych Všechna práva vyhrazena včetně překladu...

Page 3: ...English Français Nederlands Deutch Italiano Español Polski Czech User manual Manuel d utilisation Gebruiksaanwijzing Bedienungshandbuch Manuale di istruzioni Manual de instrucciones Instrukcja obsługi Návod k obsluze ...

Page 4: ...This page is intentionally left blank ...

Page 5: ...rive on your wheelchair 5 3 2 Disassembling V Drive for transportation 6 3 3 Handling V Drive when not in use 6 3 4 Operating console functions 7 3 5 Battery status and charging 7 3 6 Adjusting the V Drive module height 9 4 Maintenance 10 4 1 Cleaning 10 4 2 Reuse 10 4 3 Expected lifespan 10 4 4 End of use 10 5 Troubleshooting 11 5 1 Driving anomalies 11 5 2 System codes 11 6 Technical specificati...

Page 6: ...t checked and serviced on a regular basis This manual reflects the latest product developments Vermeiren has the right to implement changes to this type of product without any obligation to adapt or replace similar products previously delivered Pictures of the product are used to clarify the instructions in this manual Details of the depicted product may deviate from your product Information avail...

Page 7: ...s a standard version max 135kg user weight and a Heavy Duty version max 200kg user weight 1 1 Compatibility The V Drive is compatible with wheelchairs that comply to the following criteria with a distance between the outer tubing edges of 37cm 50cm This is usually but not always the same as the wheelchair seat width with a round tubing diameter between 22mm 25mm Before using your V Drive check the...

Page 8: ...anual Damage to your product caused by improper use or lack of maintenance will cause the warranty to lapse 2 2 General safety instructions Keep the following general warnings in mind during use V Drive should not become exposed to heavy snow or rainfall damp conditions or direct sunlight When connecting disconnecting the battery from the motor or the charger make sure that both the power to the c...

Page 9: ...clamp around the wheelchair handle by tightening both screws 4 Slide the console 1 back on the clamp 3 1 2 Installing the support brackets 1 Install both brackets on the bottom horizontal tubing of the wheelchair just behind the cross attachments 5 by firmly tightening the screws 2 Attach the strap 6 between the brackets 3 Ensure that the screws 7 are sufficiently tight and do not rotate on the tu...

Page 10: ...of the battery pack 13 5 Pull up the strap 3 1 2 6 to unlock the telescopic bar 3 1 3 8 Hold V Drive and push the wheelchair forward a bit so the telescopic bar comes out of the brackets Remove the V Drive module from the wheelchair 6 Place all items in the supplied carry holdall to prevent them from getting damaged 7 If necessary desired you can now fold the wheelchair for transportation 3 3 Hand...

Page 11: ...Squeeze the lever to propel theV Drive The more the trigger is squeezed the faster V Drive will travel Release the trigger to stop V Drive G Outer knob Use this knob to alter the angle of the operating console 3 5 Battery status and charging Risk of injuries and or damage due to fire Only use the battery charger delivered with the V Drive The use of any other charger may be dangerous The battery c...

Page 12: ...tery 1 Switch OFF the V Drive 2 Lift the battery pack out of the tray as described in 3 2 3 FIRST connect the battery charger to a 230V AC power socket Use the battery charger directly without extension cord on the power supply without time switch 4 Plug the adapter into the charging point of the battery pack 5 The charger s LED will illuminate orange to indicate that the batteries are charging 6 ...

Page 13: ...f 8 cm 5 steps 1 Remove the V Drive module from the wheelchair as described in 3 2 2 Remove the bolt nut connection 15 3 Slide the telescopic tube support 16 up down over the attachment block to the desired height 4 Replace and firmly tighten the bolt nut connection 15 5 Reattach the V Drive module to the wheelchair according to 3 1 3 15 16 ...

Page 14: ... inspected and serviced by your specialist dealer at least once a year or more often The minimum maintenance frequency depends on the frequency of use and should therefore be commonly agreed upon with your specialist dealer 4 1 Cleaning Wipe all rigid parts of the V Drive with a damp cloth not drenched If necessary use a mild soap suitable for varnishes and synthetics 4 2 Reuse Before each reuse h...

Page 15: ...e the batteries only if too slow Verify that the wheelchair brakes are not applied 5 2 System codes In case of a possible problem a system code is shown by the blinking of the leftmost LED on the battery charge indicator The following table summarises the possible system codes Some problems can be solved by yourself For all problems marked in grey consult your specialist dealer Code Possible probl...

Page 16: ...nsions Max weight including user and wheelchair Standard version 135 kg Heavy Duty version 200 kg Max speed 6 4 km h Energy consumption 16 km Total mass without battery pack 11 8 kg Masses of removable parts Battery pack 9 kg Type of wheels 200 x 50 mm Dimensions of V Drive module LxWxH 450 x 260 x 390 mm Driving motor Standard version 24V 150W DC Heavy Duty version 24V 200W DC Battery 2x 12V 12Ah...

Page 17: ...sur votre fauteuil roulant 5 3 2 Démontage du V Drive pour le transport 6 3 3 Manipulation du V Drive lorsqu il n est pas utilisé 6 3 4 Fonctions de la console de commande 7 3 5 État de la batterie et recharge 7 3 6 Réglage de la hauteur du module V Drive 9 4 Maintenance 10 4 1 Nettoyage 10 4 2 Réutilisation 10 4 3 Durée de vie attendue 10 4 4 Mise au rebut 10 5 Résolution des problèmes 11 5 1 Ano...

Page 18: ...égulièrement Ce manuel est le reflet des derniers développements du produit Vermeiren a le droit d apporter des modifications à ce type de produit sans être tenu d adapter ou de remplacer des produits similaires fournis précédemment Des illustrations du produit sont utilisées afin de clarifier les instructions de ce manuel Les détails du produit illustré peuvent diverger de votre produit Informati...

Page 19: ...andard poids de l utilisateur max 135 kg et une version intensif poids de l utilisateur max 200 kg 1 1 Compatibilité Le V Drive est compatible avec les fauteuils roulants qui répondent aux critères suivants avec une distance entre les bords des tubes extérieurs de 37cm 50cm Il s agit généralement mais pas toujours de la même largeur que celle du siège du fauteuil roulant avec un diamètre de tube r...

Page 20: ...e produit dus à un usage inapproprié ou à un manque d entretien auront pour effet d annuler la garantie 2 2 Consignes générales de sécurité Tenez compte des avertissements généraux suivants pendant l emploi Le V Drive ne doit pas être exposé à de fortes chutes de neige ou de pluie à des conditions humides ou à la lumière directe du soleil Lorsque vous branchez débranchez la batterie du moteur ou d...

Page 21: ...fauteuil roulant est trop fin 3 Fixez l attache autour de la poignée du fauteuil roulant en serrant les deux vis 4 Replacez la console 1 sur l attache en la glissant 3 1 2 Installation des supports de fixation 1 Installez les deux supports sur le tube horizontal inférieur du fauteuil roulant juste derrière les attaches transversales 5 2 Attachez la sangle 6 entre les supports 3 Veillez à ce que le...

Page 22: ...t 3 1 26 pour déverrouiller la barre télescopique 3 1 3 8 Tenez le V Drive et poussez un peu le fauteuil roulant vers l avant pour que la barre télescopique sorte des supports Retirez le module V Drive du fauteuil roulant 6 Placez tous les éléments dans le sac de transport fourni pour éviter de les endommager 7 Si nécessaire désiré vous pouvez à présent plier le fauteuil roulant pour le transport ...

Page 23: ...e V Drive Plus la gâchette est pressée plus le V Drive se déplace rapidement Relâchez la gâchette pour arrêter le V Drive G Bouton extérieur Utilisez ce bouton pour modifier l angle de la console de commande 3 5 État de la batterie et recharge Risque de blessures ou de dommages dus au feu Utilisez uniquement le chargeur de batterie fourni avec le V Drive L utilisation de tout autre chargeur peut ê...

Page 24: ...e dans un état pleinement utilisable et pour éviter de l endommager Pour recharger la batterie 1 Éteignez le V Drive 2 Soulevez le bloc batterie de son support comme décrit au 3 2 3 Branchez EN PREMIER LIEU le chargeur de la batterie à une prise de courant 230 V CA Utilisez le chargeur de la batterie directement sans rallonge sur l alimentation électrique sans système de minuterie 4 Branchez l ada...

Page 25: ... V Drive peut être réglée sur une plage de 8 cm 5 niveaux 1 Retirez le module V Drive du fauteuil roulant comme décrit au 3 2 2 Retirez l assemblage boulon écrou 15 3 Faites glisser le support du tube télescopique 16 vers le haut bas sur le bloc de fixation jusqu à la hauteur souhaitée 4 Replacez et serrez bien l assemblage boulon écrou 15 5 Rattachez le module V Drive au fauteuil roulant conformé...

Page 26: ...ls Chaque année ou plus souvent Faites inspecter et entretenir votre V Drive par votre revendeur spécialisé au moins une fois par an ou plus La fréquence d entretien minimale dépend de l usage et doit être déterminée de commun accord avec votre revendeur spécialisé 4 1 Nettoyage Essuyez toutes les parties rigides avec un chiffon humide pas détrempé Si nécessaire utilisez un savon doux approprié po...

Page 27: ...faibles Vérifiez si les freins du fauteuil roulant ne sont pas actionnés 5 2 Codes système En cas de problème éventuel un code système est indiqué par le clignotement du voyant le plus à gauche sur l indicateur de charge de la batterie Le tableau suivant résume les codes système possibles Vous pouvez résoudre certains problèmes vous même Pour tous les problèmes indiqués en grisé consultez votre re...

Page 28: ... Poids max y compris l utilisateur et le fauteuil roulant Version standard 135 kg Version intensif 200 kg Vitesse max 6 4 km h Consommation d énergie 16 km Poids total sans le bloc batterie 11 8 kg Poids des pièces amovibles Bloc batterie 9 kg Type de roues 200 x 50 mm Dimensions du module V Drive LxlxH 450 x 260 x 390 mm Moteur d entraînement Version standard 24V 150W DC Version intensif 24V 200W...

Page 29: ...5 3 2 De V Drive uit elkaar halen voor transport 6 3 3 V Drive hanteren wanneer niet in gebruik 6 3 4 Functies van de bedieningsconsole 7 3 5 Batterijstatus en laden 7 3 6 Hoogte van de V Drive module aanpassen 9 4 Onderhoud 10 4 1 Schoonmaken 10 4 2 Hergebruik 10 4 3 Verwachte levensduur 10 4 4 Beëindiging van gebruik 10 5 Probleemoplossing 11 5 1 Afwijkingen tijdens het rijden 11 5 2 Systeemcode...

Page 30: ...t en onderhoud te laten uitvoeren Deze handleiding houdt rekening met de recentste productontwikkelingen De Firma Vermeiren behoudt zich het recht voor om wijzigingen aan dit type product door te voeren zonder verplicht te zijn om voordien geleverde producten aan te passen of te vervangen Afbeeldingen van het product worden gebruikt om de instructies in deze handleiding te verduidelijken Details v...

Page 31: ...rsies een standaard versie max 135kg gebruikersgewicht en een Heavy Duty versie max 200kg gebruikersgewicht 1 1 Compatibiliteit V Drive is compatibel met rolstoelen die voldoen aan de volgende criteria Met een afstand tussen de buitenste buizen van 37cm 50cm Dit is meestal maar niet altijd dezelfde als de zitbreedte Met een ronde buisdiameter van 22mm 25 mm Vooraleer uw V Drive te gebruiken raadpl...

Page 32: ...t product is gebaseerd op normaal gebruik en onderhoud zoals beschreven in deze handleiding De garantie vervalt bij schade die werd veroorzaakt door verkeerd gebruik of gebrek aan onderhoud 2 2 Algemene veiligheidsmaatregelen Houd rekening met de volgende algemene waarschuwingen tijdens het gebruik V Drive mag niet blootgesteld worden aan hevige sneeuw of regen vochtige omgevingen of direct zonlic...

Page 33: ...or beide schroeven aan te draaien 4 Schuif de besturingsconsole 1 terug op de klem 3 1 2 De bevestigingsbeugels installeren 1 Monteer beide beugels op de onderste horizontale buizen van de rolstoel net achter de bevestigingen van het kruis 5 door de schroeven goed aan te draaien 2 Bevestig het lint 6 tussen de twee beugels 3 Zorg ervoor dat de schroeven 7 vast genoeg zijn aangedraaid en dat de beu...

Page 34: ...k in te duwen 13 5 Trek het lint 3 1 2 6 omhoog om de telescopische buis 3 1 3 8 los te zetten Houd V Drive vast en duw de rolstoel een beetje voorwaarts zodat de telescopische buis uit de beugels komt Verwijder de V Drive module van de rolstoel 6 Plaats alle onderdelen in de meegeleverde tas om schade te voorkomen 7 Indien nodig gewenst kan u nu de rolstoel vouwen voor transport 3 3 V Drive hante...

Page 35: ... om de V Drive te doen rijden Hoe meer de hendel wordt ingedrukt hoe sneller V Drive zal rijden Laat de hendel los om V Drive te doen stoppen G Buitenknop Gebruik deze knop om de hoek van de bedieningsconsole aan te passen 3 5 Batterijstatus en laden Gevaar voor letsel en of schade door brand Gebruik enkel de batterijlader die geleverd werd bij uw V Drive Het gebruiken van een andere lader kan gev...

Page 36: ...rij op te laden 1 Schakel V Drive UIT 2 Til het batterijpack uit de batterijhouder zoals beschreven in 3 2 3 Verbind EERST de batterijlader met een 230V AC stopcontact Gebruik de batterijlader rechtstreeks in het stopcontact zonder verlengsnoer en zonder tijdschakelaar 4 Sluit de lader aan op het aansluitpunt van het batterijpack 5 De LED van de lader licht oranje op om aan te geven dat de batteri...

Page 37: ...5 stappen 1 Verwijder de V Drive module van de rolstoel zoals beschreven in 3 2 2 Verwijder de bout moer verbinding 15 3 Schuif de bevestiging van de telescopische buis 16 omhoog omlaag over het bevestigingsblok tot de gewenste hoogte 4 Plaats de bout moer verbinding 15 terug en draai stevig aan 5 Bevestig de V Drive module terug op de rolstoel volgens 3 1 3 15 16 ...

Page 38: ...aarlijks of vaker Laat uw V Drive nakijken en onderhouden door uw vakhandelaar ten minste één keer per jaar of vaker De minimale onderhoudsfrequentie is afhankelijk van het gebruik en moet daarom besproken worden met uw vakhandelaar 4 1 Schoonmaken Veeg alle harde onderdelen van de V Drive schoon met een vochtig doek niet doorweekt Indien nodig gebruik een milde zeep die geschikt is voor vernis en...

Page 39: ...batterijen indien te traag Zorg ervoor dat de remmen van de rolstoel niet aan staan 5 2 Systeemcodes In geval van een mogelijk probleem wordt door het knipperen van de linkse LED van de batterij indicator een systeemcode weergegeven Volgende tabel somt de mogelijke systeemcodes op Sommige problemen kunnen door uzelf opgelost worden Voor alle problemen in het grijs dient u uw vakhandelaar te raadpl...

Page 40: ...Omschrijving Afmetingen Max gewicht incl gebruiker en rolstoel Standaard versie 135 kg Heavy Duty versie 200 kg Max snelheid 6 4 km h Energieconsumptie 16 km Totaal gewicht zonder batterijpack 11 8 kg Gewicht afneembare onderdelen Batterijpack 9 kg Type wielen 200 x 50 mm Dimensies V Drive module LxBxH 450 x 260 x 390 mm Motor Standaard versie 24V 150W DC Heavy Duty versie 24V 200W DC Batterij 2x ...

Page 41: ...rive am Rollstuhl 5 3 2 Demontage des V Drive zwecks Transport 6 3 3 V Drive Handhabung bei Nichtgebrauch 6 3 4 Funktionen der Bedienkonsole 7 3 5 Akkustatus und Aufladung 7 3 6 Höhenanpassung beim V Drive Modul 9 4 Instandhaltung 10 4 1 Reinigung 10 4 2 Wiederbenutzung 10 4 3 Voraussichtliche Nutzungsdauer 10 4 4 Nutzungsende 10 5 Störungsbeseitigung 11 5 1 Auffälligkeiten beim Fahren 11 5 2 Syst...

Page 42: ...erprüfen und oder warten lassen Dieses Handbuch enthält die neuesten Produktentwicklungen Vermeiren behält sich das Recht vor Veränderungen an dieser Art von Produkt vorzunehmen ohne eine Verpflichtung einzugehen ähnliche bereits ausgelieferte Produkte anzupassen oder auszutauschen Abbildungen des Produkts dienen zur Verdeutlichung der Anweisungen in diesem Handbuch Das gezeigte Produkt kann in De...

Page 43: ...zbreiten kompatibel eine Standardversion max 135 kg Benutzergewicht und eine Schwerlastversion max 200 kg Benutzergewicht 1 1 Kompatibilität Der V Drive ist für Rollstühle geeignet die folgende Kriterien erfüllen Abstand zwischen den Außenrohrkanten 37 cm 50 cm Dies ist nicht immer in der Regel aber identisch mit der Rollstuhlsitzbreite Rundrohrdurchmesser 22 mm 25 mm Bevor Sie den V Drive benutze...

Page 44: ...ch beschrieben Schäden an Ihrem Produkt die auf unsachgemäße Benutzung oder mangelnde Wartung zurückzuführen sind führen zum Erlöschen der Garantie 2 2 Allgemeine Sicherheitshinweise Beachten Sie bei der Benutzung die folgenden allgemeinen Warnhinweise Der V Drive darf weder starkem Schneefall oder Regen noch hoher Feuchtigkeit oder direkter Sonneneinstrahlung ausgesetzt werden Achten Sie beim Ans...

Page 45: ...estigen Sie die Halterung am Rollstuhlgriff indem Sie die beiden Schrauben festziehen 4 Schieben Sie die Konsole 1 wieder auf die Halterung 3 1 2 Montage der Stützhalterungen 1 Montieren Sie beide Halterungen am unteren horizontalen Rohr des Rollstuhls direkt hinter den Traversen 5 2 Bringen Sie den Gurt 6 zwischen den Halterungen an 3 Achten Sie darauf dass die Schrauben 7 ausreichend fest angezo...

Page 46: ...schnitt 3 1 2 6 um die Teleskopstange zu entriegeln Abschnitt 3 1 3 8 Halten Sie den V Drive fest und drücken Sie den Rollstuhl etwas nach vorn so dass sich die Teleskopstange aus den Halterungen löst Entfernen Sie den V Drive vom Rollstuhl 6 Legen Sie alle Teile in die mitgelieferte Tragetasche um sie vor Beschädigungen zu schützen 7 Falls notwendig gewünscht können Sie den Rollstuhl nun für den ...

Page 47: ...r der Hebel betätigt wird desto schneller fährt der V Drive Um den V Drive anzuhalten lassen Sie den Hebel los G Justierknopf Mit diesem Knopf können Sie den Winkel der Bedienkonsole verändern 3 5 Akkustatus und Aufladung Gefahr von Personen und Sachschäden durch Feuer Benutzen Sie ausschließlich das zum Lieferumfang des V Drive gehörende Ladegerät Die Benutzung eines anderen Ladegeräts kann mit G...

Page 48: ... erhalten und Lagerungsschäden zu vermeiden So laden Sie den Akku auf 1 Schalten Sie den V Drive AUS 2 Nehmen Sie das Akkupack aus der Ablage siehe Abschnitt 3 2 3 Schließen Sie ZUERST das Akku Ladegerät an eine Steckdose mit 230 V Wechselstrom an Schließen Sie das Ladegerät direkt ohne Verlängerungskabel an der Netzstromversorgung an ohne Zeitschalter 4 Schließen Sie das Ladegerät am Ladeanschlus...

Page 49: ... ist 3 6 Höhenanpassung beim V Drive Modul Die Höhe des V Drive Moduls ist in einem Bereich von 8 cm 5 Stufen einstellbar 1 Entfernen Sie den V Drive vom Rollstuhl siehe Abschnitt 3 2 2 Entfernen Sie die Schraube Mutter Verbindung 15 3 Schieben Sie das Teleskoprohr 16 im Befestigungsblock nach oben unten bis die gewünschte Höhe erreicht ist 4 Bringen Sie die Schraube Mutter Verbindung 15 wieder an...

Page 50: ... V Drive mindestens einmal pro Jahr oder häufiger von Ihrem Fachhändler inspizieren und warten Die minimale Wartungshäufigkeit ist von der Benutzung abhängig und sollte daher zusammen mit Ihrem Fachhändler abgesprochen werden 4 1 Reinigung Wischen Sie alle festen Teile des V Drive mit einem feuchten nicht durchnässten Tuch ab Benutzen Sie ggf eine milde Seife die für Lacke und Kunststoffe geeignet...

Page 51: ... dem Wählrad ein Laden Sie die Akkus auf nur wenn zu langsam Kontrollieren Sie ob die Feststellbremsen des Rollstuhls angezogen sind 5 2 Systemcodes Sollte ein Problem auftreten wird durch Blinken der äußerst linken LED an der Ladestandsanzeige ein Systemcode angezeigt Mögliche Systemcodes sind in der folgenden Tabelle zusammengefasst Einige Probleme können Sie auch selbst beheben Bei allen grau h...

Page 52: ...ive Beschreibung Abmessungen Max Gewicht inkl Benutzer und Rollstuhl Standardversion 135 kg Schwerlastversion 200 kg Max Geschwindigkeit 6 4 km h Energieverbrauch 16 km Gesamtgewicht ohne Akkupack 11 8 kg Gewicht der abnehmbaren Teile Akkupack 9 kg Art der Räder 200 x 50 mm Abmessungen des V Drive Moduls LxBxH 450 x 260 x 390 mm Antriebsmotor Standardversion 24 V 150 W DC Schwerlastversion 24 V 20...

Page 53: ...na 5 3 2 Smontaggio del modulo V Drive per il trasporto 6 3 3 Gestione del modulo V Drive quando non è in uso 6 3 4 Funzioni della console di comando 7 3 5 Stato e ricarica delle batterie 7 3 6 Regolazione dell altezza del modulo V Drive 9 4 Manutenzione 10 4 1 Pulizia 10 4 2 Utilizzi successivi 10 4 3 Durata prevista 10 4 4 Fine vita 10 5 Soluzione dei problemi di funzionamento 11 5 1 Anomalie di...

Page 54: ...ù recenti del prodotto Vermeiren si riserva il diritto di introdurre modifiche di questo tipo di prodotto senza alcun obbligo di adattare o sostituire i prodotti analoghi consegnati in precedenza Le immagini del prodotto vengono utilizzate per chiarire le istruzioni contenute nel manuale I dettagli del prodotto raffigurato possono essere diversi da quelli del prodotto in uso Informazioni disponibi...

Page 55: ...i due versioni vale a dire una versione standard peso massimo con utente 135 kg e una per impieghi gravosi peso massimo con utente 200 kg 1 1 Compatibilità Il modulo V Drive è compatibile con le carrozzine che soddisfano i seguenti criteri distanza fra i bordi dei tubi esterni pari a 37 50 cm Tale valore coincide solitamente ma non sempre con la larghezza del sedile della carrozzina con diametro d...

Page 56: ...ne normali del medesimo come descritti in questo manuale I danni al prodotto dovuti a uso improprio o manutenzione carente causano la decadenza della garanzia 2 2 Istruzioni generali di sicurezza Durante l uso tenere presenti le seguenti avvertenze generali Il modulo V Drive non deve essere esposto a piogge o nevicate intense all umidità o alla luce solare diretta Quando si collega scollega la bat...

Page 57: ...orno alla maniglia della carrozzina serrando entrambe le viti 4 Inserire nuovamente la console 1 sul morsetto 3 1 2 Installazione delle staffe di supporto 1 Installare entrambe le staffe sul tubo orizzontale inferiore della carrozzina subito dietro gli attacchi 5 della crociera 2 Fissare la cinghia 6 fra le staffe 3 Accertarsi che le viti 7 siano serrate a sufficienza e non ruotino sul tubo 3 1 3 ...

Page 58: ... la cinghia 3 1 2 elemento 6 per sbloccare la barra telescopica 3 1 3 elemento 8 Trattenere il modulo V Drive e spingere leggermente in avanti la carrozzina in modo che la barra telescopica fuoriesca dalle staffe Rimuovere il modulo V Drive dalla carrozzina 6 Collocare tutti gli articoli nell apposita borsa di trasporto per evitare che si danneggino 7 Se occorre lo si desidera è ora possibile ripi...

Page 59: ...Premere la leva per azionare il modulo V Drive Aumentando la pressione sulla leva la velocità di marcia del modulo V Drive aumenta Per arrestare il modulo V Drive rilasciare la leva G Manopola esterna Utilizzare questa manopola per variare l angolazione della console di comando 3 5 Stato e ricarica delle batterie Rischio di lesioni e o di danni da incendio Utilizzare esclusivamente il caricabatter...

Page 60: ...Per caricare la batteria 1 Spegnere il modulo V Drive 2 Sollevare il pacco batterie ed estrarlo dal vassoio come descritto nel 3 2 3 Collegare ANZITUTTO il caricabatterie a una presa elettrica a 230 Vc a Collegare il caricabatterie direttamente alla presa di alimentazione senza prolunghe né timer 4 Collegare l adattatore al punto di ricarica del pacco batterie 5 Il LED del caricabatterie si illumi...

Page 61: ...imuovere il modulo V Drive dalla carrozzina come descritto nel 3 2 2 Rimuovere il bullone e il dado di collegamento 15 3 Fare scorrere il supporto 16 del tubo telescopico verso l alto il basso sul blocco di fissaggio fino all altezza desiderata 4 Rimontare e serrare a fondo il collegamento 15 con dado e bullone 5 Fissare nuovamente alla carrozzina il modulo V Drive come indicato nel 3 1 3 15 16 ...

Page 62: ...olta all anno o con maggiore frequenza richiedere al proprio rivenditore specializzato un intervento di ispezione e manutenzione del modulo V Drive La frequenza minima di manutenzione dipende da quella di utilizzo e deve pertanto essere concordata con il proprio rivenditore specializzato 4 1 Pulizia Strofinare tutti i componenti rigidi dello scooter con un panno umido non zuppo Se necessario utili...

Page 63: ... che i freni della carrozzina non siano inseriti 5 2 Codici di sistema Se si verifica un problema il LED più a sinistra sull indicatore dello stato di carica della batteria lampeggia visualizzando un codice di sistema La tabella riportata di seguito riassume i possibili codici di sistema Alcuni problemi possono essere risolti dall utente Per tutti i problemi contrassegnati in grigio rivolgersi al ...

Page 64: ...rizione Dimensioni Peso max utente e carrozzina compresi Versione standard 135 kg Versione per impieghi gravosi 200 kg Velocità massima 6 4 km h Consumo energetico 16 km Massa totale senza pacco batterie 11 8 kg Masse dei componenti rimovibili Pacco batterie 9 kg Tipo di ruote 200 x 50 mm Dimensioni del modulo V Drive Lu x La x H 450 x 260 x 390 mm Motore elettrico di trazione Versione standard 24...

Page 65: ...ruedas 5 3 2 Desmontaje del V Drive para su transporte 6 3 3 Manejo del V Drive cuando no está en uso 6 3 4 Funciones del panel de control 7 3 5 Estado de la batería y su recarga 7 3 6 Ajuste de la altura del módulo V Drive 9 4 Mantenimiento 10 4 1 Limpieza 10 4 2 Reutilizar 10 4 3 Vida útil prevista 10 4 4 Fin de vida útil 10 5 Resolución de problemas 11 5 1 Anomalías de conducción 11 5 2 Códigos...

Page 66: ...to Vermeiren se reserva el derecho a implementar cambios en este tipo de producto sin que ello suponga obligación alguna de adaptar o cambiar productos similares previamente entregados Las imágenes del producto están presentes para clarificar las instrucciones contenidas en este manual Los detalles del producto mostrado pueden variar con su producto Información disponible En nuestro sitio web http...

Page 67: ...a versión estándar máx 135 kg de peso del usuario y una versión resistente máx 200 kg peso del usuario 1 1 Compatibilidad El módulo V Drive es compatible con sillas de ruedas que cumplan con los siguientes requisitos con una distancia de 37 cm 50 cm entre los extremos de los tubos externos Esta suele ser aunque no siempre igual a la anchura del asiento con un diámetro de los tubos de entre 22mm 25...

Page 68: ...un uso indebido o falta de mantenimiento 2 2 Instrucciones generales de seguridad Tener en cuenta las siguientes advertencias durante su utilización No exponer el V Drive a lluvias o nevadas fuertes a condiciones húmedas o a la luz del sol Al conectar o desconectar la batería del motor o el cargador asegurarse de que la alimentación al cargador y al panel de control V Drive esté apagada El V Drive...

Page 69: ...r del mango de la silla de ruedas apretando ambos tornillos 4 Volver a deslizar el panel de control 1 en la abrazadera 3 1 2 Instalación de las garras de soporte 1 Instalar ambas garras de soporte en el tubo horizontal inferior de la silla de ruedas justo detrás de los acoplamientos de la cruceta 5 2 Fijar la correa 6 entre las garras de soporte 3 Asegurarse 7 de que los tornillos estén lo suficie...

Page 70: ...ear la barra telescópica 3 1 3 8 Sujetar el V Drive y empujar la silla de ruedas hacia delante para que la barra telescópica salga de las garras de soporte Retirar el módulo V Drive de la silla de ruedas 6 Colocar todos los objetos en la bolsa de viaje suministrada para evitar que se dañen 7 Si fuera necesario o deseado ahora se puede plegar la silla de ruedas para su transporte 3 3 Manejo del V D...

Page 71: ...ar el V Drive Cuanto más se apriete la palanca más rápido irá el V Drive Soltar la palanca para parar el V Drive G Perilla exterior Utilizar esta perilla para ajustar el ángulo del panel de control 3 5 Estado de la batería y su recarga Riesgo de lesiones o daños por incendio Usar exclusivamente el cargador de batería suministrado con el V Drive La utilización de otro cargador puede llegar a ser pe...

Page 72: ...vitar que se dañe Para cargar la batería 1 Apagar el V Drive 2 Sacar la batería de la bandeja como se describe en 3 2 3 Conectar PRIMERO el cargador de batería a una toma de corriente de 230V CA Conectar el cargador de batería directamente sin cable de extensión a la red eléctrica sin temporizador 4 Enchufar el adaptador al punto de carga de la batería 5 El LED del cargador se iluminará con una lu...

Page 73: ...e se puede ajustar en un rango de 8 cm 5 escalones 1 Retirar el módulo V Drive de la silla de ruedas como se describe en 3 2 2 Retirar la unión de tornillo y tuerca 15 3 Deslizar el soporte del tubo telescópico 16 arriba abajo sobre el bloque de acoplamiento hasta alcanzar la altura deseada 4 Volver a colocar la conexión tuerca tornillo y fijarla firmemente 15 5 Volver a acoplar el módulo V Drive ...

Page 74: ...asar por inspección y mantenimiento realizados por el distribuidor especializado por lo menos una vez al año o más a menudo La frecuencia mínima de mantenimiento depende de la frecuencia de uso y debe por tanto acordarse mutuamente con el distribuidor especializado 4 1 Limpieza Limpiar todas las piezas rígidas del scooter con un paño húmedo no empapado Si fuera necesario utilizar un jabón suave qu...

Page 75: ...asiado lento Comprobar que no estén aplicados lo frenos de la silla de ruedas 5 2 Códigos de sistema En caso de un posible problema se mostrará un código de sistema mediante el LED parpadeante del extremo derecho del indicador de carga de la batería La siguiente tabla contiene todos los códigos de sistema posibles Algunos problemas los puede resolver el usuario Para el resto de problemas resaltado...

Page 76: ... Drive Descripción Dimensiones Peso máx incluido el usuario y la silla de ruedas Versión estándar 135 kg Versión resistente 200 kg Velocidad máx 6 4 km h Consumo eléctrico 16 km Peso total sin la batería 11 8 kg Peso de las piezas desmontables Batería 9 kg Tipo de ruedas 200 x 50 mm Dimensiones del módulo V Drive LxAnxAlt 450 x 260 x 390 mm Motor de accionamiento Versión estándar 24V 150W CC Versi...

Page 77: ...3 2 Demontaż V Drive w celu transportu 6 3 3 Postępowanie z nieużywanym V Drive 6 3 4 Funkcje konsoli kierowniczej 7 3 5 Stan akumulatora i ładowanie 7 3 6 Regulacja wysokości modułu V Drive 9 4 Konserwacja 10 4 1 Czyszczenie 10 4 2 Ponowne użycie 10 4 3 Przewidywany okres użytkowania 10 4 4 Zakończenie użytkowania 10 5 Diagnozowanie i rozwiązywanie problemów 11 5 1 Nieprawidłowości podczas jazdy ...

Page 78: ...ukcie Firma Vermeiren ma prawo do wprowadzania zmian w produktach tego typu bez obowiązku adaptowania lub wymiany podobnych poprzednio dostarczonych produktów Ilustracje produktu stanowią dodatkowe objaśnienia do instrukcji w niniejszym dokumencie Szczegóły przedstawionego produktu mogą się różnić od rzeczywistego produktu posiadanego przez użytkownika Dostępne informacje W naszej witrynie interne...

Page 79: ...kg dlatego można go dopasować do różnych wózków i różnych szerokości siedziska 1 1 Zgodność V Drive pasuje do wózków które spełniają następujące kryteria Odległość między krawędziami zewnętrznych rur ramy 37 cm 50 cm Zazwyczaj chociaż nie zawsze ten wymiar jest taki sam jak szerokość siedziska wózka średnica okrągłej rury ramy 22 mm 25 mm Przed rozpoczęciem korzystania z V Drive należy sprawdzić s...

Page 80: ... użytkowania i konserwacji opisanych w niniejszej instrukcji Uszkodzenie produktu spowodowane nieprawidłową eksploatacją lub brakiem konserwacji spowoduje unieważnienie gwarancji 2 2 Ogólne instrukcje bezpieczeństwa Podczas eksploatacji należy pamiętać o następujących ogólnych ostrzeżeniach Nie należy wystawiać V Drive na działanie silnych opadów śniegu i deszczu wilgoci lub bezpośredniego światła...

Page 81: ...za cienka podłożyć gumową opaskę 4 3 Dokręcić obie śruby aby zamocować obejmę na rączce wózka 4 Nasunąć konsolę 1 z powrotem na obejmę 3 1 2 Montaż wsporników 1 Zamontować oba wsporniki na dolnej poziomej rurze ramy wózka tuż za mocowaniami krzyżaka 5 2 Przyczepić pasek 6 między wspornikami 3 Upewnić się że śruby 7 są mocno dokręcone i wsporniki nie obracają się na rurze 3 1 3 Montaż modułu V Driv...

Page 82: ...lokować pałąk teleskopowy 3 1 3 8 Trzymając V Drive popchnąć wózek odrobinę do przodu aby pałąk teleskopowy wysunął się ze wsporników Wyjąć moduł V Drive z wózka 6 Włożyć wszystkie elementy do dostarczonego pokrowca transportowego aby zapobiec ich uszkodzeniu 7 Jeśli jest to konieczne pożądane teraz można złożyć wózek w celu transportu 3 3 Postępowanie z nieużywanym V Drive Jeśli asystent chce pch...

Page 83: ...ąć dźwignię aby uruchomić V Drive Im mocniej ściska się dźwignię tym szybciej jedzie V Drive Puścić dźwignię aby zatrzymać V Drive G Zewnętrzne pokrętło To pokrętło służy do zmiany kąta nachylenia konsoli kierowniczej 3 5 Stan akumulatora i ładowanie Ryzyko obrażeń i lub uszkodzeń mienia w wyniku pożaru Używać wyłącznie ładowarki dostarczonej z V Drive Stosowanie innej ładowarki może być niebezpie...

Page 84: ...hniczną akumulatora i zapobiec jego uszkodzeniu Ładowanie akumulatora 1 WYŁĄCZYĆ V Drive 2 Podnieść i wysunąć akumulator z podstawki jak opisano w 3 2 3 NAJPIERW podłączyć ładowarkę do gniazdka 230 V AC Ładowarkę należy podłączać do gniazdka bezpośrednio bez przedłużaczy i wyłączników czasowych 4 Podłączyć zasilacz do gniazda ładowania akumulatora 5 Kontrolka LED ładowarki zapali się na pomarańczo...

Page 85: ...e 8 cm w 5 krokach 1 Wyjąć moduł V Drive z wózka jak opisano w 3 2 2 Odkręcić połączenie śruba nakrętka 15 3 Przesunąć podporę rury teleskopowej 16 w górę w dół na bloku mocowania na żądaną wysokość 4 Ponownie zmontować i mocno dokręcić połączenie śruba nakrętka 15 5 Ponownie przymocować moduł V Drive do wózka jak opisano w 3 1 3 15 16 ...

Page 86: ...dawcy raz w roku lub częściej Minimalna częstotliwość czynności konserwacyjnych zależy od częstości użytkowania Dlatego należy ją uzgodnić z wyspecjalizowanym sprzedawcą 4 1 Czyszczenie Wszystkie twarde części produktu wycierać wilgotną ale nieociekającą wodą ściereczką W razie konieczności używać łagodnego detergentu odpowiedniego do mycia powierzchni lakierowanych i z tworzyw sztucznych 4 2 Pono...

Page 87: ...wolno Sprawdzić czy hamulce wózka nie są zaciśnięte 5 2 Kody systemu Ewentualne problemy są sygnalizowane przez kody systemu w postaci migającej lewej kontrolki LED na wskaźniku naładowania akumulatora Poniższa tabela zawiera zestawienie możliwych kodów systemowych Niektóre problemy może rozwiązać sam użytkownik W przypadku wszystkich problemów oznaczonych kolorem szarym należy się skontaktować z ...

Page 88: ...z użytkownikiem i wózkiem Wersja standardowa 135 kg Wersja wzmocniona 200 kg Prędkość maksymalna 6 4 km h Zużycie energii 16 km Łączna masa bez akumulatora 11 8 kg Masy wyjmowanych części Akumulator 9 kg Rodzaj kół 200 x 50 mm Wymiary modułu V Drive DxSxW 450 x 260 x 390 mm Silnik napędowy Wersja standardowa 24 V 150 W DC Wersja wzmocniona 24 V 200 W DC Akumulator 2 x 12 V 12 Ah 20 h Ładowarka Wyj...

Page 89: ... na invalidním vozíku 5 3 2 Demontáž pohonu V Drive pro přepravu 6 3 3 Manipulace s pohonem V Drive když není používán 6 3 4 Funkce ovládací konzoly 7 3 5 Stav a nabíjení baterií 7 3 6 Seřízení výšky modulu pohonu V Drive 9 4 Údržba servis 10 4 1 Čištění 10 4 2 Znovupoužití výrobku 10 4 3 Životnost výrobku 10 4 4 Likvidace výrobku 10 5 Řešení problémů 11 5 1 Jízdní anomálie 11 5 2 Systémové kódy 1...

Page 90: ...rolovat a opravovat Tento návod obsahuje nejnovější verzi výrobku Společnost Vermeiren má právo provádět změny tohoto typu výrobku aniž by byla povinna upravit nebo nahradit podobné výrobky které již byly dodány Obrázky výrobku slouží k objasnění pokynů v tomto návodu Detaily znázorněného výrobku se mohou od daného výrobku lišit Dostupné informace Nejnovější verzi informací tohoto návodu vždy nale...

Page 91: ...ným verzím standardní verzi hmotnost uživatele max 135 kg a robustní verzi hmotnost uživatele max 200 kg 1 1 Kompatibilita Pohon V Drive je kompatibilní s invalidními vozíky které splňují tato kritéria se vzdáleností 37 50 cm mezi vnějšími okraji trubek Ta je obvykle ale ne vždy stejná jako šířka sedadla invalidního vozíku s průměrem kruhové trubky 22 25 mm Před provozem pohonu V Drive ověřte tech...

Page 92: ...o v tomto návodu V případě poškození výrobku způsobeného nesprávným použitím či absencí údržby tato záruka zanikne 2 2 Obecné bezpečnostní pokyny Při použití mějte na paměti následující obecná upozornění U pohonu V Drive nesmí dojít k jeho vystavení hustému sněžení či dešti mokru ani přímému slunečnímu svitu Při zapojování odpojování baterií od motoru nebo nabíječky zajistěte aby bylo vypnuto napá...

Page 93: ...ka invalidního vozíku příliš tenká použijte kruhovou gumu 4 3 Utáhněte svorku okolo držadla invalidního vozíku utažením obou šroubů 4 Nasuňte konzolu 1 zpět na svorku 3 1 2 Instalace držáků podpěry 1 Nainstalujte oba držáky na dolní vodorovnou trubku invalidního vozíku hned za příčná uchycení 5 2 Upevněte popruh 6 mezi držáky 3 Ověřte že jsou šrouby 7 dostatečně utaženy a že se neotáčejí na trubce...

Page 94: ... 13 5 Vytažením popruhu odst 3 1 2 6 odemkněte teleskopickou tyč odst 3 1 3 8 Držte pohon V Drive a posuňte invalidní vozík trochu dopředu aby teleskopická tyč vyjela ven z držáků Odeberte modul pohonu V Drive z invalidního vozíku 6 Vložte všechny položky do dodané přenášecí tašky aby nedošlo k jejich poškození 7 Je li to potřeba požadováno lze nyní invalidní vozík složit pro přepravu 3 3 Manipula...

Page 95: ...Stisknutím páky zaktivujete pohon V Drive Čím více je páka stisknuta tím rychleji pohon V Drive pojede Uvolněním páky se pohon V Drive zastaví G Vnější knoflík Tento knoflík slouží ke změně úhlu ovládací konzoly 3 5 Stav a nabíjení baterií Riziko zranění anebo poškození kvůli požáru Používejte pouze nabíječku baterií dodanou s pohonem V Drive Použití jakékoli jiné nabíječky může být nebezpečné Nab...

Page 96: ...hopná Nabíjení baterie 1 Vypněte pohon V Drive 2 Vyjměte bateriový modul z přihrádky podle popisu v odst 3 2 3 NEJPRVE zapojte nabíječku baterií do el zásuvky 220 V Nabíječku baterií zapojte přímo bez prodlužovacího kabelu do el zásuvky bez časového spínače 4 Adaptér zapojte do nabíjecího bodu bateriového modulu 5 Dioda LED nabíječky se rozsvítí oranžově a tím indikuje nabíjení baterií 6 Po dokonč...

Page 97: ...u 8 cm 5 kroků 1 Odeberte modul pohonu V Drive z invalidního vozíku podle popisu v odst 3 2 2 Demontujte spoj šroub matice 15 3 Posuňte podpěru teleskopické trubky 16 nahoru dolů po upevňovacím bloku na požadovanou výšku 4 Namontujte a řádně utáhněte spoj šroub matice 15 5 Opět nasaďte modul pohonu V Drive na invalidní vozík podle odst 3 1 3 15 16 ...

Page 98: ...u ročně nebo častěji nechte pohon V Drive u odborného prodejce ke kontrole a provedení servisu Minimální četnost údržby závisí na frekvenci používání a proto by měla být společně dohodnuta s vaším odborným prodejcem 4 1 Čištění Otřete všechny pevné části pohonu vlhkým nikoli mokrým hadříkem V případě potřeby použijte jemné mýdlo vhodné na laky a syntetické barvy 4 2 Znovupoužití výrobku Před každý...

Page 99: ... pomalý Ověřte že nejsou na invalidním vozíku aktivovány brzdy 5 2 Systémové kódy V případě možného problému se systémový kód zobrazí blikáním diody LED zcela vlevo na indikátoru nabití baterie Možné systémové kódy jsou uvedeny v následující tabulce Některé problémy můžete vyřešit sami Při všech problémech označených šedě se poraďte se svým specializovaným prodejcem Kód Možný problém Možný účinek ...

Page 100: ...opis Rozměry Max hmotnost včetně uživatele a invalidního vozíku Standardní verze 135 kg Robustní verze 200 kg Max rychlost 6 4 km h Spotřeba energie 16 km Celková hmotnost bez bateriového modulu 11 8 kg Hmotnosti snímatelných částí Bateriový modul 9 kg Typ kol 200 x 50 mm Rozměry modulu pohonu V Drive DxŠxV 450 x 260 x 390 mm Hnací motor Standardní verze 150 W 24 V Robustní verze 200 W 24 V Bateri...

Page 101: ......

Page 102: ......

Page 103: ... Date By stamp Kind of work I S R D Date By stamp Kind of work I S R D Date By stamp Kind of work I S R D Date By stamp Kind of work I S R D Date By stamp Kind of work I S R D Date By stamp Kind of work I S R D Date By stamp Kind of work I S R D Date By stamp Kind of work I S R D Date By stamp Kind of work I S R D Date By stamp Kind of work I S R D Date By stamp Kind of work I S R D Date By stamp ...

Page 104: ...iren Group 2020 Vermeiren GROUP NV Vermeirenplein 1 15 2920 Kalmthout BE website www vermeiren com R E Vermeiren GROUP Vermeirenplein 1 15 2920 Kalmthout Belgium User manual V Drive_MULTI_W200849_A5_2020 05_D ...

Reviews: