background image

Altitude, Coraille 

2018-08 

Maintenance 


EN - 10 


EN 


NL 


Maintenance 


Regular care ensures that your shell chair is preserved in a perfectly functional condition.  

4.1 

Points of maintenance 


Risk of injuries and damage 

Repairs and replacements may only be undertaken by trained persons and only genuine 
replacement parts of Vermeiren should be used. 


The last page of this manual contains a registration form for the specialist dealer to 
record each service. 

The service frequency depends on the frequency and intensity of use. Contact your dealer to 
agree to a common timetable for inspection/maintenance/repair. 
 

Before each use 

Inspect next points: 

  All parts: Present and undamaged or worn. 

  All parts: Clean, see § 4.2.1.  

  Wheels, shell, footrest, footplate(s), body belt, hip belt: Well secured.  

  Working of tilt lever and footrest lever (gas springs), brakes, buckles of belts. 

  Wheels/tyres; keep them free of wires, hair, sand, fibres and other contamination (oil, mud). 

  Condition of frame parts: No deformation, instability, weakness or loose connections 

  Shell-chair upholstery, head cushion, seat cushion, calf-rest cushion: No excessive wear 

(like dented spots, damage or tears).  

Contact your specialist dealer for possible repairs or part replacements. 

4.2 

Instructions of maintenance 

4.2.1  Cleaning 


Risk of damage  

  Never use a steam cleaner to clean the chair. 

  Wash the covers of the upholstery according to the instructions on the washing label. 

Wipe all rigid parts of the chair frame with a damp cloth (not drenched). If necessary, use a 
mild soap, suitable for varnishes and synthetics.  
The upholstery can be cleaned with lukewarm water and a mild soap.  Do not use abrasive 
cleaning agents or sponge, or hard brush to clean. 

To facilitate the cleaning,  the upholstery covers  can be removed (via  zippers and Velcro 
straps). Next, they can be washed, see the washing label inside the upholstery cover. 

4.2.2  Disinfection 


Risk of damage 

Disinfections may only be undertaken by trained persons. Consult your specialist dealer. 

CAUTION

CAUTION

CAUTION

Summary of Contents for Altitude

Page 1: ...N U A L M A N U E L D U T I L I S A T I O N G E B R U I K S A A N W I J Z I N G G E B R A U C H S A N W E I S U N G M A N U A L E D I I S T R U Z I O N I M A N U A L D E I N S T R U C C I O N E S I N S T R U K C J A O B S Ł U G I N Á V O D K O B S L U Z E ...

Page 2: ...publicateur ni traitée dupliquée ou distribuée à l aide de systèmes électroniques Alle rechten inclusief vertaling voorbehouden Niets uit deze handleiding mag geheel of gedeeltelijk in enige vorm druk fotokopie microfilm of ieder ander procedé zonder de schriftelijke toelating van de uitgever worden gereproduceerd of met behulp van elektronische systemen worden verwerkt gekopieerd of verspreid All...

Page 3: ...tion manual Shell chair Manuel d utilisation Fauteuil coquille Gebruiksaanwijzing Zitschaalstoel Gebrauchsanweisung Sitzschalenstuhl Manuale di istruzioni Seggiola a guscio Manual de instrucciones Silla monocarcasa Instrukcja obsługi Wózek pielęgnacyjny Návod k obsluze Zdravotnické křeslo ...

Page 4: ...This page is intentionally left blank ...

Page 5: ... 2 2 General safety instructions 5 2 3 Symbols on the chair 5 2 4 Transport and storage 6 3 Using this chair 7 3 1 Brakes 7 3 2 Moving to from chair 8 3 3 Comfort adjustments 8 4 Maintenance 10 4 1 Points of maintenance 10 4 2 Instructions of maintenance 10 4 3 Troubleshooting 11 4 4 Expected lifespan 11 4 5 End of use 11 5 Technical specifications 11 ...

Page 6: ...per use or lack of maintenance will cause the warranty to lapse This manual reflects the latest product developments Vermeiren has the right to implement changes to this type of product without being imposed to any obligation to adapt or replace similar products previously delivered Pictures are used to clarify the instructions in this manual Details of the depicted product may deviate from your p...

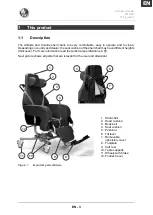
Page 7: ...the seat cushion of the shell chair may have different heights thickness For more information read the technical specifications in 5 Next picture shows all parts that are relevant for the user and attendant Figure 1 Important parts Altitude 1 Shell chair 2 Head cushion 3 Body belt 4 Seat cushion 5 Push bar 6 Tilt lever 7 Removable upholstery cover 8 Footplate 9 Calf rest 10 Table supports 11 Wheel...

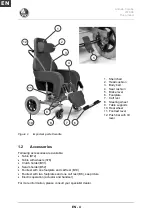
Page 8: ...1 Serum holder B52 Footrest with one footplate and calf rest B10 Footrest with two footplates and one calf rest B6 see picture Electric operation actuator and handset For more information please consult your specialist dealer 1 Shell chair 2 Head cushion 3 Body belt 4 Seat cushion 5 Brake lever 6 Footplate 7 Calf rest 8 Steering wheel 9 Table supports 10 Rear wheel 11 Footrest lever 12 Push bar wi...

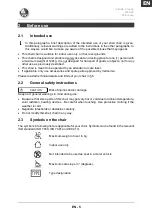
Page 9: ...tendant or care taker If applicable only use accessories and spare parts approved by Vermeiren Please read all technical details and limits of your chair in 5 2 2 General safety instructions Risk of injuries and or damage Keep next general warnings in mind during use Be aware that some parts of this chair may get very hot or cold due to ambient temperature solar radiation heating devices Be carefu...

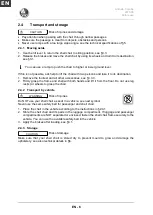
Page 10: ...p the frame and shell with both hands and lift it from the floor Do not use leg rest s or wheels to grasp the chair 2 4 2 Transport by vehicle Risk of injuries Do NOT use your shell chair as seat in a vehicle see next symbol Never use the same safety belt for passenger and shell chair 1 Place the chair in the vehicle according to the instructions in 2 4 1 2 Store the shell chair and its parts in t...

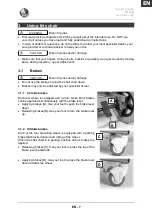
Page 11: ...uries and or damage Do not use the brakes to slow the shell chair down Brakes may only be adjusted by your specialist dealer 3 1 1 Coraille brakes Each rear wheel is equipped with a drum brake Both brakes can be operated simultaneously with the brake lever Applying brakes A Use your foot to push the brake lever down Releasing brakes B Use your foot to turn the brake lever up 3 1 2 Altitude brakes ...

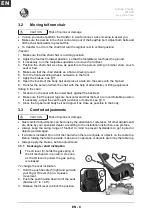
Page 12: ...n the seat with the lower back against the backrest 2 Make sure that the upper legs are horizontal and that the feet are in comfortable position If necessary adjust the seat height cushion or footrest see 3 3 3 Close the hip belt and body belt and adjust it as close as possible to the body 3 3 Comfort adjustments Risk of injuries or damage Next comfort adjustments can be done by the attendant or c...

Page 13: ...hout removal of the calf rest according to the instructions below In the same way the footrest length can be adjusted range 185 mm step less Disassemble 1 Loosen clamping lever 4 Pull it up turn it clockwise to replace it to new position Next push it down on the bolt and turning it anticlockwise to loosen the bolt 2 Repeat this till the footrest support 1 is released Now it can be adjusted or remo...

Page 14: ...d fibres and other contamination oil mud Condition of frame parts No deformation instability weakness or loose connections Shell chair upholstery head cushion seat cushion calf rest cushion No excessive wear like dented spots damage or tears Contact your specialist dealer for possible repairs or part replacements 4 2 Instructions of maintenance 4 2 1 Cleaning Risk of damage Never use a steam clean...

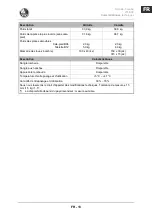
Page 15: ...gislation The best way to do so is to disassemble the chair to facilitate the transport of recyclable parts 5 Technical specifications The technical details below are only valid for this chair at standard settings and optimal ambient conditions Take these details into account during use The values are no longer applicable if your chair has been modified damaged or suffers from severe wear Table 2 ...

Page 16: ... adjustable stepless 0 to 56 Backrest angle 90 Distance between footplate and seat 350 mm to 535 mm Static stability downhill 6 Static stability uphill 6 Description Altitude Coraille Total mass 33 9 kg 39 0 kg Mass of heaviest part without footrest 31 6 kg 36 7 kg Masses of removable parts Footrest B06 Table B12 2 3 kg 5 0 kg 2 3 kg 4 9 kg Diameter wheels number 100 x 40 4x 150 x 30 2x 315 x 15 2...

Page 17: ...ctions générales de sécurité 5 2 3 Symboles sur le fauteuil 5 2 4 Transport et entreposage 6 3 Utiliser ce fauteuil 7 3 1 Freins 7 3 2 Se déplacer de vers le fauteuil 8 3 3 Réglages de confort 8 4 Entretien 10 4 1 Points d entretien 10 4 2 Instructions d entretien 11 4 3 Résolution des problèmes 11 4 4 Durée de vie attendue 11 4 5 Mise au rebut 11 5 Caractéristiques techniques 12 ...

Page 18: ...é ou à un manque d entretien auront pour effet d annuler la garantie Ce manuel est le reflet des derniers développements du produit Vermeiren a le droit d apporter des modifications à ce type de produit sans être tenu d adapter ou de remplacer des produits similaires fournis précédemment Les images sont fournies afin de clarifier les instructions de ce manuel Les détails du produit illustré peuven...

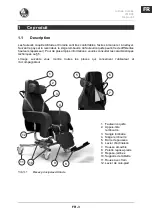
Page 19: ... différentes hauteurs épaisseur Pour de plus amples informations veuillez consulter les caractéristiques techniques au 5 L image suivante vous montre toutes les pièces qui concernent l utilisateur et l accompagnateur Pièces principales Altitude 1 Fauteuil coquille 2 Appuie tête rembourré 3 Sangle lombaire 4 Siège rembourré 5 Barre de poussée 6 Levier d inclinaison 7 Housse amovible 8 Palette repos...

Page 20: ...s et un repose jambes B10 Cale pied avec deux palettes repose pieds et un repose jambes B6 voir photo Commande électrique actionneur et télécommande Pour de plus amples informations veuillez consulter votre revendeur spécialisé 1 Fauteuil coquille 2 Appuie tête rembourré 3 Sangle lombaire 4 Siège rembourré 5 Levier de frein 6 Palette repose pieds 7 Repose jambes 8 Roue directionnelle 9 Supports de...

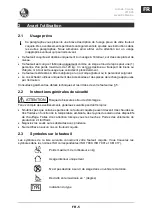
Page 21: ...ccessoires et des pièces de rechange approuvés par Vermeiren Consultez également les détails techniques et les limites de votre fauteuil au 5 2 2 Instructions générales de sécurité Risque de blessures et ou de dommages Tenez compte des avertissements généraux suivants pendant l emploi N oubliez pas que certaines parties de ce fauteuil coquille peuvent devenir très chaudes ou très froides en foncti...

Page 22: ...ais et soulevez les du sol N utilisez pas le s repose jambes ni les roues pour saisir le fauteuil 2 4 2 Transport dans un véhicule Risque de blessures N utilisez PAS votre fauteuil coquille comme siège dans un véhicule voir symbole suivant N utilisez jamais la même ceinture de sécurité pour le passager et le fauteuil coquille 1 Placez le fauteuil dans le véhicule suivant les instructions du 2 4 1 ...

Page 23: ...u de dommages N utilisez pas les freins pour ralentir le fauteuil coquille Seul votre revendeur spécialisé peut effectuer le réglage des freins 3 1 1 Freins Coraille Chaque roue arrière est équipée d un frein à tambour Les deux freins peuvent être actionnés simultanément à l aide du levier de frein Serrer les freins A Utilisez votre pied pour abaisser le levier Relâcher les freins B Utilisez votre...

Page 24: ... la sangle lombaire et mettez la de côté Faites de même avec la sangle aux hanches 9 Transférez la personne de vers le fauteuil à l aide du des accompagnateur s ou de l équipement de levage S asseoir dans le fauteuil coquille 1 Asseyez vous sur le siège le bas du dos contre le dossier 2 Assurez vous que le haut des jambes est horizontal et que les pieds sont dans une position confortable Si nécess...

Page 25: ...ison pour bloquer la position 3 3 2 Angle du cale pied Le levier du cale pied 12 maintient les ressorts à gaz du mécanisme de poussée en position Dès que le levier du cale pied est tiré le ressort à gaz est libéré En tirant le levier du cale pied 12 sur le côté du fauteuil le cale pied 9 va se tourner vers le haut Vous le rabaissez en poussant le cale pied à la main vers le bas tout en tirant le l...

Page 26: ... des pièces de remplacement d origine de Vermeiren peuvent être utilisées La dernière page de ce manuel contient un formulaire d enregistrement pour permettre au revendeur spécialisé de consigner chaque service La fréquence d entretien dépend de la fréquence et de l intensité de l utilisation Contactez votre revendeur pour convenir d un rendez vous pour une inspection entretien réparation Avant ch...

Page 27: ...ez vous auprès de votre revendeur spécialisé à cet égard 4 3 Résolution des problèmes Même si vous utilisez votre fauteuil coquille de façon appropriée un problème technique n est pas exclu Les symptômes suivants peuvent indiquer un problème grave Aussi contactez toujours votre revendeur spécialisé si vous détectez l une des anomalies suivantes Bruit anormal Usure inégale dans la sculpture de l un...

Page 28: ...ourré 60 mm 80 mm 100 mm Hauteur du dossier dépend du siège rembourré 832 mm 812 mm 792 mm Hauteur des accoudoirs dépend du siège rembourré 275 mm 255 mm 235 mm Largeur du siège 380 mm 400 mm 420 mm 440 mm 480 mm Largeur hors tout 720 mm Hauteur hors tout réglable à 0 1295 mm 1320 mm 1345 mm Hauteur hors tout réglable à 40 950 mm 975 mm 1000 mm Longueur hors tout de la plus petite de 0 à la plus g...

Page 29: ...g 2 3 kg 4 9 kg Diamètre des roues nombre 100 x 40 4x 150 x 30 2x 315 x 15 2x Description Caractéristiques Sangle lombaire Disponible Sangle aux hanches Disponible Appuie tête rembourré Disponible Température d entreposage et d utilisation 5 C 41 C Humidité d entreposage et d utilisation 30 70 Nous nous réservons le droit d apporter des modifications techniques Tolérance de mesure 15 mm 1 5 kg 1 5...

Page 30: ...Altitude Coraille 2018 08 Caractéristiques techniques FR 14 EN FR NL Cette page a été intentionnellement laissée en blanc ...

Page 31: ... Algemene veiligheidsinstructies 5 2 3 Symbolen op de rolstoel aanwezig 5 2 4 Transport en opbergen 6 3 Uw rolstoel gebruiken 6 3 1 Remmen 7 3 2 In uit de rolstoel gaan 7 3 3 Comfort instellingen 8 4 Onderhoud 10 4 1 Onderhoudspunten 10 4 2 Onderhoudsinstructies 10 4 3 Problemen oplossen 11 4 4 Verwachte levensduur 11 4 5 Einde gebruik 11 5 Technische specificaties 11 ...

Page 32: ...n uw product ten gevolge van oneigenlijk gebruik of gebrek aan onderhoud zal de garantie vervallen Deze handleiding weerspiegelt de laatste productontwikkelingen Vermeiren heeft het recht om wijzigingen aan dit type product aan te brengen zonder de opgelegde verplichting om vergelijkbare producten die voordien geleverd werden aan te passen of te vervangen In deze handleiding worden afbeeldingen ge...

Page 33: ... verschillende hoogtes dikte hebben Voor meer informatie kunt u in de technische specificaties vinden in 5 In volgende afbeelding staan alle onderdelen die van belang zijn voor de gebruiker Figuur 1 Belangrijke onderdelen Altitude 1 Zitschaal 2 Hoofdkussen 3 Gordel voor bovenlichaam 4 Zitkussen 5 Duw beugel 6 Hendel om te kantelen 7 Verwijderbare hoes van de bekleding 8 Voetplaat 9 Onderbeensteun ...

Page 34: ...un met één voetplaat en onderbeensteun B10 Voetensteun met twee voetplaten en één onderbeensteun B6 zie afbeelding Elektrische bediening actuator en handbediening Voor meer informatie kunt u contact opnemen met uw vakhandelaar 1 Zitschaal 2 Hoofdkussen 3 Gordel voor bovenlichaam 4 Zitkussen 5 Rem hendel 6 Voetplaat 7 Onderbeensteun 8 Stuurwiel 9 Tafel steunen 10 Achterwiel 11 Hendel voor voetenste...

Page 35: ...s en reserveonderdelen die door Vermeiren goedgekeurd zijn Neem alle technische informatie en de grenzen van uw rolstoel door zie 5 2 2 Algemene veiligheidsinstructies Kans op letsel en of schade Tijdens het gebruik hou volgende algemene waarschuwingen in gedachte Hou er rekening mee dat bepaalde delen van uw rolstoel erg warm of koud kunnen worden ten gevolge van de omgevingstemperatuur zonnestra...

Page 36: ...plaats in een voertuig zie symbool hiernaast Gebruik nooit dezelfde veiligheidsgordel voor passagier en rolstoel 1 Plaats de stoel in het voertuig volgens de instructies in 2 4 1 2 Berg de stoel en zijn onderdelen op in de bagageruimte Als de bagage en passagiers compartimenten niet gescheiden of afgesloten zijn maak dan het frame van de zitschaalstoel goed vast aan het voertuig Hiervoor kan u een...

Page 37: ...r te duwen Remmen opzetten B Gebruik uw voet om de remhendel omhoog te duwen 3 1 2 Remmen van de Altitude Elk van de vier zwenkwielen is voorzien van een parkeerrem die de rol en draaibeweging blokkeert In parkeerstand staan alle vier remmen van de zitschaalstoel op Remmen afzetten C Gebruik uw voet om de om de bovenkant van de remhendel naar achter te duwen Remmen opzetten D Gebruik uw voet om de...

Page 38: ...letsel of schade Volgende comfort instellingen kunnen door de begeleider of verzorger gedaan worden Alle overige afstellingen worden uitgevoerd door uw vakhandelaar volgens de installatie instructies zie de verwijzing in het voorwoord Hou altijd rekening met de zwaaihoek van de voetsteun zodat er geen omstanders gekwetst raken of objecten beschadigd worden Indien de stoel voorzien is van een tafel...

Page 39: ...wijze kan de voetsteun lengte aangepast worden over 185 mm traploos Demonteren 1 Draai de spanhendel 4 los Trek deze omhoog en draai in wijzer zin om deze in een nieuwe stand te zetten Druk de hendel vervolgens neer op de bout en draai in tegenwijzer zin om de bout te lossen 2 Herhaal dit tot de voetsteun buis 1 vrij is Deze kan nu ingesteld of verwijderd worden Monteren instellen 1 Steek de voets...

Page 40: ...den haar zand en tapijtvezels en ander vuil olie modder Conditie van het frame Geen vervorming instabiliteit zwakte of losse verbindingen Bekleding van de zitschaal hoofdkussen zitkussen onderbeenkussen Geen overmatige slijtage zoals ingedrukte plekken beschadigingen of scheuren Neem contact op met uw vakhandelaar voor eventuele reparaties of vervanging van onderdelen 4 2 Onderhoudsinstructies 4 2...

Page 41: ... af te voeren Best kunt u de rolstoel demonteren zodat de herbruikbare materialen makkelijker vervoerd en gerecycleerd kunnen worden 5 Technische specificaties Onderstaande technische gegevens zijn geldig voor deze stoel bij standaard instellingen en optimale omgevingscondities Hou rekening met deze gegevens tijdens gebruik De waarden gelden niet meer ingeval van aanpassingen schade of ernstige sl...

Page 42: ...90 Afstand tussen voetplaat en zit 350 mm tot 535 mm Statische stabiliteit bergafwaarts 6 Statische stabiliteit bergopwaarts 6 Beschrijving Altitude Coraille Totale massa 33 9 kg 39 0 kg Totale massa van zwaarste onderdeel zonder voetsteun 31 6 kg 36 7 kg Massa van te verwijderen onderdelen Voetsteun B06 Tafel B12 2 3 kg 5 0 kg 2 3 kg 4 9 kg Wieldiameter aantal 100 x 40 4x 150 x 30 2x 315 x 15 2x ...

Page 43: ...2 2 Allgemeine Sicherheitshinweise 5 2 3 Symbole am Stuhl 5 2 4 Transport und Lagerung 6 3 Benutzung des Stuhls 7 3 1 Bremsen 7 3 2 Transfer in den aus dem Rollstuhl 8 3 3 Komforteinstellungen 8 4 Instandhaltung 11 4 1 Wartungspunkte 11 4 2 Wartungshinweise 11 4 3 Störungsbeseitigung 12 4 4 Voraussichtliche Nutzungsdauer 12 4 5 Nutzungsende 12 5 Technische Daten 13 ...

Page 44: ...Benutzung oder mangelnde Wartung zurückzuführen sind führen zum Erlöschen der Garantie Dieses Handbuch enthält die neuesten Produktentwicklungen Vermeiren behält sich das Recht vor Veränderungen an dieser Art von Produkt vorzunehmen ohne eine Verpflichtung einzugehen ähnliche bereits ausgelieferte Produkte anzupassen oder auszutauschen Die Abbildungen dienen zur Verdeutlichung der Anweisungen in d...

Page 45: ...er kann das Sitzkissen des Sitzschalenstuhls unterschiedlich hoch sein Dicke Weitergehende Informationen finden Sie in den technischen Spezifikationen in Kapitel 5 Das nächste Bild zeigt alle Komponenten die für den Benutzer und die Begleitperson wichtig sind 1 Sitzschalenstuhl 2 Kopfablage 3 Leibgurt 4 Sitzkissen 5 Schiebebügel 6 Kipphebel 7 Abnehmbarer Polsterbezug 8 Fußplatte 9 Wadenplatte 10 T...

Page 46: ...mit einer Fußplatte und Wadenplatte B10 Fußstütze mit zwei Fußplatten und einer Wadenplatte B6 siehe Abbildung Elektrischer Betrieb Aktuator und Bedienteil Für weitergehende Informationen wenden Sie sich bitte an Ihren Fachhändler 1 Sitzschalenstuhl 2 Kopfablage 3 Schultergurt 4 Sitzkissen 5 Bremshebel 6 Fußplatte 7 Wadenplatte 8 Schwenkrolle 9 Tischträger 10 Hinterrad 11 Fußstützenhebel 12 Schieb...

Page 47: ...st ausschließlich von Vermeiren genehmigte Zubehör oder Ersatzteile Sehen Sie sich auch die technischen Daten und die Grenzen Ihres Sitzschalenstuhls in Kapitel 5 an 2 2 Allgemeine Sicherheitshinweise Gefahr von Personen und oder Sachschäden Beachten Sie bei der Benutzung die folgenden allgemeinen Warnhinweise Beachten Sie dass bestimmte Teile dieses Sitzschalenstuhls infolge der Umgebungstemperat...

Page 48: ...eben Sie ihn hoch Heben Sie den Stuhl nicht an den Fußstützen oder den Rollen an 2 4 2 Transport in einem Fahrzeug Verletzungsgefahr Benutzen Sie Ihren Sitzschalenstuhl NICHT als Sitz in einem Fahrzeug siehe nächstes Symbol Benutzen Sie niemals denselben Sicherheitsgurt für Fahrgast und Sitzschalenstuhl 1 Verstauen Sie den Stuhl im Fahrzeug gemäß den Anweisungen in Kapitel 2 4 1 2 Legen Sie den Si...

Page 49: ...en Benutzen Sie die Feststellbremsen keinesfalls um den in Bewegung befindlichen Sitzschalenstuhl abzubremsen Die Bremsen dürfen nur von Ihrem Fachhändler eingestellt werden 3 1 1 Bremsen beim Coraille An jedem Hinterrad befindet sich eine Trommelbremse Beide Bremsen können mit dem Bremshebel gleichzeitig betätigt werden Bremsen betätigen A Drücken Sie den Bremshebel mit dem Fuß nach unten Bremsen...

Page 50: ...n Sie ihn zur Seite Verfahren Sie so auch mit dem Hüftgurt 9 Bewegen Sie die Person mit Hilfe einer oder mehrerer Begleitpersonen oder einer Hebevorrichtung in den Stuhl hinein oder aus ihm heraus Sitzen im Rollstuhl 1 Setzen Sie sich so hin dass der untere Lendenbereich an der Rückenlehne anliegt 2 Achten Sie darauf dass Ihre Oberschenkel horizontal sind und Ihre Füße eine bequeme Stellung haben ...

Page 51: ...halten Wiederherstellend er Sitzposition 1 Halten Sie die Schiebestange fest und ziehen mit dem Finger am Kipphebel 6 2 Bewegen Sie die Schiebestange langsam nach oben Lassen Sie den Kipphebel wieder los um diese Stellung zu beizubehalten 3 3 2 Fußstützenwinkel Der Fußstützenhebel 12 hält die Gasfeder des Druckmechanismus in Position Zieht man am Fußstützenhebel wird die Gasfeder freigegeben Wenn ...

Page 52: ...chraube zu lösen 2 Wiederholen Sie diesen Vorgang bis die Fußstützenhalterung 1 gelöst ist Die Fußstütze kann nun eingestellt oder entfernt werden Montage Anpassung 1 Setzen Sie die Fußstützenhalterung 1 in die Fußstützenführung 2 hinter der Wadenplatte 3 ein 2 Stellen Sie die gewünschte Länge für die Fußstützenhalterung ein und ziehen Sie den Spannhebel 4 im Uhrzeigersinn fest 3 Achten Sie darauf...

Page 53: ...llen Reifen von Drähten Haaren Sand Fasern und andere Verunreinigungen Öl Schmutz freihalten Zustand der Rahmenteile keine Deformation Instabilität Schwachstelle oder lose Verbindungen Polsterung des Sitzschalenstuhls Nackenkissen Sitzkissen Wadenplatte kein übermäßiger Verschleiß wie Eindellungen Beschädigungen oder Risse Wenden Sie sich wegen etwaiger Reparaturen oder Ersatzteilen an Ihren Fachh...

Page 54: ... an einem der Reifen Ruckartige Bewegungen Stuhl zieht zu einer Seite Beschädigte oder gebrochene Rollen Beschädigter oder gebrochener Kipp oder Fußstützenmechanismus 4 4 Voraussichtliche Nutzungsdauer Die durchschnittliche Nutzungsdauer Ihres Sitzschalenstuhls beträgt 5 Jahre Je nach Nutzungshäufigkeit und Wartung kann die Nutzungsdauer Ihres Sitzschalenstuhls länger oder kürzer sein 4 5 Nutzungs...

Page 55: ...h Sitzkissen 275 mm 255 mm 235 mm Sitzbreite 380 mm 400 mm 420 mm 440 mm 480 mm Gesamtbreite 720 mm Gesamthöhe einstellbar bei 0 1295 mm 1320 mm 1345 mm Gesamthöhe einstellbar bei 40 950 mm 975 mm 1000 mm Gesamtlänge minimal bei 0 bis maximal bei 40 mit B06 in Maximaleinstellung 1090 mm bis 1640 mm Sitztiefe in der Mitte 440 mm 460 mm 480 mm Sitzflächenhöhe an der Vorderkante einstellbar bei 0 mit...

Page 56: ...he Daten Leibgurt Verfügbar Hüftgurt Verfügbar Kopfablage Verfügbar Benutzungs und Lagerungstemperatur 5 C 41 C Benutzungs und Lagerungsfeuchte 30 70 Technische Änderungen jederzeit vorbehalten Messtoleranz 15 mm 1 5 kg 1 5 Verfügbarkeit je nach Land Händler gemessen in der Mitte ...

Page 57: ...i sicurezza 5 2 3 Simboli presenti sulla seggiola 5 2 4 Trasporto e magazzinaggio 6 3 Uso della seggiola 7 3 1 Freni 7 3 2 Trasferimento alla dalla seggiola 8 3 3 Regolazioni per il comfort 8 4 Manutenzione 10 4 1 Punti di manutenzione 10 4 2 Istruzioni per la manutenzione 11 4 3 Soluzione dei problemi di funzionamento 11 4 4 Durata prevista 11 4 5 Fine vita 11 5 Specifiche tecniche 12 ...

Page 58: ...lla garanzia Questo manuale rispecchia gli sviluppi più recenti del prodotto Vermeiren si riserva il diritto di introdurre modifiche di questo tipo di prodotto senza alcun obbligo di adattare o sostituire i prodotti analoghi consegnati in precedenza Le immagini vengono utilizzate per chiarire le istruzioni contenute nel manuale I dettagli del prodotto raffigurato possono essere diversi da quelli d...

Page 59: ...l sedile della seggiola a guscio può essere differente Per maggiori informazioni leggere le specifiche tecniche fornite nel 5 L immagine riportata di seguito mostra tutti i componenti di rilievo per l utente e l assistente 1 Seggiola a guscio 2 Cuscino poggiatesta 3 Cintura per il corpo 4 Cuscino del sedile 5 Barra di spinta 6 Leva di inclinazione 7 Rivestimento rimovibile dell imbottitura 8 Pedan...

Page 60: ...olpacci B10 Poggiapiedi con due pedane e un poggiapolpacci B6 vedere l immagine Azionamento elettrico attuatore e telecomando Per maggiori informazioni consultare il proprio rivenditore specializzato 1 Seggiola a guscio 2 Cuscino poggiatesta 3 Cintura per il corpo 4 Cuscino del sedile 5 Leva del freno 6 Pedana 7 Poggiapolpacci 8 Ruota direttrice 9 Supporti per il tavolino 10 Ruota posteriore 11 Le...

Page 61: ...zare esclusivamente accessori e ricambi approvati da Vermeiren Leggere tutte le informazioni tecniche di dettaglio e le limitazioni della seggiola riportate nel 5 2 2 Istruzioni generali di sicurezza Rischio di lesioni e o danni Durante l uso tenere presenti le seguenti avvertenze Non dimenticare che alcune parti della seggiola possono diventare molto calde o fredde a causa della temperatura ambie...

Page 62: ...pavimento Non afferrare la seggiola utilizzando l appoggio gli appoggi per le gambe o le ruote 2 4 2 Trasporto mediante un veicolo Rischio di lesioni NON utilizzare la seggiola a guscio come sedile in un veicolo vedere il simbolo successivo Non utilizzare la stessa cintura di sicurezza per passeggero e seggiola a guscio 1 Collocare la seggiola nel veicolo attenendosi alle istruzioni fornite nel 2 ...

Page 63: ...eggiola a guscio La regolazione dei freni deve essere eseguita esclusivamente da un rivenditore specializzato 3 1 1 Freni modello Coraille Ciascuna ruota posteriore è dotata di un freno a tamburo La leva del freno consente di azionare contemporaneamente entrambi i freni Inserimento dei freni A Spingere verso il basso la leva del freno con un piede Rilascio dei freni B Sollevare la leva del freno c...

Page 64: ...1 8 Aprire la fibbia della cintura per il corpo e disporla di lato Fare lo stesso con la cintura per i fianchi 9 Trasferire la persona sulla dalla seggiola con l ausilio di uno o più assistenti o di un dispositivo di sollevamento Posizione di seduta sulla seggiola 1 Sedersi sul sedile con la parte inferiore della schiena contro lo schienale 2 Accertarsi che la parte superiore delle gambe sia orizz...

Page 65: ...e 3 3 2 Angolazione del poggiapiedi La leva 12 del poggiapiedi trattiene in posizione la molla a gas del meccanismo di spinta Non appena si tira tale leva la molla a gas viene rilasciata Tirando la leva 12 del poggiapiedi verso il fianco della seggiola il poggiapiedi 9 ruota verso l alto Spingendo manualmente il poggiapiedi verso il basso mentre la leva è tirata esso si riabbassa Rilasciare la lev...

Page 66: ...ambi originali Vermeiren L ultima pagina di questo manuale contiene un modulo di registrazione che consente ai rivenditori specializzati di registrare ogni intervento di assistenza La frequenza di assistenza dipende dalla frequenza e dall intensità dell uso Concordare con il proprio rivenditore un calendario comune per le attività di ispezione manutenzione riparazione Prima di ciascun utilizzo Isp...

Page 67: ...oprio concessionario autorizzato 4 3 Soluzione dei problemi di funzionamento Anche se si utilizza la seggiola a guscio nel modo corretto vi è comunque la possibilità che si verifichi un problema tecnico I sintomi elencati di seguito possono indicare un problema grave Rivolgersi pertanto sempre al proprio rivenditore specializzato se si rileva una qualunque delle seguenti anomalie Rumori strani Usu...

Page 68: ...l sedile 275 255 235 mm Larghezza del sedile 380 400 420 440 480 mm Larghezza complessiva 720 mm Altezza complessiva regolabile a 0 1 295 1 320 1 345 mm Altezza complessiva regolabile a 40 950 975 1 000 mm Lunghezza complessiva minima a 0 massima a 40 con l elemento B06 regolato sul valore massimo 1 090 1 640 mm Profondità del sedile al centro 440 460 480 mm Altezza della superficie del sedile in ...

Page 69: ...fianchi Disponibile Cuscino poggiatesta Disponibile Temperatura di magazzinaggio e di utilizzo 5 C 41 C Umidità di magazzinaggio e di utilizzo 30 70 Vermeiren si riserva il diritto di introdurre modifiche tecniche Tolleranze di misurazione 15 mm 1 5 kg 1 5 La disponibilità dipende dal Paese concessionario valori misurati al centro ...

Page 70: ...Altitude Coraille 2018 08 Specifiche tecniche IT 14 EN NL IT Questa pagina è stata intenzionalmente lasciata in bianco ...

Page 71: ...seguridad 5 2 3 Símbolos presentes en la silla monocarcasa 5 2 4 Transporte y almacenamiento 6 3 Uso de esta silla 7 3 1 Frenos 7 3 2 Trasladarse hacia de la silla 8 3 3 Ajustes de comodidad 8 4 Mantenimiento 10 4 1 Puntos de mantenimiento 10 4 2 Instrucciones de mantenimiento 11 4 3 Resolución de problemas 11 4 4 Vida útil prevista 11 4 5 Fin de vida útil 11 5 Especificaciones técnicas 12 ...

Page 72: ...los desarrollos más recientes del producto Vermeiren se reserva el derecho a implementar cambios en este tipo de producto sin que ello suponga obligación alguna de adaptar o cambiar productos similares previamente entregados Las imágenes están presentes para clarificar las instrucciones contenidas en este manual Los detalles del producto mostrado pueden variar con su producto Información disponibl...

Page 73: ... de la silla monocarcasa puede variar de altura grosor Para más información léase las especificaciones técnicas en 5 La siguiente imagen muestra todas las partes relevantes para el usuario y el auxiliar 1 Silla monocarcasa 2 Almohadilla para la cabeza 3 Cinturón de sujeción 4 Cojín del asiento 5 Barra de empuje 6 Palanca de inclinación 7 Tapicería desfundable 8 Reposapiés 9 Soporte para pantorrill...

Page 74: ...las B10 Reposapiés con dos paletas y un soporte para pantorrillas B6 véase la imagen Operación eléctrica actuador y mando Para más información consulte con su distribuidor especializado 1 Silla monocarcasa 2 Almohadilla para la cabeza 3 Cinturón de sujeción 4 Cojín del asiento 5 Palanca de freno 6 Reposapiés 7 Soporte para pantorrillas 8 Rueda direccional 9 Soportes de mesa 10 Rueda trasera 11 Pal...

Page 75: ...r Vermeiren Consulte todos los detalles técnicos y las limitaciones de la silla monocarcasa en 5 2 2 Instrucciones generales de seguridad Riesgo de lesiones y daños Tenga en cuenta las siguientes advertencias durante su utilización Téngase en cuenta que ciertas partes de la silla monocarcasa pueden llegar a calentarse o enfriarse demasiado a causa de la temperatura ambiente la luz del sol equipos ...

Page 76: ...rcasa con ambas manos y elevarla del suelo No utilizar el reposapiés ni las ruedas para agarrar la silla 2 4 2 Transporte mediante vehículo Riesgo de lesiones NO utilizar la silla monocarcasa como asiento en un vehículo véase el siguiente símbolo Nunca utilizar el mismo cinturón de seguridad para el pasajero y la silla monocarcasa 1 Colocar la silla en el vehículo según las instrucciones en 2 4 1 ...

Page 77: ...asa Los frenos sólo pueden ser ajustados por un distribuidor especializado 3 1 1 Frenos del modelo Coraille Cada rueda trasera viene con un freno de tambor Ambos frenos pueden manejarse simultáneamente con la palanca de freno Aplicar los frenos A Utilizar el pie para presionar la palanca de freno hacia abajo Soltar los frenos B Utilizar el pie para empujar la palanca de freno hacia arriba 3 1 2 Fr...

Page 78: ... 3 1 8 Abrir la hebilla del cinturón de sujeción y colocarlo a un lado Hacer lo mismo con el cinturón para la cadera 9 Trasladar a la personas hacia o desde la silla con ayuda de un auxiliar o equipo de izado Sentarse en la silla 1 Sentarse en el asiento apoyando la zona lumbar contra el respaldo 2 Asegurarse de que los muslos estén en posición horizontal y que los pies estén en una posición cómod...

Page 79: ...ar la posición 3 3 2 Ángulo del reposapiés La palanca del reposapiés 12 mantiene el resorte de gas del mecanismo de inclinación en su posición Cuando se tira de la palanca del reposapiés el resorte de gas es liberado Al tirar de la palanca del reposapiés 12 en el lateral de la silla el reposapiés 9 se elevará Al empujar el reposapiés manualmente hacia abajo mientras se tira de la palanca vuelve a ...

Page 80: ...ltima página de este manual contiene un formulario de registro para que el distribuidor especializado pueda registrar cada mantenimiento La frecuencia de los mantenimientos depende de la frecuencia e intensidad de uso Póngase en contacto con su distribuidor para acordar un horario común para realizar inspecciones mantenimientos y reparaciones Antes de cada uso Inspeccionar los siguientes puntos To...

Page 81: ...e con su distribuidor especializado al respecto 4 3 Resolución de problemas Aunque se utilice la silla monocarcasa de la manera indicada también pueden surgir a veces problemas técnicos Los siguientes síntomas pueden significar un problema grave Se recomienda por tanto ponerse siempre en contacto con su distribuidor especializado si nota los siguientes problemas Ruidos extraños Desgaste desigual d...

Page 82: ... 100 mm Altura del respaldo depende del cojín del asiento 832 mm 812 mm 792 mm Altura de los reposabrazos depende del cojín del asiento 275 mm 255 mm 235 mm Anchura del asiento 380 mm 400 mm 420 mm 440 mm 480 mm Anchura total 720 mm Altura total ajustable a 0 1 295 mm 1 320 mm 1 345 mm Altura total ajustable a 40 950 mm 975 mm 1 000 mm Longitud total mínima a 0 y máxima a 40 con B06 al ajuste máxi...

Page 83: ... kg 4 9 kg Diámetro de las ruedas número 100 x 40 4x 150 x 30 4x 315 x 15 4x Descripción Especificaciones Cinturón de sujeción Disponible Cinturón para la cadera Disponible Almohadilla para la cabeza Disponible Temperatura de almacenamiento y uso 5 C 41 C Humedad de almacenamiento y uso 30 70 Nos reservamos el derecho a introducir cambios técnicos Tolerancia dimensional 15 mm 1 5 kg 1 5 Su disponi...

Page 84: ...Altitude Coraille 2018 08 Especificaciones técnicas ES 14 EN NL ES Esta página se ha dejado en blanco intencionadamente ...

Page 85: ...3 Symbole na wózku 5 2 4 Transport składanie i przechowywanie 6 3 Użytkowanie wózka 6 3 1 Hamulce 7 3 2 Przesiadanie się na wózek z wózka 7 3 3 Regulacje elementów mających wpływ na wygodę użytkowania 8 4 Konserwacja 9 4 1 Punkty poddawane konserwacji 9 4 2 Instrukcje konserwacji 10 4 3 Diagnozowanie i rozwiązywanie problemów 10 4 4 Oczekiwany okres użytkowania 11 4 5 Koniec użytkowania 11 5 Dane ...

Page 86: ...ważnienie gwarancji Instrukcja obejmuje najnowsze rozwiązania zastosowane w produkcie Firma Vermeiren ma prawo do wprowadzania zmian w produktach tego typu bez obowiązku adaptowania lub wymiany podobnych poprzednio dostarczonych produktów Ilustracje stanowią dodatkowe objaśnienia do instrukcji w niniejszym podręczniku Szczegóły przedstawionego produktu mogą się różnić od rzeczywistego produktu pos...

Page 87: ...a wózka pielęgnacyjnego może mieć różną wysokość grubość Aby dowiedzieć się więcej należy się zapoznać z danymi technicznymi w 5 Na kolejnym rysunku przedstawiono wszystkie części istotne z punktu widzenia użytkownika i asystenta 1 Fotel wózka 2 Podgłówek 3 Pasy bezpieczeństwa 4 Poduszka siedziska 5 Rączka do pchania 6 Dźwignia pochylenia 7 Zdejmowana tapicerka 8 Podpórka pod stopy 9 Podpórka pod ...

Page 88: ...ki B10 Podnóżek z dwiema podpórkami pod stopy i jedną podpórką pod łydki B6 patrz ilustracja Mechanizm elektryczny siłownik i manipulator Aby dowiedzieć się więcej należy się skontaktować z wyspecjalizowanym sprzedawcą 1 Fotel wózka 2 Podgłówek 3 Pasy bezpieczeństwa 4 Poduszka siedziska 5 Dźwignia hamulca 6 Podpórka pod stopy 7 Podpórka pod łydki 8 Kółko kierujące 9 Wsporniki stolika 10 Tylne koło...

Page 89: ...znie akcesoriów i części zapasowych zatwierdzonych przez Vermeiren Należy się zapoznać z wszystkimi danymi technicznymi i ograniczeniami wózka które są podane w 5 2 2 Ogólne instrukcje bezpieczeństwa Ryzyko obrażeń i lub uszkodzeń Podczas eksploatacji należy pamiętać o ogólnych ostrzeżeniach Niektóre części wózka mogą stać się bardzo gorące lub zimne ze względu na temperaturę otoczenia promieniowa...

Page 90: ... tym samym pasem bezpieczeństwa 1 Wózek umieścić w pojeździe zgodnie z instrukcjami w 2 4 1 2 Wózek pielęgnacyjny i jego części włożyć do bagażnika Jeśli bagażnik i kabina pasażerów NIE są oddzielone lub zamknięte mocno i bezpiecznie przypiąć ramę wózka do pojazdu Można użyć samochodowego pasa bezpieczeństwa 3 Po załadowaniu zacisnąć hamulce 3 1 2 4 3 Przechowywanie Ryzyko uszkodzenia Upewnić się ...

Page 91: ... do tyłu Zaciskanie hamulców D Nacisnąć stopą dźwignię hamulca w dół w kierunku kółka 3 2 Przesiadanie się na wózek z wózka Ryzyko obrażeń i uszkodzeń Jeśli pacjent nie może się bezpiecznie przesiąść powinien poprosić o pomoc Upewnić się że pasażer wózka nie może się wyślizgnąć z pasów bezpieczeństwa pasa biodrowego Aby temu zapobiec wyregulować oba pasy i odchylić wózek do tyłu Aby przenieść osob...

Page 92: ... sprzedawca postępując zgodnie z instrukcją instalacji patrz wstęp Zawsze pamiętać o zasięgu wychylenia podnóżka aby nie potrącić innych ludzi ani obiektów Jeśli jest zamontowany stolik Nie przechylać wózka gdy na blacie stoją płyny lub inne przedmioty Przed złożeniem blatu stolika na bok upewnić się że blat nie uderzy w żadną osobę ani obiekt Przed wykonaniem regulacji zawsze zacisnąć hamulce 3 3...

Page 93: ... Następnie popchnąć ją w dół na śrubie i obrócić w lewo aby poluzować śrubę 2 Powtórzyć aż wspornik podnóżka 1 się zwolni Można go teraz wyregulować lub zdemontować Montaż regulacja 1 Wprowadzić wspornik podnóżka 1 w gniazdo podnóżka 2 za płytą podpórki pod łydki 3 2 Dopasować długość wspornika podnóżka i zablokować dźwignię 4 obracając ją w prawo 3 Upewnić się że dźwignia blokująca 4 jest mocno z...

Page 94: ...ontaktować się z wyspecjalizowanym sprzedawcą w kwestii ewentualnych napraw lub wymiany części 4 2 Instrukcje konserwacji 4 2 1 Czyszczenie Ryzyko uszkodzenia Nigdy nie czyścić wózka myjką parową Tapicerkę prać zgodnie z instrukcjami na etykiecie Wszystkie twarde części ramy wózka wycierać wilgotną ale nie ociekającą wodą ściereczką W razie konieczności używać łagodnego detergentu odpowiedniego do...

Page 95: ...zym sposobem aby to zrobić jest demontaż wózka w celu ułatwienia transportu części nadających się do przetworzenia 5 Dane techniczne Dane techniczne zamieszczone poniżej dotyczą tylko tego wózka przy standardowych ustawieniach i optymalnych warunkach otoczenia Podczas użytkowania należy uwzględnić te dane Wartości będą nieważne jeśli wózek zostanie zmodyfikowany uszkodzony lub w dużym stopniu zuży...

Page 96: ...d stopę i siedziskiem 350 mm 535 mm Stabilność statyczna przy zjeździe w dół 6 Stabilność statyczna przy podjeździe w górę 6 Opis Altitude Coraille Masa łączna 33 9 kg 39 0 kg Masa najcięższej części bez podnóżka 31 6 kg 36 7 kg Masy demontowalnych części Podnóżek B06 Stolik B12 2 3 kg 5 0 kg 2 3 kg 4 9 kg Średnica kół liczba 100 x 40 4x 150 x 30 2x 315 x 15 2x Opis Specyfikacja Pasy bezpieczeństw...

Page 97: ...rčené použití 5 2 2 Obecné bezpečnostní pokyny 5 2 3 Symboly na křesle 5 2 4 Přeprava a uložení 6 3 Použití tohoto křesla 7 3 1 Brzdy 7 3 2 Přesun na křeslo nebo z něj 8 3 3 Úpravy komfortu 8 4 Údržba 10 4 1 Body údržby 10 4 2 Pokyny údržby 10 4 3 Řešení problémů 11 4 4 Očekávaná životnost 11 4 5 Konec používání 11 5 Technické údaje 11 ...

Page 98: ...ení výrobku způsobeného nesprávným použitím či absencí údržby tato záruka zanikne V tomto návodu se odráží nejnovější vývoj výrobku Společnost Vermeiren má právo provádět změny tohoto typu výrobku aniž by byla povinna upravit nebo nahradit podobné výrobky které již byly dodány Obrázky slouží k objasnění pokynů v tomto návodu Detaily výrobku na obrázcích se mohou od daného výrobku lišit Dostupné in...

Page 99: ...ít čalounění sedadla zdravotnického křesla jinou výšku tloušťku Více informací viz technické specifikace v odst 5 Následující obrázek ukazuje všechny části které se týkají uživatele a asistenta Důležité části křesla Altitude 1 Zdravotnické křeslo 2 Opěrka hlavy 3 Bezpečnostní pás 4 Čalounění sedadla 5 Tlačná tyč 6 Páka náklonu 7 Snímatelný potah čalounění 8 Podnožka 9 Lýtková opěrka 10 Podpěry sto...

Page 100: ...rum B52 Nožní opěrka s jednou podnožkou a lýtkovou opěrkou B10 Nožní opěrka se dvěma podnožkami a jednou lýtkovou opěrkou B6 viz obr Elektrická obsluha pohon a ovladač O další informace požádejte svého odborného prodejce 1 Zdravotnické křeslo 2 Opěrka hlavy 3 Bezpečnostní pás 4 Čalounění sedadla 5 Brzdová páka 6 Podnožka 7 Lýtková opěrka 8 Řídící kolečko 9 Podpěry stolku 10 Zadní kolo 11 Páka nožn...

Page 101: ...y používejte pouze příslušenství a náhradní díly schválené společností Vermeiren Přečtěte si všechny technické detaily a omezení tohoto křesla v odst 5 2 2 Obecné bezpečnostní pokyny Riziko zranění anebo poškození Při použití mějte na paměti následující obecná upozornění Mějte na paměti že určité části tohoto křesla mohou být velmi teplé nebo studené vlivem okolní teploty slunečního záření či topn...

Page 102: ...a rukama a zvedněte křeslo z podlahy K uchopení křesla nepoužívejte opěrku nohou ani kola 2 4 2 Přeprava vozidlem Riziko zranění Toto zdravotnické křeslo NIKDY nepoužívejte jako sedadlo ve vozidle viz další symbol Nikdy nepoužívejte stejný bezpečnostní pás pro cestujícího a zdravotnické křeslo 1 Umístěte křeslo do vozidla podle pokynů v odst 2 4 1 2 Uložte zdravotnické křeslo a jeho části do zavaz...

Page 103: ...1 Brzdy Riziko zranění anebo poškození Nepoužívejte brzdy ke zpomalení zdravotnického křesla Seřízení brzd smí provádět pouze odborný prodejce 3 1 1 Brzdy křesla Coraille Každé zadní kolo disponuje bubnovou brzdou Obě brzdy lze obsluhovat současně pomocí brzdové páky Aktivace brzd A Zatlačte brzdovou páku dolů pomocí chodidla Deaktivace brzd B Otočte brzdovou páku nahoru pomocí chodidla 3 1 2 Brzd...

Page 104: ...zení Sezení v křesle 1 Sedněte si na sedadlo a dolní část zad opřete o opěradlo 2 Ověřte že jsou stehenní části nohou vodorovně a chodidla v pohodlné poloze V případě potřeby seřiďte výšku sedadla sedáku nebo nožní opěrky viz odst 3 3 3 Zacvakněte bederní a bezpečnostní pásy a seřiďte je co nejblíže k tělu 3 3 Úpravy komfortu Riziko zranění či poškození Další úpravy komfortu může provádět doprovod...

Page 105: ...tkové opěrky podle níže uvedených pokynů Stejným způsobem lze nastavit délku nožní opěrky rozsah 185 mm plynulý Rozložení 1 Povolte upínací páku 4 Vytáhněte ji nahoru a jejím otočením ve směru hodinových ručiček ji uveďte do nové polohy Dále zatlačte dolů na šroub a jeho otáčením proti směru hodinových ručiček jej povolte 2 Tento postup opakujte dokud nedojde k uvolnění podpěry nožní opěrky 1 Nyní...

Page 106: ...udržujte je bez drátů vlasů písku vláken a jiných nečistot olej bláto Stav součástí rámu Žádná deformace nestabilita zeslabení nebo uvolněné spoje Čalounění zdravotnického křesla opěrka hlavy čalounění sedadla čalounění lýtkové opěrky Bez nadměrného opotřebení např promáčknutá místa poškození nebo roztržení Pro případné opravy či výměny částí se obraťte na svého odborného prodejce 4 2 Pokyny údržb...

Page 107: ...uží nebo zkrátí 4 5 Konec používání Po skončení životnosti musí být křeslo zlikvidováno podle místní legislativy pro životní prostředí Nejlepším způsobem likvidace je rozebrání křesla pro usnadnění přepravy recyklovatelných součástí 5 Technické údaje Technické údaje uvedené níže platí pouze pro toto křeslo při standardních nastaveních a optimálních podmínkách okolí Během používání berte tyto údaje...

Page 108: ...dla 465 mm 490 mm 515 mm Úhel roviny sedadla plynule nastavitelný 0 až 40 Úhel nožní opěrky plynule nastavitelný 0 až 56 Úhel opěradla 90 Vzdálenost mezi nožní deskou a sedadlem 350 mm až 535 mm Statická stabilita svah dolů 6 Statická stabilita svah nahoru 6 Popis Altitude Coraille Celková hmotnost 33 9 kg 39 0 kg Hmotnost nejtěžší části bez opěrky nohou 31 6 kg 36 7 kg Hmotnosti snímatelných část...

Page 109: ... Date By stamp Kind of work I S R D Date By stamp Kind of work I S R D Date By stamp Kind of work I S R D Date By stamp Kind of work I S R D Date By stamp Kind of work I S R D Date By stamp Kind of work I S R D Date By stamp Kind of work I S R D Date By stamp Kind of work I S R D Date By stamp Kind of work I S R D Date By stamp Kind of work I S R D Date By stamp Kind of work I S R D Date By stamp ...

Page 110: ...n it e mail info vermeiren it Vermeiren Suisse S A Eisenbahnstrasse 62 3645 Gwatt Thun phone 41 0 33 335 14 75 fax 41 0 33 335 14 67 website www vermeiren ch e mail info vermeiren ch Poland Spain Portugal Vermeiren Polska Sp z o o ul Łączna 1 PL 55 100 Trzebnica phone 48 0 71 387 42 00 fax 48 0 71 387 05 74 website www vermeiren pl e mail info vermeiren pl Vermeiren Iberica S L Carratera de Cartel...

Reviews: