9
C
B51
|
B61
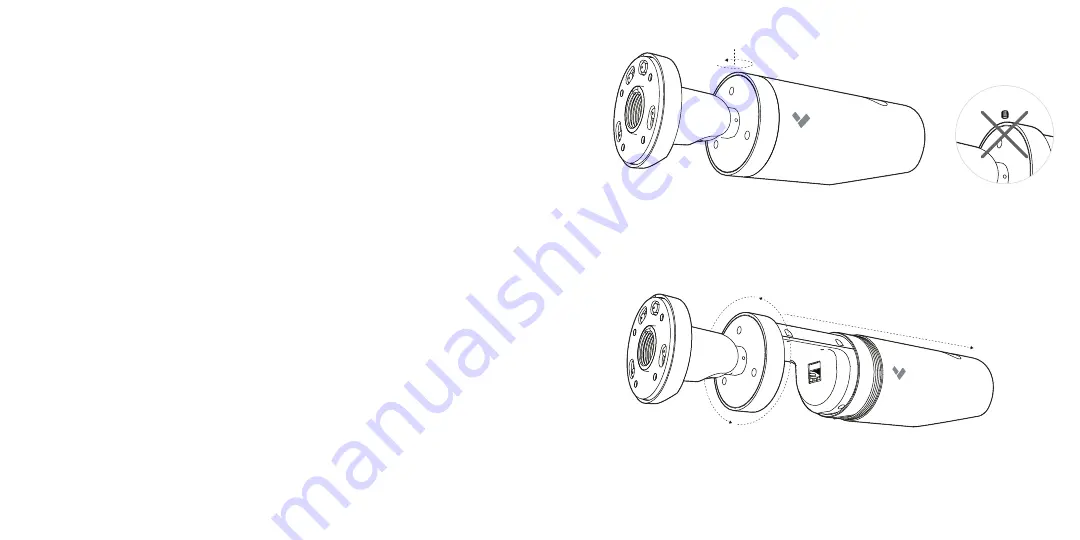
Connect
Use the T8 drive to loosen the set screw. Do not completely remove the screw.
Twist the Cover Collar near the middle of the camera to remove the outer Cover.
Page 1: ...CB51 CB61 Outdoor Bullet Camera...
Page 2: ...Cat6 ethernet cable with a 2 25 inch outside diameter 5 6 5mm 802 3af 802 3at POE Power over Ethernet PoE switch or a PoE injector For operation below 20 C use 802 3at PoE A 2 Phillips screwdriver or...
Page 3: ...plate 1 Spare collar locking screw CB51 CB61 Outdoor Bullet Camera Mount Plate pre assembled with camera Mounting Hardware T8 and T25 Hand Tool Cable Gland Wrench Junction Box Adapter Cover Junction...
Page 4: ...7 Mount Plate Removable Cover Collar Locking Screw Ball Joint Lock Screw Optional Cable Exit Cover Collar Base Plate Base Locking Screw Status LED CB51 CB61 Overview 3 4 NPT Threaded Connection...
Page 5: ...9 CB51 CB61 Connect Use the T8 drive to loosen the set screw Do not completely remove the screw Twist the Cover Collar near the middle of the camera to remove the outer Cover...
Page 6: ...Camera is running connected and streaming video Status LED Connect CB51 CB61 to an 802 3af 802 3at Power over Ethernet PoE port on your network Go to www verkada com start For detailed installation i...
Page 7: ...unting To unlock the Mount Plate from the Base Plate loosen the Base Locking Screw using the provided T8 hand tool The screw should be backed out approximately 2 5mm from the Base Plate Do not fully r...
Page 8: ...r metal drill 1 8 inch pilot holes Drive mounting screws directly into the pilot holes For drywall plaster or masonry separate wall anchors may be required To remove the Mount Plate from the Base Plat...
Page 9: ...late before fully securing it to the mounting surface Leave enough slack to safely handle the camera during cable gland installation Remove the cable gland from CB51 CB61 Route the ethernet cable thro...
Page 10: ...and twist clockwise until you feel the camera lock securely in place Once secured tighten the T8 security screw using the provided hand tool Align mounting features on the Mount Plate with the mountin...
Page 11: ...it in position Gently tighten down the metal nut by hand You should still be able to move the cable back and forth through the gland Slide the metal nut over the RJ45 connector and engage the threads...
Page 12: ...thernet cable back through the cable gland assembly Plug in the ethernet cable to the camera s RJ45 jack The cable should be routed straight from the cable gland into the RJ45 jack Firmly tighten the...
Page 13: ...Secure To finish securing the device align the outer Cover with the camera and push into place The external threads on the outer Cover will meet the internal threads on the Cover Collar at the back of...
Page 14: ...o thread the outer housing into place The outer Cover will be pulled into place and should seat against the ring when fully tightened Use the T8 security key to tighten the set screw on the side of th...
Page 15: ...29 CB51 CB61 Adjust Adjust your camera to the desired viewing angle Use the online stream to confirm image orientation Image can be flipped 180 online in Command...
Page 16: ...the camera in place use the T25 security torx key to turn the screw on the side of stand This will tighten the ball joint To fully secure the device rotate the torx handle 90 degrees and tighten the s...
Page 17: ...1 833 837 5232 support verkada com www verkada com support...