background image

                                                                                                                                Puma Disc Inkjet Printer


ZZ 004 833                                                                         - 11 - 

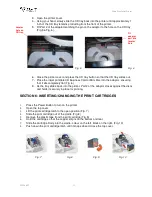
3.  Open the printer cover  
4.  Using your hand, slowly slide the CD tray back into the printer until approximately 1 

inch of the CD tray remains protruding from the front of the printer.  

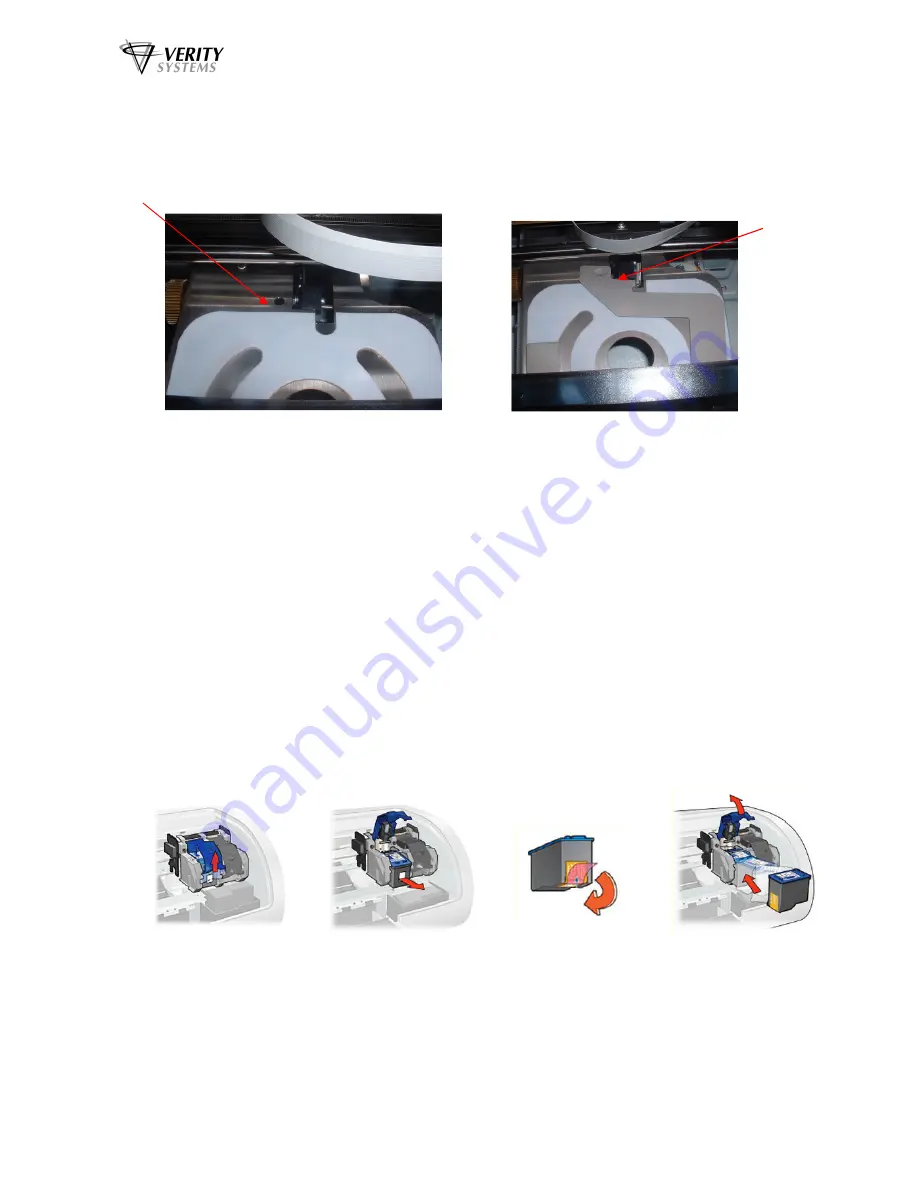
5.  Fit Part 2 of the adaptor matching the pin on the adaptor to the hole on the CD tray 

(Fig 5 & Fig. 6). 


6.  Close the printer cover and press the CD tray button so that the CD tray slides out.  
7.  Place the inkjet printable CD Business Card or Mini Disc into the adaptor, ensuring 

that it sits completely flat (Fig. 6).  

8.  As the tray slides back into the printer, Part 2 of the adaptor closes against the discs 

and holds it securely in place for printing. 

 
SECTION 6: INSERTING/CHANGING THE PRINT CARTRIDGES 


1.


Press the Power Button to turn on the printer 

2.


Open the top cover 

3.


Lift the print cartridge latch to the open position (Fig. 7) 

4.


Slide the print cartridge out of the cradle (Fig. 8) 

5.


Remove the plastic tape from the print cartridge (Fig. 9) 

6.


Hold the cartridge so that the copper strip is on the bottom and rear 

7.


Slide the cartridge firmly into the cradle, colour on the left, black on the right. (Fig. 10)


8.


Push down the print cartridge latch until it snaps closed. Close the top cover. 


Fig. 8 

Fig. 7 


Fig. 9 


Fig. 10 

Fig. 6 

Fig. 5 


Locator 

hole on 
CD tray


Fit 
adaptor 
part into 
locator 
hole


Summary of Contents for Puma

Page 1: ...inter ZZ 004 833 1 COMPLETE SOLUTIONS FOR ON DEMAND CD DVD PRODUCTION Photo Quality CD DVD Inkjet Printer OPERATING MAINTENANCE OPERATING MAINTENANCE OPERATING MAINTENANCE OPERATING MAINTENANCE MANUAL MANUAL MANUAL MANUAL ...

Page 2: ...ev 1 01 Production Standard ZZ 004 833 VERITY SYSTEMS LTD VERITY SYSTEMS INC 2 Eastern Road 5441 Merchant Circle Unit A Aldershot Placerville Hampshire California GU12 4TD 95667 United Kingdom United States Tel 44 0 1252 317000 Tel 530 626 9363 Fax 44 0 1252 316555 Fax 530 626 9395 Email sales veritysystems com Email ussales veritysystems us www veritysystems com ...

Page 3: ... reproduced copied or exhibited to a third party without the written permission of Verity Systems ENVIRONMENTAL PROTECTION Waste electrical products should not be thrown away with household waste Please recycle where facilities exist Check with your local authority r retailer for recycling advice Verity Systems reserves the right to amend or modify the specifications and design criteria applying t...

Page 4: ... AND PERFORMANCE VERITY SYSTEMS SHALL IN NO EVENT BE LIABLE FOR DIRECT INDIRECT SPECIAL INCIDENTAL CONTINGENT OR CONSEQUENTIAL DAMAGES RESULTING FROM ANY DEFECT IN THE SOFTWARE OR ITS DOCUMENTATION INCLUDING DAMAGES FROM LOSS OF DATA EVEN IF VERITY SYSTEMS OR AN AUTHORIZED VERITY SYSTEMS DEALER HAS BEEN ADVISED OF THE POSSIBILITY OF SUCH DAMAGES YOU AGREE THAT VERITY SYSTEMS LIABILITY ARISING OUT ...

Page 5: ... 9 4 5 CD Tray Button 10 Section 5 INSERTING A DISC INTO THE PUMA 10 5 1 Inserting a Standard CD DVD 10 5 2 Inserting a CD Business Card Mini Disc 10 11 Section 6 INSERTING CHANGING PRINT CARTRIDGES 11 Section 7 INSTALLING PRINTER SOFTWARE 12 13 Section 8 INSTALLING CD LABEL DESIGNER Graphics Software 13 Section 9 USING CD LABEL DESIGNER PRINTING A DISC 13 15 Section 10 SETTING PRINTER PREFERENCES...

Page 6: ...WARE PACKAGES 27 34 CorelDRAW Photoshop 27 Create a Page 27 Introducing the Mask 27 Understanding the Mask Interface 28 30 Mask Type 28 Enable Mask 28 Standard Area Settings 29 Hub Area Settings 29 30 Mask Origin 30 Parameter Unit 30 Templates 30 Appendix B Recommendations Maintenance 31 33 Standard Terms Conditions 34 37 ...

Page 7: ...D inkjet printer Desk top printer Combine with autoloader Direct to surface colour inkjet printing Laser sharp printing Perfect clean crisp graphics High speed printing 4800 dpi resolution with 16 7 million colours Hewlett Packard inkjet Technology Genuine HP inks Ultra small ink drops about 32 per dot 1 3 Specifications Minimum System Requirements Windows 2000 Pentium 133MHz 64Mb RAM Windows XP P...

Page 8: ... present If there are missing or damaged parts contact Verity Systems or an authorised distributor immediately You should find the following Verity Systems Puma Power Cable USB Cable Quick Start Guide CD including Printer Driver User Manual Test Image Templates 2 Blank Printable CDs One C8856A Black Ink Cartridge One C8857A Tri Colour Ink Cartridge CD Label Designer Graphics Software CD Note Be su...

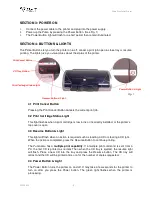
Page 9: ...inter s top cover is open 4 3 Resume Button Light This light will flash when an action is required such as loading a CD or clearing a CD jam When the action is completed press the Resume Button to continue printing The Puma also has a multiple print capability If a multiple print command is sent from a PC the first CD is printed as normal Then when the CD tray is ejected the resume light will flas...

Page 10: ... tray as shown below in Fig 2 When you send your image to printer the CD Tray will tray slide back into the printer and printing will commence 5 2 CD Business Cards Mini Discs option The Puma will also print directly onto inkjet printable CD Business Cards rectangular and saddle hockey rink and Mini Discs via the special adaptors Fig 3 which can be purchased separately see your dealer for details ...

Page 11: ...ides back into the printer Part 2 of the adaptor closes against the discs and holds it securely in place for printing SECTION 6 INSERTING CHANGING THE PRINT CARTRIDGES 1 Press the Power Button to turn on the printer 2 Open the top cover 3 Lift the print cartridge latch to the open position Fig 7 4 Slide the print cartridge out of the cradle Fig 8 5 Remove the plastic tape from the print cartridge ...

Page 12: ...the Puma and plug into the power supply Switch on the printer 7 If the Digital Signature Not Found message box appears again select Yes to continue installation In Windows XP select Continue Anyway 8 The Found New Hardware box will appear on screen which will search for the driver In Windows XP select No not at this time and click Next 9 At the next box select Install the software automatically Re...

Page 13: ...There may be variations in the following instructions depending on your operating system 2000 or XP and configuration 1 Insert the CD Label Designer software disc into the CD ROM drive in your PC and the installation wizard should automatically start 2 Click Next when prompted to continue Read the license agreement and tick the box to confirm that you agree 3 Continue to click Next when prompted t...

Page 14: ...ionality When you have finished creating your label save the project by clicking File Save Enter a filename and click the Save button To print a disc Click on File Print Ensure the printer selected at the top of the Window is the Puma Ensure the Print Layout selected on the left hand side of the window is the Puma Classic Mini Click on the Print button Note Every Puma is factory set for the correc...

Page 15: ...will only have to adjust these settings once These options adjust the dimensions of the label entering in lower values will decrease the printable area higher values will increase it If the printed image is off centre on your disc you can adjust these values to change the position of the disc Increasing the Left value will move the print to the right increasing the Top value will move the print do...

Page 16: ...hoice you make here will depend on the image you wish to print If you are printing basic text select Text Quality If printing basic graphics select White Inkjet For images where only the very best will do such as high resolution photos select Premium Inkjet or Premium Matt or Glossy Print Quality There are 6 options to choose from FastDraft Prints at the fastest speed while using the least amount ...

Page 17: ...RET Normal Inkjet 600x600 dpi Normal Text 300x300 dpi Fast Text 300x300 dpi Selecting a setting will automatically select the most suitable disc surface and print quality for the job in hand Example If you select Premium Photo Quality Matt 4800x1200 dpi the Disc Surface Type is automatically set to Premium Matt whilst the Print Quality Type is automatically set to Maximum dpi You can delete these ...

Page 18: ...ith the following options Fig 19 Ink Volume Select this feature to lessen or increase the amount of ink used to print a document Dry time Select this feature to increase the time the printer holds a document After printing if ink on your printed document smears Low Memory Mode Select this option to allow the draft to be printed if your computer does not have enough memory or disk space to print a ...

Page 19: ...arkness or printed colours Colour Tone Warmth or coolness of printed colours Colour Space Defines the range of colours that can be printed sRGB sYCC is an appropriate colour space for most print jobs Adobe RGB is an emerging colour space that offers more colours than sRGB sYCC but which only works for images Fig 20 ...

Page 20: ...nk Levels Estimates the amount of ink left in each cartridge Displays only when printing 10 5 Mask Settings The Puma s built in mask determines the printable area for your image and prevents your image from being printed outside the printable area of the CD media you are using or onto the CD tray of the printer itself This mask should be used when printing discs using any design software program o...

Page 21: ...of a CD check this box and adjust dimensions accordingly Mask Origin To alter the origin of the mask when printing through a graphics package other than CD Label Designer Parameter Unit Select the size of unit you wish to make changes with I e either 1mm or 0 1mm increments For more information on using the Puma mask and using graphics software other than CD Label Designer see Appendix A 10 6 Cali...

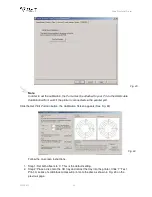
Page 22: ... parallel port Click the Set Print Position button the Calibration Screen appears See Fig 24 Follow the on screen instructions 1 Step 1 Set both offsets to 0 This is the default setting 2 Step 2 Place a disc onto the CD tray and retract the tray into the printer Click 1st Test Print A series of solid black circles will print onto the disc as shown in Fig 24 on the previous page Fig 23 Fig 24 ...

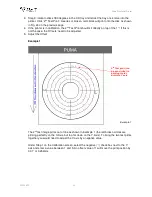
Page 23: ...e Offsets need to be adjusted 5 Adjust the Offset Example 1 The 2nd test image prints out of line as shown in Example 1 the red broken circles are printing perfectly on the X Axis but too far down on the Y Axis To bring the two test prints together you would need to adjust the Y axis by a negative value Under Step 1 on the Calibration screen select the negative check box next to the Y axis and ent...

Page 24: ...p 1 on the Calibration screen select the negative check box next to the X axis and the Y axis and enter a value in each between 1 and 5 6 Once you have entered a value repeat Steps 2 3 and 4 until both Test prints align Some trial an error will be required in order to get the alignment exactly right 7 When you have completed the calibration hit the Exit button the numbers you have entered are stor...

Page 25: ... this is the case the printer cartridge light will stop flashing once the top cover is opened or the printer is printing The problem is not related to the ink volume if the light continues to flash when the top cover is opened 2 Power Light is Flashing The printer is preparing to print The light stops flashing when the printer has received all data 3 All Lights are flashing The printer may need to...

Page 26: ...port personnel can be reached at VERITY SYSTEMS LTD VERITY SYSTEMS INC 2 Eastern Road 5441 Merchant Circle Unit A Aldershot Placerville Hampshire California GU12 4TD 95667 United Kingdom United States Tel 44 0 1252 796901 Tel 530 626 9363 Fax 44 0 1252 316555 Fax 530 626 9395 Email uksupport veritysystems com Email ussupport veritysystems com Open GMT Time Open PST Time ...

Page 27: ...shop graphics software to create an image to print on the Puma we recommend you start by creating a page 120 mm x 120 mm in your design software Introducing the Mask Unlike other CD DVD printers on the market the Puma boasts a unique and easy to use mask which makes the accurate printing of CDs from graphics software packages such as CorelDRAW Photoshop easier than ever before The Puma mask looks ...

Page 28: ...g pages Mask Type The Puma has pre determined masks for the following types of media Standard CDs DVDs 120mm Business Card Round 63mm i e Saddle Hockey Business Card Round 61mm i e Saddle Hockey Business Card Round 58mm i e Saddle Hockey Business Card Rectangular 58mm Business Card Rectangular 63mm Mini CDs 80mm Select the media you wish to print from the drop down list and a picture of that mask ...

Page 29: ...eter However this outer diameter can be reduced to accommodate the slightest variation in printable media Inner Diameter This can be increased or decreased in size Height To adjust the height of the mask for CD business cards Width To adjust the width of the mask for CD business cards Corner Height To adjust the corner height of the mask for CD business cards Corner Width To adjust the corner widt...

Page 30: ...x 1mm to x0 1mm as shown below in Fig G This way tiny movements can be made to align the mask perfectly Parameter Unit As mentioned above the parameter unit can be changed from x1 mm to x 0 1 mm movements allowing you to adjust your mask by tiny increments at a time so that a perfect mask can be achieved Changing this setting to x 0 1mm will result in all measurements on the Mask interface being s...

Page 31: ...the tray simply wipe with a moist cloth DO NOT put your hand or any other object inside the printer while it is printing DO NOT spill liquid onto the printer Getting the Most out of Your Puma If you wish to print photo quality graphics onto your CDs DVDs the higher the input the higher the output Use jpegs tiff files that are 300dpi resolution Cleaning Procedure The following procedures will cure ...

Page 32: ...th the printer lid open you will see the brass cog wheel see picture below that drives the printer tray Clean this in the same way as the toothed section using a soft damp toothbrush Again remove any excess with a soft cloth 4 The print carriage moves left to right on a metal slide bar see picture above Over time this can become contaminated with ink dirt To clean simply dampen a lint free cloth w...

Page 33: ...contaminated with ink it may cause banding on the printed disc To clean the linear encoder wipe it with a damp lint free cloth Calibration The Puma comes with its own calibration tool within the printer driver If the printed image is slightly off centre you can re align and re centre the printed image For more information regarding calibration please refer to section 10 6 page 23 of the printer us...

Page 34: ...rity Systems reserves the right to deliver all or any as soon as they are available at Verity Systems premises and the Purchaser shall honour all statements presented in respect of such deliveries in accordance with the Settlement Terms Notification to the Purchaser by Verity Systems that the goods are available for delivery to an independent carrier or to the Purchaser or his agent shall constitu...

Page 35: ...aser acknowledges that he is in possession of the goods solely as bailee for Verity Systems as shall as bailee insure and keep the same insured in the name of Verity Systems in their full reinstatement value in some reputable insurance office and indemnify Verity Systems for any uninsured loss thereof For the purpose of recovering the goods Verity Systems may enter any premises where the goods are...

Page 36: ...any particular purpose of the goods are hereby expressly excluded and Verity Systems shall not except as set out above be under any liability whatsoever in respect of defects in goods delivered or for any injury damage or loss resulting from such defects from any cause whatsoever 13 LEGAL CONSTRUCTION except where otherwise stipulated in writing the relations arrangements and agreements between th...

Page 37: ... Systems to do so No waiver or delay in exercise by Verity Systems of its right under this clause shall be deemed to imply acceptance of the default or any subsequent default If the Purchaser shall become bankrupt go into liquidation have a Receiving Order made against him or carry on his business under a Receiver Verity Systems shall have the liberty without prejudice to any further remedies unde...

Page 38: ...41 Merchant Circle Unit A Aldershot Placerville Hampshire California GU12 4TD 95667 United Kingdom United States Tel 44 0 1252 317000 Tel 530 626 9363 Fax 44 0 1252 316555 Fax 530 626 9395 Email sales veritysystems com Email ussales veritysystems us Website http www veritysystems com Supplied by ...

Reviews: