background image

                                                                                                                   OptiPrinter PRO CD/DVD Inkjet Printer


ZZ 004 821                                                                           - 32 - 

The mask interface displays the hub. 


Once again the 

Outer

 & 

Inner 

diameters of the hub can be adjusted to fit your media’s  


requirements exactly. See Fig. B. 


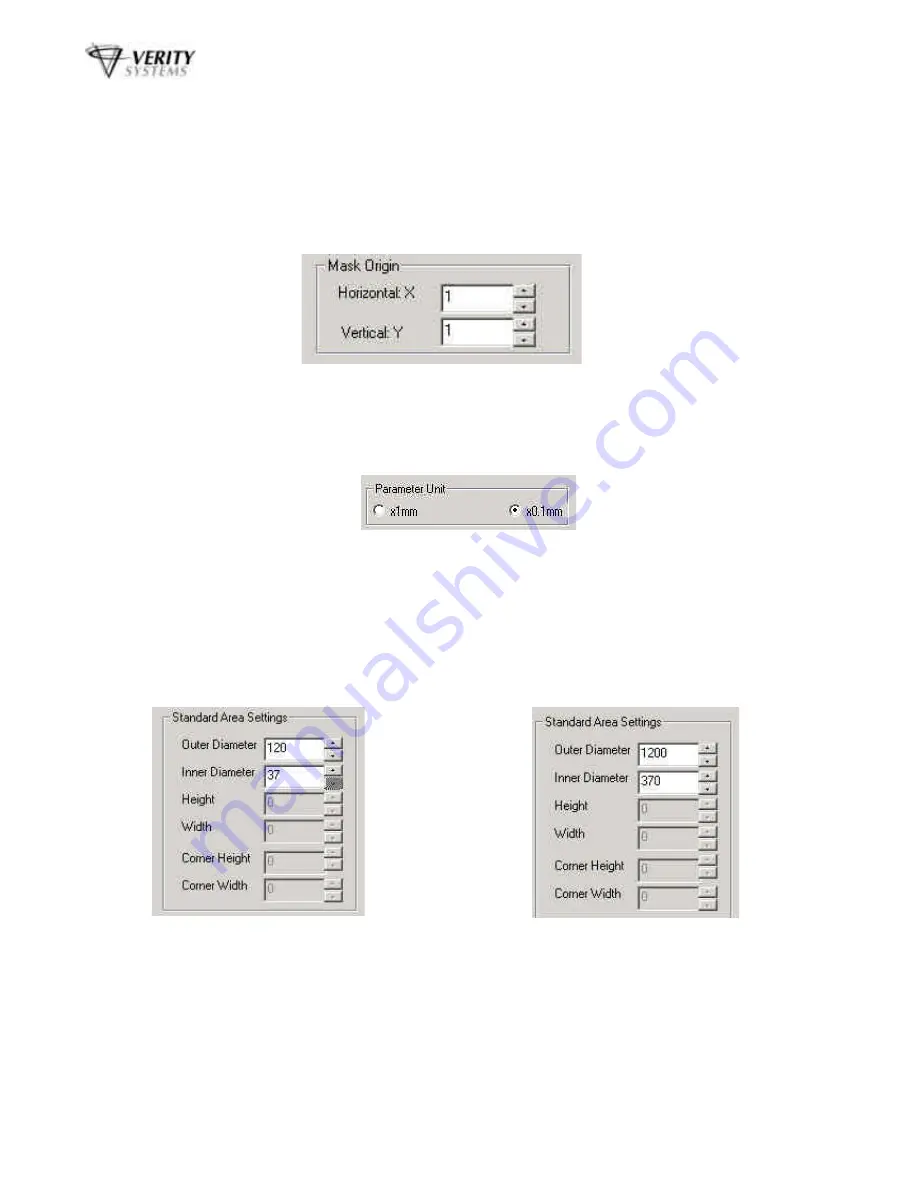
Mask Origin: 


The Calibration tab should be used to align your print image with the CD, however, the masks 
origin can also be used to more the position of the image by entering values in the X & Y axis. 


As you will see from the above diagram (Fig. F), the maximum distance you can move the 
mask is 1mm in any direction. It is therefore advisable to change the unit of parameter from x 
1mm to x0.1mm as shown below in Fig. G This way, tiny movements can be made to align the 
mask perfectly. 


Parameter Unit: 


As mentioned above, the parameter unit can be changed from x1 mm to x 0.1 mm movements 

allowing you to adjust your mask by tiny increments at a time so that a perfect mask can be 
achieved. 


Changing this setting to x 0.1mm will result in all measurements on the Mask interface being 
shown as tenths of a millimeter as shown in Fig. H 


Templates:


To help you position your images correctly in either CorelDRAW 11 or Photoshop7,  
templates are included on the CD enclosed.  


These templates should be used as guides as to where to position your graphics in relation to 
the media you wish to print. 

Fig. F 

Fig. G


Parameter Unit = x1mm 

Parameter Unit = x0.1mm 

Fig. H

Summary of Contents for Inkjet Printer

Page 1: ...OptiPrinter PRO CD DVD Inkjet Printer ZZ 004 821 1 COMPLETE SOLUTIONS FOR ON DEMAND CD DVD PRODUCTION Photo Quality CD DVD Inkjet Printer OPERATING MAINTENANCE MANUAL ...

Page 2: ...20 Rev 1 01 Production Standard ZZ 004 821 VERITY SYSTEMS LTD VERITY SYSTEMS INC 2 Eastern Road 5441 Merchant Circle Unit A Aldershot Placerville Hampshire California GU12 4TD 95667 United Kingdom United States Tel 44 0 1252 317000 Tel 530 626 9363 Fax 44 0 1252 316555 Fax 530 626 9395 Email sales veritysystems com Email ussales veritysystems com www veritysystems com ...

Page 3: ...emoved by authorized personnel COPYRIGHT This document is the property of Verity Systems and it may not be reproduced copied or exhibited to a third party without the written permission of Verity Systems Verity Systems reserves the right to amend or modify the specifications and design criteria applying to these products ...

Page 4: ...QUALITY AND PERFORMANCE VERITY SYSTEMS SHALL IN NO EVENT BE LIABLE FOR DIRECT INDIRECT SPECIAL INCIDENTAL CONTINGENT OR CONSEQUENTIAL DAMAGES RESULTING FROM ANY DEFECT IN THE SOFTWARE OR ITS DOCUMENTATION INCLUDING DAMAGES FROM LOSS OFDATA EVEN IF VERITY SYSTEMS OR AN AUTHORIZED VERITY SYSTEMS DEALER HAS BEEN ADVISED OF THE POSSIBILITY OF SUCH DAMAGES YOU AGREE THAT VERITY SYSTEMS LIABILITY ARISIN...

Page 5: ...Power Button light 9 4 5 CD Tray Button 10 Section 5 INSERTING A CD INTO THE OPTIPRINTER PRO 10 11 5 1 Inserting a Standard CD DVD 10 5 2 Inserting a CD Business Card Mini Disc 10 11 Section 6 INSERTING CHANGING PRINT CARTRIDGES 11 Section 7 INSTALLING PRINTER SOFTWARE 12 13 Section 8 INSTALLING DISCUS Graphics Software 13 Section 9 USING DISCUS PRINTING A CD 13 16 Section 10 SETTING PRINTER PREFE...

Page 6: ...SUPPORT 28 Appendix A OTHER GRAPHICS SOFTWARE PACKAGES 29 32 CorelDRAW Photoshop 29 Create a Page 29 Introducing the Mask 29 Understanding the Mask Interface 30 Mask Type 30 Enable Mask 30 Standard Area Settings 30 31 Hub Area Settings 31 32 Mask Origin 32 Parameter Unit 32 Templates 32 Appendix B Recommendations 33 ...

Page 7: ...disc duplicator for fast unattended printing of greater quantities 1 2 Features Professional photo quality CD DVD inkjet printer Desk top printer Combine with autoloader Direct to surface color inkjet printing Laser sharp printing Perfect clean crisp graphics High speed printing 4800 dpi resolution with 16 7 million colors Uses standard off the shelf standard HP print cartridges Hewlett Packard in...

Page 8: ... C6658 SECTION 2 BOX CONTENTS Carefully remove your Verity Systems OptiPrinter PRO from its shipping carton and verify that all parts are present If there are missing or damaged parts contact Verity Systems or an authorized distributor immediately You should find the following Ø Verity Systems OptiPrinter PRO Ø Power Cable Ø USB Cable Ø Quick Start Guide Ø CD including Printer Driver User Manual T...

Page 9: ... the printer s top cover is open 4 3 Resume Button Light This light will flash when an action is required such as loading a CD or clearing a CD jam When the action is completed press the Resume Button to continue printing The OptiPrinter Pro also has a multiple print capability If a multiple print command is sent from a PC the first CD is printed as normal Then when the CD tray is ejected the resu...

Page 10: ...of the tray as shown below in Fig 2 When you send your image to printer the CD Tray will tray slide back into the printer and printing will commence 5 2 CD Business Cards Mini Discs option The OptiPrinter PRO will also print directly onto inkjet printable CD Business Cards rectangular and saddle hockey rink and Mini Discs via the special adaptors Fig 3 which can be purchased separately see your de...

Page 11: ...tray slides back into the printer Part 2 of the adaptor closes against the discs and holds it securely in place for printing SECTION 6 INSERTING CHANGING THE PRINT CARTRIDGES 1 Press the Power Button to turn on the printer 2 Open the top cover 3 Lift the print cartridge latch to the open position Fig 7 4 Slide the print cartridge out of the cradle Fig 8 5 Remove the plastic tape from the print car...

Page 12: ...ue installation select Yes In Windows XP select Continue Anyway 4 On the final screen click Finish 5 Connect the OptiPrinter Pro to your PC via the USB cable 6 Connect the power cable to the back of the OptiPrinter Pro and plug into the power supply Switch on the printer 7 If the Digital Signature Not Found message box appears again select Yes to continue installation In Windows XP select Continue...

Page 13: ... click Next h When complete select Finish and the Verity Systems OptiPrinter PRO print driver icon will appear in your printer settings i The Digital Signature Not Found message box see Fig 11 will appear You will be asked if you wish to continue installation select Yes In Windows XP select Continue Anyway SECTION 8 INSTALLING DISCUS Graphics Software Insert the Discus CD into your CD ROM and foll...

Page 14: ...OptiPrinter PRO CD DVD Inkjet Printer ZZ 004 821 14 Select a label type Use the tabs along the top to create your artwork Fig 12 Fig 13 ...

Page 15: ... can be seen by clicking the Help Button on the Discus interface Once your artwork is complete select the Print tab Choose the OptiPrinter Pro from the Select template menu Next select Setup Choose the Verity Systems OptiPrinter PRO from the drop down list of printers and ensure the Paper Size is set to A4 210 x 297mm Source is set at Upper Tray and that Orientation is set at Portrait Note It is i...

Page 16: ...ge to move your template back forth and up down until your test prints centrally onto your disc Once the test print has been perfected you are now ready to print the artwork you created Place a blank CD into the CD tray On the print tab select Print Ensure that the OptiPrinter PRO has been selected from the Print Properties and select Print again Your OptiPrinter PRO will begin to print your disc ...

Page 17: ...r Inkjet Premium Glossy Premium Plus Glossy Premium Matt Colorfast Glossy Glossy 4800x1200dpi Other Photo Quality Text Quality The choice you make here will depend on the image you wish to print If you are printing basic text select Text Quality If printing basic graphics select White Inkjet For images where only the very best will do such as high resolution photos select Premium Inkjet or Premium...

Page 18: ...nt settings Default Premium Photo Quality Matt 4800x1200 dpi Premium Photo Quality Glossy 4800x1200 dpi Photo Quality Matt PhotoREt Photo Quality Glossy PhotoREt Best Inkjet PhotoREt Normal Inkjet 600x600 dpi Normal Text 300x300 dpi Fast Text 300x300 dpi Selecting a setting will automatically select the most suitable disc surface and print quality for the job in hand Example If you select Premium ...

Page 19: ... c Select Advanced Features and you are presented with the following options Fig 19 Ink Volume Select this feature to lessen or increase the amount of ink used to print a document Dry time Select this feature to increase the time the printer holds a document After printing if ink on your printed document smears Low Memory Mode Select this option to allow the draft to be printed if your computer do...

Page 20: ...OptiPrinter PRO CD DVD Inkjet Printer ZZ 004 821 20 Fig 19 ...

Page 21: ...tness or darkness or printed colors Color Tone Warmth or coolness of printed colors Color Space Defines the range of colors that can be printed sRGB sYCC is an appropriate color space for most print jobs Adobe RGB is an emerging color space that offers more colors than sRGB sYCC but which only works for images Fig 20 ...

Page 22: ...s option Display Ink Levels Estimates the amount of ink left in each cartridge Displays only when printing 10 5 Mask Settings The OptiPrinter PRO s built in mask determines the printable area for your image and prevents your image from being printed outside the printable area of the CD media you are using or onto the CD tray of the printer itself This mask should be used when printing discs using ...

Page 23: ...If you are using Discus software you MUST switch off the mask Standard Area Setting Adjust the printable area of your design Hub Area Setting To print on the central hub of a CD check this box and adjust dimensions accordingly Mask Origin To alter the origin of the mask when printing through a graphics package other than Discus Parameter Unit Select the size of unit you wish to make changes with I...

Page 24: ...necessary to recalibrate it to ensure a perfect image position on the CD This tab allows you to fine tune the position of the printed image with the CD Note In order to set the calibration the OptiPrinter Pro must be attached to your PC via the USB cable Calibration will not work if the printer is connected via the parallel port Click the Set Print Position button the Calibration Screen appears Se...

Page 25: ... in Fig 24 on the previous page 4 If the printer is in calibration the 2nd Test Print should sit directly on top of the 1st If this is not the case the Offsets need to be adjusted 5 Adjust the Offset Example 1 The 2nd test image prints out of line as shown in Example 1 the red broken circles are printing perfectly on the X Axis but too far down on the Y Axis To bring the two test prints together y...

Page 26: ...der Step 1 on the Calibration screen select the negative check box next to the X axis and the Y axis and enter a value in each between 1 and 5 6 Once you have entered a value repeat Steps 2 3 and 4 until both Test prints align Some trial an error will be required in order to get the alignment exactly right 7 When you have completed the calibration hit the Exit button the numbers you have entered a...

Page 27: ... ink If this is the case the printer cartridge light will stop flashing once the top cover is opened or the printer is printing The problem is not related to the ink volume if the light continues to flash when the top cover is opened 2 Power Light is Flashing The printer is preparing to print The light stops flashing when the printer has received all data 3 All Lights are flashing The printer may ...

Page 28: ...ems support personnel can be reached at VERITY SYSTEMS LTD VERITY SYSTEMS INC 2 Eastern Road 5441 Merchant Circle Unit A Aldershot Placerville Hampshire California GU12 4TD 95667 United Kingdom United States Tel 44 0 1252 796901 Tel 530 626 9363 Fax 44 0 1252 316555 Fax 530 626 9395 Email uksupport veritysystems com Email ussupport veritysystems com Open GMT Time Open PST Time ...

Page 29: ...oftware to create an image to print on the OptiPrinter PRO we recommend you start by creating a page 120 mm x 120 mm in your design software Introducing the Mask Unlike other CD DVD printers on the market the OptiPrinter PRO boasts a unique and easy to use mask which makes the accurate printing of CDs from graphics software packages such as CorelDRAW Photoshop easier than ever before The OptiPrint...

Page 30: ...d masks for the following types of media Standard CDs DVDs 120mm Business Card Round 63mm i e Saddle Hockey Business Card Round 61mm i e Saddle Hockey Business Card Round 58mm i e Saddle Hockey Business Card Rectangular 58mm Business Card Rectangular 63mm Mini CDs 80mm Select the media you wish to print from the drop down list and a picture of that mask will appear on the interface see Fig B Enabl...

Page 31: ...mmodate the slightest variation in printable media Inner Diameter This can be increased or decreased in size Height To adjust the height of the mask for CD business cards Width To adjust the width of the mask for CD business cards Corner Height To adjust the corner height of the mask for CD business cards Corner Width To adjust the corner width of the mask for CD business cards Hub Area Settings T...

Page 32: ...r from x 1mm to x0 1mm as shown below in Fig G This way tiny movements can be made to align the mask perfectly Parameter Unit As mentioned above the parameter unit can be changed from x1 mm to x 0 1 mm movements allowing you to adjust your mask by tiny increments at a time so that a perfect mask can be achieved Changing this setting to x 0 1mm will result in all measurements on the Mask interface ...

Page 33: ...anging ink cartridge see section 5 DO NOT manually force the CD tray into the printer From time to time the CD tray of the OptiPrinter PRO may collect deposits of ink where an image has printed directly onto the CD tray To clean the tray simply wipe with a moist cloth DO NOT put your hand or any other object inside the printer while it is printing DO NOT spill liquid onto the printer Getting the M...

Page 34: ...oad 5441 Merchant Circle Unit A Aldershot Placerville Hampshire California GU12 4TD 95667 United Kingdom United States Tel 44 0 1252 317000 Tel 530 626 9363 Fax 44 0 1252 316555 Fax 530 626 9395 Email sales veritysystems com Email ussales veritysystems com Website http www veritysystems com Supplied by ...

Reviews: