background image

UX700 I

NSTALLATION

 G

UIDE

27

C

HAPTER

 5

Verifone Service and Support

Contact your local Verifone representative or service provider for any problems 
with your device.

For product service and repair information:

USA – Verifone Service and Support Group, 1-800-837-4366, 


Monday - Friday, 8 A.M. - 8 P.M., Eastern time

International – Contact your Verifone representative 

Returning a 

Device for 

Service

Before returning the UX700 device, you must obtain an MRA number. The 
following procedure describes how to return one or more devices for repair or 
replacement (U.S. customers only). 

1

Get the following information from the printed labels at the back of each 
UX700 device to be returned:

Product ID, including the model and part number. For example, “UX700” 
and “M184-XXX-XXX-XXX.”

Serial number (S/N nnn-nnn-nnn)

2

Obtain the MRA number(s) by completing one of the following:

Call Verifone toll-free within the United States at 1-800-Verifone and follow 
the automated menu options.

Select the MRA option from the automated message. The MRA 
department is open Monday to Friday, 8 A.M.–8 P.M., Eastern Time.

Give the MRA representative the information you gathered in Step 1.

Complete the Inquiry Contact Form at 

https://www.verifone.com/en/us/

contact-us.

Address the Subject box to “Verifone MRA Dept.”

NOTE

Customers outside the United States are advised to contact their local Verifone 

representative for assistance regarding service, return, or replacement of devices 
and accessories.

Summary of Contents for UX700

Page 1: ...Verifone Part Number DOC184 001 EN A Revision A UX700 Installation Guide...

Page 2: ...lity of any example or sample program before placing the software into productive use This document including without limitation the examples and software programs is supplied As Is Verifone Inc 1 800...

Page 3: ...cting Unit Location 11 Choosing Mounting Location 11 Inside the Shipping Carton 11 Installing or Replacing SAM Cards 12 Inspecting the Connection Port 13 To Connect the Terminal to a PC 15 To Enable S...

Page 4: ...Returning a Device for Service 27 Accessories and Documentation 28 Connection Cables 28 Power Cables 28 Cleaning Kit 28 Documentation 29 CHAPTER 6 Troubleshooting Guidelines Device Does Not Start 30 D...

Page 5: ...s with other devices Chapter 3 Specifications Lists the power requirements and dimensions of the device Chapter 4 Maintenance and Cleaning Explains the maintenance of the device Chapter 5 Verifone Ser...

Page 6: ...UX700 Certifications and Regulations Sheet VPN DOC184 002 EN UX700 Quick Installation Guide VPN DOC184 003 EN Table 1 Document Conventions Convention Meaning Example Blue Text in blue indicates terms...

Page 7: ...rnet HW Hardware LCD Liquid Crystal Display MDB Multi Drop Bus MSR Magnetic Stripe Card Reader NAND flash Non volatile storage technology NFC Near Field Communications PCI Payment Card Industry PIN Pe...

Page 8: ...and NFC Contactless Reader including Apple Pay Google Pay and Samsung Pay mobile wallets The easy to read color touch screen supports all payment related user interactions and keypad for secure PIN e...

Page 9: ...trusion and supports a broad spectrum of software based security features PCI PTS 6 X approved for debit and other PIN based transactions EMV Level 1 Type approval Supports reliable security features...

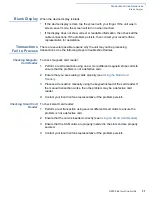
Page 10: ...lling or Replacing SAM Cards Inspecting the Connection Port Mounting the Device Using the Smart Card Reader Using the Device CTLS Transaction Contactless Considerations The contactless antenna is loca...

Page 11: ...secure product Tampering causes it to cease to function or to operate in an unsecured manner Unpacking the Shipping Carton To unpack the shipping carton 1 Carefully inspect the shipping carton and its...

Page 12: ...curity Access Module SAM card or replace the old card You can find three SAM slots and one Micro SD card slot on the UX700 see Figure 2 To install or replace SAM cards 1 Disconnect the device from all...

Page 13: ...put connectors Ethernet RS 232 USB A USB B and DC power To Connect the Terminal Power Supply The UX700 device can be powered from a PSU in the non Verifone system or by a Verifone Power supply It can...

Page 14: ...he Connection Port UX700 INSTALLATION GUIDE 14 Figure 3 UX700 Power Supply Connection TIP To protect against possible damage caused by lightning strikes and electrical surges consider installing a pow...

Page 15: ...nnection Port UX700 INSTALLATION GUIDE 15 To Connect the Terminal to a PC There are two RS232 connections COM1 COM2 Insert the RS 232 cable to the UX700 device and the PC Figure 4 Connecting to a PC 8...

Page 16: ...ce Switch This service switch is used to select safe boot for the Android processor Figure 6 Service Switches Service switch During power up press and hold the service switch to access the Android Pro...

Page 17: ...ssories and Documentation for cable part numbers and ordering information Mounting the Device Use the following procedure to mount the UX700 to a suitable mounting surface To mount the unit Align the...

Page 18: ...eader Insert the smart card to proceed with the EMV transaction EMV supports credit card and debit card transactions To Conduct a Smart Card Transaction 1 Position the smart card with the contacts fac...

Page 19: ...ard removal invalidates the transaction Figure 8 Inserting a Smart Card WARNING Vous allez perdre des fichiers de donn es de la transaction n est pas encore en m moire si il ya une perturbation dans l...

Page 20: ...tic card from the side of the device as shown in the illustration below Figure 9 Using the Multi Card Reader 3 Swipe the card through the magnetic card reader 4 If using a card insert the card and fol...

Page 21: ...CTLS Transaction The UX700 device supports contactless credit or debit card transactions To perform a contactless transaction gently tap the card or hold the card on the surface of the display on the...

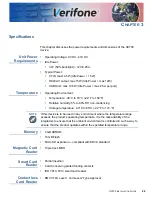
Page 22: ...non condensing Storage temperature 30 C to 80 C 22 F to 176 F Memory 2 GB SDRAM 16 GB Flash Micro SD expansion compliant with SD3 0 standard Magnetic Card Reader Triple track MSR Smart Card Reader Par...

Page 23: ...s Modules SAMs card slots Display 5 screen size 720 x 1280 HD resolution IPS LCD touchscreen External Dimensions Length 70 mm 2 75 Width 110 mm 4 33 Height 146 mm 5 75 Weight 586 g Processor Quad Core...

Page 24: ...Barcode Scanner UX700 INSTALLATION GUIDE 24 USB B Client port x 1 MDB x 1 GPIO x 1 Switched Power output x 1 Camera Barcode Scanner 2 MP Front camera QR code scanning Security PCI PTS 6 X approved SR...

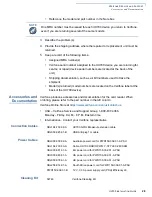
Page 25: ...ke it to the nearest authorized service facility for servicing or replacement For your safety have this device serviced only by a Verifone authorized service provider Cleaning and sanitizing The devic...

Page 26: ...SR should be cleaned regularly once per week is recommended The MSR can be cleaned with the Verifone cleaning card Part Number 02746 02 NOTE If using a commercially available cleaning card use ONLY an...

Page 27: ...the back of each UX700 device to be returned Product ID including the model and part number For example UX700 and M184 XXX XXX XXX Serial number S N nnn nnn nnn 2 Obtain the MRA number s by completin...

Page 28: ...refer to the part number in the left column Verifone Online Store at https www verifone com en us contact us USA Verifone Service and Support Group 1 800 837 4366 Monday Friday 8 A M 8 P M Eastern tim...

Page 29: ...ONE SERVICE AND SUPPORT Accessories and Documentation UX700 INSTALLATION GUIDE 29 Documentation VPN DOC184 002 EN UX700 Certifications and Regulations Sheet VPN DOC184 003 EN UX700 Quick Installation...

Page 30: ...es Not Show Correct Readable Info If the device display does not show correct readable info Check all the cable connections If the problem persists then contact your local Verifone representative for...

Page 31: ...card reader 1 Perform a test transaction using one or more different magnetic stripe cards to ensure that the problem is not a defective card 2 Ensure that you are swiping cards properly see Using th...

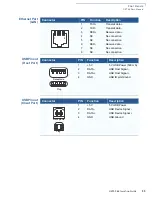
Page 32: ...N Function Description 1 Portpwr 9 to 43 V DC PowerOut max 1 A 2 NC No connection 3 NC No connection 4 GND Power ground 5 RXD Receive data 6 TXD Transmit data 7 CTS Clear to send 8 RTS Request to send...

Page 33: ...ata 4 NC No connection 5 NC No connection 6 RXD Receive data 7 NC No connection 8 NC No connection 1 8 Connector PIN Function Description 1 5 V 5 V USB Power 500 mA 2 DATA USB Host Signal 3 DATA USB H...

Page 34: ...WAKE Signal 4 Slave TX Slave TX 5 Slave RX Slave RX 6 MDB GND Ground Connector PIN Function Description 1 DC 9 43 9V 43V Power Output 2 GPIO_1_CON GPIO 3 GPIO_2_CON GPIO 4 GPIO_3_CON GPIO 5 GPIO_4_CON...

Page 35: ...UX700 Installation Guide Verifone Part Number DOC184 001 EN A Revision A Verifone Inc Tel 1 800 Verifone www verifone com...

Reviews: