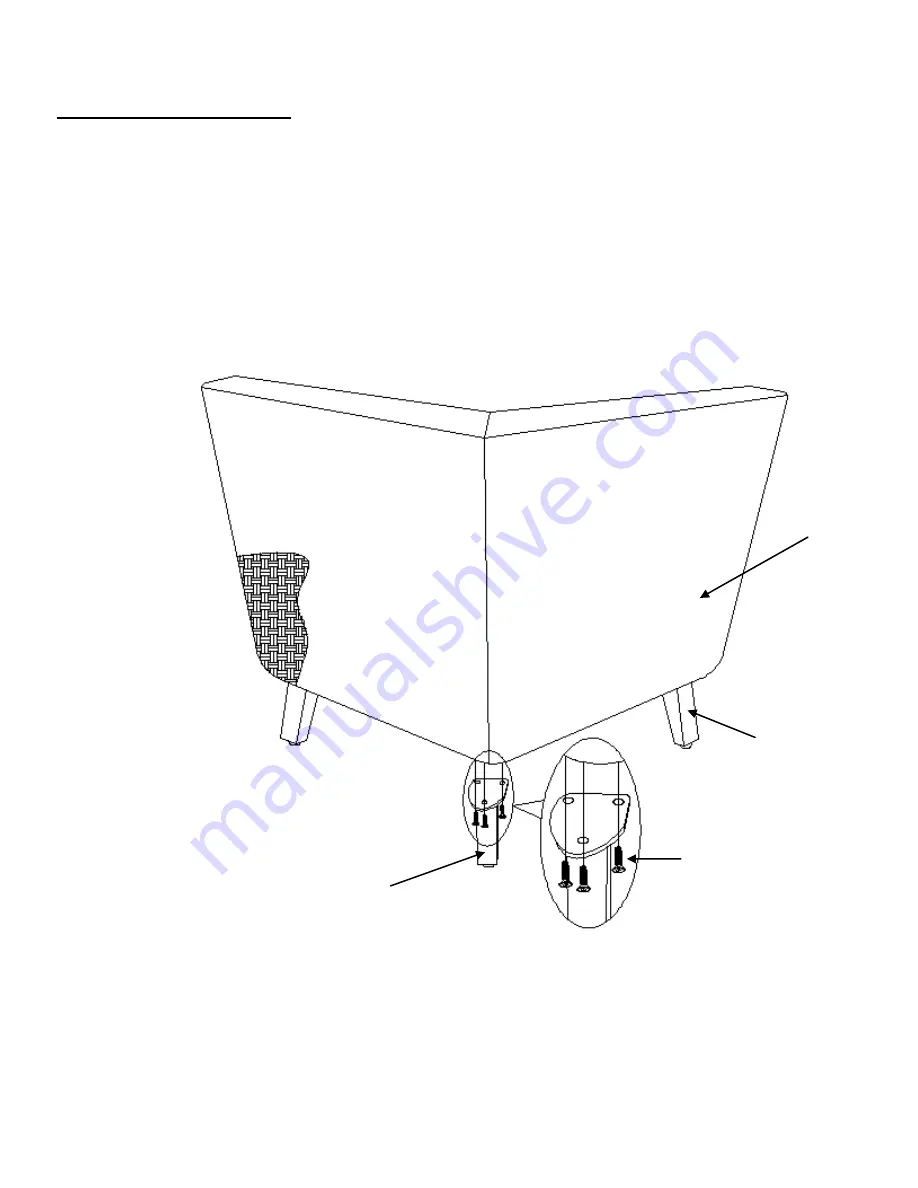
VERANDA CLASSICS 1500072 Manual Download Page 7


Figure 4


4. CORNER ASSEMBLY 


Attach Corner Back Leg (I) to Corner Seat Frame (C) loosely with screws (K) using Allen 
wrench (L). Once the leg is aligned correctly, tighten screws (K) with Allen wrench (L).  

  
Please make sure the leg is attached as shown in Figure 4 below. 


C


H


Summary of Contents for 1500072

Page 1: ...UTURE REFERENCE READ CAREFULLY For Outdoor Use Only Customer Service E Mail customerservice foremostgroups com 8 30a m 5 00p m EST M F Toll Free 1 855 390 5474 Int 001 855 286 4931 Fax 973 428 8026 Website www foremostgroups com 906 Murray Road East Hanover New Jersey 07936 US ...

Page 2: ...uctions carefully and thoroughly before assembling Check parts against the parts list to make sure you have all the parts needed for proper assembly Familiarize yourself with the inventory of parts and the accompanying illustrations to ensure safe and proper assembly Failure to tighten bolts may cause injury Do not force components and over tighten the nuts during assembly Place chair on a non abr...

Page 3: ...NCH 1 M RIGHT BACK CUSHION 1 N RIGHT SEAT CUSHION 1 O ARMLESS BACK CUSHION 2 P ARMLESS SEAT CUSHION 2 Q CORNER BACK CUSHION 2 R CORNER SEAT CUSHION 1 S LEFT BACK CUSHION 1 T LEFT SEAT CUSHION 1 U OTTOMAN SEAT CUSHION 1 V PILLOW 5 W CLIP 8 PARTS LIST CONTINUED ...

Page 4: ...e the bases are aligned correctly tighten all screws K with Allen wrench L Please make sure legs are attached and facing forward as shown in Figure 1 below A F K G Straight legs should be attached facing the front K Thinner part of base on the outside Thinner part of base on the outside Remove all protective material carefully Avoid cutting the surface of the furniture while removing the packaging...

Page 5: ...e the bases are aligned correctly tighten all screws K with Allen wrench L Please make sure legs are attached and facing forward as shown in Figure 1 below A F K G Straight legs should be attached facing the front K Thinner part of base on the outside Thinner part of base on the outside Remove all protective material carefully Avoid cutting the surface of the furniture while removing the packaging...

Page 6: ...C upside down on a soft surface Attach Corner Base H to Corner Seat Frame C loosely with screws K using Allen wrench L Once the base is aligned correctly tighten all screws K with Allen wrench L Please make sure the base is attached as shown in Figure 3 below C H K ...

Page 7: ...tach Corner Back Leg I to Corner Seat Frame C loosely with screws K using Allen wrench L Once the leg is aligned correctly tighten screws K with Allen wrench L Please make sure the leg is attached as shown in Figure 4 below C H K I ...

Page 8: ...to Left Seat Frame D with screws K using Allen wrench L Once the bases are aligned correctly tighten all screws K with Allen wrench L Please make sure legs are attached and facing forward as shown in Figure 5 below D F K G K Straight legs should be attached facing the front Thinner part of base on the outside Thinner part of base on the outside ...

Page 9: ...side down on a soft surface Attach Ottoman Legs J to Ottoman Frame E loosely with screws K using Allen wrench L Once the legs are aligned correctly tighten all screws K with Allen wrench L Please make sure legs are attached correctly as shown in Figure 6 below E J K ...

Page 10: ...carefully stretch the clip W and attach seat sections as illustrated in Figure 7 below MELROSE 6 PC SECTIONAL SET FULL SET ASSEMBLY Figure 7 7 With the help of another person carefully turn the assembled pieces to their upright positions ...

Page 11: ...9 Place the cushions and the throw pillows on the sections as shown in Figure 8 below A B C B D E U N M V V V V V P O Q Q R O P T S Figure 8 ...

Page 12: ...1 Parramatta Road Kawasaki ku Kawasaki shi Gwangmyeong si Kaohsiung Taiwan Lidcombe NSW 2141 Kanagawa 210 0832 Japan Gyeonggi do 14347 Korea Company Tax ID 96972798 Australia 044 281 2600 1899 9900 0800 885 889 www costco com au www costco co jp www costco co kr www costco com tw CARE MAINTENANCE Clean furniture frame with wet towel using mild soap and water solution Dry completely with soft towel...

Reviews: