background image

32

Thumbnails - continued
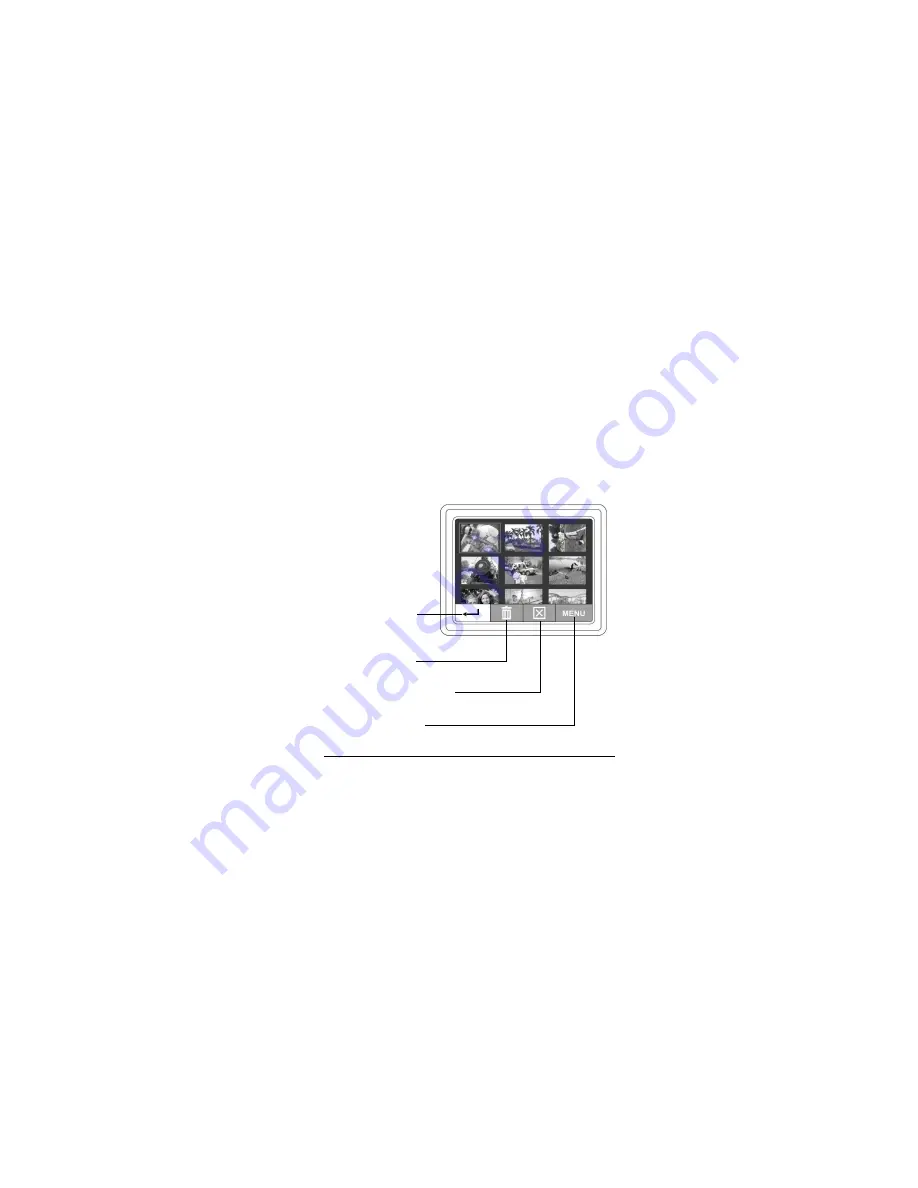
Press 

OK/MENU 

to bring up the menu bar.

Use the Scroll Up button to scroll right to left and use the Scroll Down 
button to scroll left to right.

To turn off menu bar and
continue scrolling through 

To erase the selected 

image

thumbnails

To enlarge the selected image

Back To Main Menu

Summary of Contents for Capture 1300

Page 1: ...ur camera and offers helpful tips for enjoying your camera for years to come The Veo Capture 1300 Digital Camera can be used as a digital still camera or a Personal Computer based Internet web camera...

Page 2: ...ra Kit Contents Your Veo Capture 1300 Digital Camera Kit includes the following items Veo Capture 1300 Digital Camera Wrist Strap User s Guide Camera Software Suite CD ROM USB Cable 4 Energizer Alkali...

Page 3: ...Veo Capture 1300 Digital Camera 3 Camera Features and Functions Front of the camera...

Page 4: ...4 Back of the camera...

Page 5: ...RAM or better 280 MB available hard drive space CD ROM drive Available USB port Display adapter capable of 800x600 in 16 bit color Standard microphone for sending video mail and videoconferencing Int...

Page 6: ...6 Attaching the Wrist Strap Attach the wrist strap as shown below...

Page 7: ...d batteries with new batteries 1 Slide and open the battery door located on the side of the camera 2 Insert the batteries as indicated in the illustra tion Close the battery door by sliding it in unti...

Page 8: ...back up battery maintains any images that are stored in the camera s internal memory Note Always replace the camera s AA batteries when the LCD Status indicator indicates low batteries Doing so will...

Page 9: ...k Up Battery Installation and Removal The back up battery compartment is located on the bottom of the camera To gain access to the compartment squeeze the spring tabs on both sides of the cradle and p...

Page 10: ...back into the camera until end tabs snap into place Note If the back up battery charge is low or no back up battery is in the camera the bbL symbol will appear in the LCD screen for a few seconds when...

Page 11: ...memory insert either a CompactFlash Type I or CompactFlash Type II memory card not included in the CompactFlash compartment as shown in the illustration below Insert the CompactFlash card with the fro...

Page 12: ...compartment cover 3 Gently push the EJECT slider 4 Remove the card from the compartment and close the cover Note Make sure the camera s power is turned off before removing a CompactFlash card Your cam...

Page 13: ...nal memory of the camera and a CompactFlash card is inserted in the camera the camera checks to see if there is enough memory space available on the card to accept all the pictures in the internal mem...

Page 14: ...to either delete images from the camera s memory or transfer pictures to your computer in order to take additional pictures To delete pictures from the CompactFlash card make sure the CompactFlash ca...

Page 15: ...eo Capture 1300 Digital Camera Note Formatting a CompactFlash card will erase any existing information on the card including files from other cameras or devices Be sure to transfer important data to y...

Page 16: ...tton again to display the SETUP Menu 6 Use the Scroll Down button and highlight FORMAT CF 7 Press the OK MENU button again A warning message will appear on the screen 8 Select CONTINUE to format your...

Page 17: ...Use AUTO mode to let the camera decide if the flash is needed Use ON mode to force the flash to always fire ON mode can help if there are shadows on your subject OFF mode forces the flash to never fi...

Page 18: ...he top of the camera Use the resolution button to switch between 1 3 Mega Pixel and VGA image mode Note Resolution affects image size and file size Use 1 3 Mega Pixel for printing anything larger than...

Page 19: ...e color LCD will be disabled when the batteries reach the low condition If you press the Display On button you will hear three quick beeps and the display will remain off Empty the batteries are too w...

Page 20: ...s LCD indicates whether a CompactFlash card has been properly inserted into the camera Please check that this icon is present after inserting your card This will let you know that the card has been fu...

Page 21: ...is inserted Otherwise it reflects the remaining internal memory The remaining picture count must be estimated because pictures take varying amounts of memory to store based on the complexity of the sc...

Page 22: ...22 Color LCD Menus To see an image in the color LCD press the LCD Display On Off button on the back of the camera or press OK MENU to go directly to the main menu on off Color LCD off Color LCD on...

Page 23: ...Veo Capture 1300 Digital Camera 23 Setup Quality Sets the quality of the photos The value selected remains the default until the setting is changed again Setup...

Page 24: ...th largest file size Best print quality BETTER initial default Moderate compression GOOD Highest compression Lowest image quality with smallest file size Suitable for web or email Note For best qualit...

Page 25: ...ure 1300 Digital Camera 25 Setup Quick View Displays the photo you have just taken on the color LCD and gives you a chance to delete the photo ON Quick View ON OFF default to conserve battery power Qu...

Page 26: ...ick View is ON taking a picture will give you the option to cancel saving a picture Press Menu OK to cancel saving the picture The picture will be automatically saved after a short interval of time ha...

Page 27: ...ASE ALL to erase all the pictures stored either inside the CompactFlash Card or the internal memory To delete photos from the CompactFlash Card make sure the CompactFlash card is in the camera To dele...

Page 28: ...28 Setup Format CF Formats or reformats a CompactFlash Card CANCEL default Cancel formatting CONTINUE Formats the CompactFlash Card and removes all files from it Format CF...

Page 29: ...PLAYBACK to view photos that are stored in the camera Selecting the PLAYBACK command displays the last photo taken on the color LCD Press the Scroll Up button to scroll forward and press the Scroll D...

Page 30: ...d use the Scroll Down button to scroll left to right Note With a CompactFlash card inserted you can only view the pictures on the card To view pictures stored in internal memory please remove the card...

Page 31: ...Veo Capture 1300 Digital Camera 31 Thumbnails Thumbnails display nine photos at a time on the color LCD Use the LCD Scroll Up and Down buttons to select a thumbnail Thumbnails...

Page 32: ...menu bar Use the Scroll Up button to scroll right to left and use the Scroll Down button to scroll left to right To turn off menu bar and continue scrolling through To erase the selected image thumbn...

Page 33: ...gital Zoom allows you to enlarge the image 2x the normal size Note Digital zoom applies to every photo if enabled until you disable the digital zoom function Note Images will automatically be captured...

Page 34: ...34 Exiting from the Main or Setup Menu Exiting from either theMain or Setup Menu will return to eitherLive Preview or OFF depending on how you entered menu mode or Setup Main...

Page 35: ...lizes more battery power 3 Hold the camera steady Press and hold the shutter button until the camera beeps The camera decreases the picture counter in the LCD status display by one Note The picture co...

Page 36: ...the screen to complete the installation 1 Turn on the camera 2 Connect the USB cable to any available USB port on your computer 3 Connect the other end of the cable to the camera as shown below Note...

Page 37: ...pter is not included in your Veo Capture 1300 Digital Camera Kit To order the adapter please contact us at the web page or phone number below http www veoproducts com purchase htm or 408 474 0494 Mond...

Page 38: ...oes not appear click on Start Run and type in D veoautorun exe D refers to the letter of your CD ROM drive however you may need to change the drive letter if your CD ROM drive is located as another dr...

Page 39: ...ture 1300 screen will appear with various activities you can accomplish with your camera Download Manage Pictures launch ArcSoft PhotoImpression 3 0 to download your pictures Make Panoramic Pictures l...

Page 40: ...rogram enables you to edit retouch enhance or add special effects to digital images with point n click simplicity It also offers a great variety of project templates for creating greeting cards and ca...

Page 41: ...om your camera follow the steps below 1 Click the Get Photobutton on the Main Screen and select Camera Scanner A list of your TWAIN devices will appear 2 Under Select Source select Veo Capture 1300 Ca...

Page 42: ...urrent image to it 1 Click on Get Photo on the Main Screen and selectAlbum 2 Select the Album that your picture is currently saved in and then double click on the picture to select the picture 3 The p...

Page 43: ...ant email Finally click OK to start your email program which will send off the email with the picture attached Note If your email program is not MAPI compliant or if MAPI is not enabled on your Comput...

Page 44: ...bines multiple photos into a single panoramic picture It enables you to create eye catching large format panoramas with point and click simplicity You can also view your panoramas from different persp...

Page 45: ...deo and image editing software program The program enables you to create and edit new videos using existing video and image files making desktop video presentations for home business and the web Getti...

Page 46: ...nline help If you need more information or instructions on how to use a specific feature or tool click the Help button in the upper right hand corner within the specific program Technical Support Phon...

Page 47: ...orded video updating webcams and digital pictures Getting Started with SpotLife 1 Double click on the Veo Capture 1300 icon located on your desktop 2 Click Broadcast Internet Video to launch SpotLife...

Page 48: ...ng To ensure that you obtain the most from your camera experience we have compiled this brief instruction guide to help you get started Note that this guide is provided only as a reference and is not...

Page 49: ...tarting Windows Messenger 1 Click on Start All Programs Windows Messenger to start Windows Messenger 2 You will be prompted with the sign in screen Enter your e mail address and password and then clic...

Page 50: ...The people on your contact list will appear If you want to connect with another user for videoconferencing you will need to add them to your contact list using the Add button Follow the rest of the di...

Page 51: ...n the person s name that you would like to connect with A conversation window will appear where you can do the following Start camera Start talking Send a file Text messages Turn on your camera for vi...

Page 52: ...ick the Start Camera button The text message window will also display the message You have asked to have a video and voice conversation Please wait for a response or Cancel Alt Q the pending invitatio...

Page 53: ...on Once connected to the other person your screen will appear similar to the image pictured The other person s video will appear in the large video window while your own video will appear in the lower...

Page 54: ...u will be able to communicate with friends and family through Microsoft NetMeeting To ensure that you obtain the most from your camera experience we have compiled this brief instruction guide to help...

Page 55: ...ke sure any other video camera applications are closed before starting Microsoft NetMeeting 1 Look for the NetMeeting icon on your desktop or Quick Launch bar and then double click on it to start Micr...

Page 56: ...tMeeting continued 3 Turn your camera on by clicking the Play Pause button to initiate the video stream Adjust the camera angle and focus to ensure a clear picture of you for your videoconferencing pa...

Page 57: ...user is easy via the MSN Messenger service simply download and install MSN Messenger from Microsoft at http messenger msn com Directions for installing and setting up MSN Messenger will be shown on t...

Page 58: ...send it to the other person who will use NetMeeting to call you To obtain your IP address first connect to your Internet Service Provider Start NetMeeting and then click on Help About Windows NetMeet...

Page 59: ...The resources listed below are third party sources and are neither endorsed nor supported by the camera manufacturer and have been provided only as a reference Phone 800 936 5700 425 635 7123 Toll Fre...

Page 60: ...ettings 2 What type of memory card does the camera use The camera utilizes only CompactFlash cards We recommend CompactFlash cards that carry the CompactFlash Association Logo 3 What are the recommend...

Page 61: ...also be purchased by contacting us at the web page or phone number below http www veoproducts com purchase htm or 408 474 0494 Monday through Friday from 8 30 a m to 5 30 p m Pacific Time 6 How do I c...

Page 62: ...recommended 8 What are some suggestions to conserve the batteries It is recommended that the color LCD be turned off whenever possible to significantly conserve battery life 9 Cleaning the lens and L...

Page 63: ...Verify that the USB port on the computer is functioning properly Check to see if the camera power is on Problem Cannot use the internal memory Pictures do not save to the internal memory Solution Chec...

Page 64: ...ra making sure that the batteries are still full D Click on Start Settings Control Panel System Device Manager Universal Serial Bus Controller Windows 98 ME or Click on Start Settings Control Panel Sy...

Page 65: ...r You can then drag and drop the files from your CompactFlash card to your computer Problem The CompactFlash card is not detected when inserted into the camera Solution Open the CompactFlash card slot...

Page 66: ...ur e mail If you are ready to send your e mail press SEND NOW 5 If you are not sure how to attach files with your particular e mail program please refer to the program documentation or contact America...

Page 67: ...nd button to send your e mail 8 For any questions related to Hotmail please contact Hotmail Support or click on the Help link on the Hotmail webpage Yahoo Mail 1 Start Yahoo Mail and log in to your Ya...

Page 68: ...dy to send the e mail click on the Send button to send your e mail 10 For any questions related to Yahoo please contact Yahoo support for further assistance Camera Precautions To avoid electrical shoc...

Page 69: ...equently Asked Questions and more information about the Veo Capture 1300 Digital Camera please see our website at http www veoproducts com technical htm For Technical Support by phone please call 408...

Page 70: ...roduct does not function due to manufacturer defects during the warranty period the manufacturer at its option will either repair or replace this product with one that is functionally equivalent These...

Reviews: