background image

E - 6

Parts and Functions

(Continued on next page)

(Continued on next page)

(Continued on next page)

(Continued on next page)

(Continued on next page)

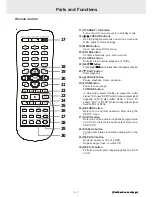
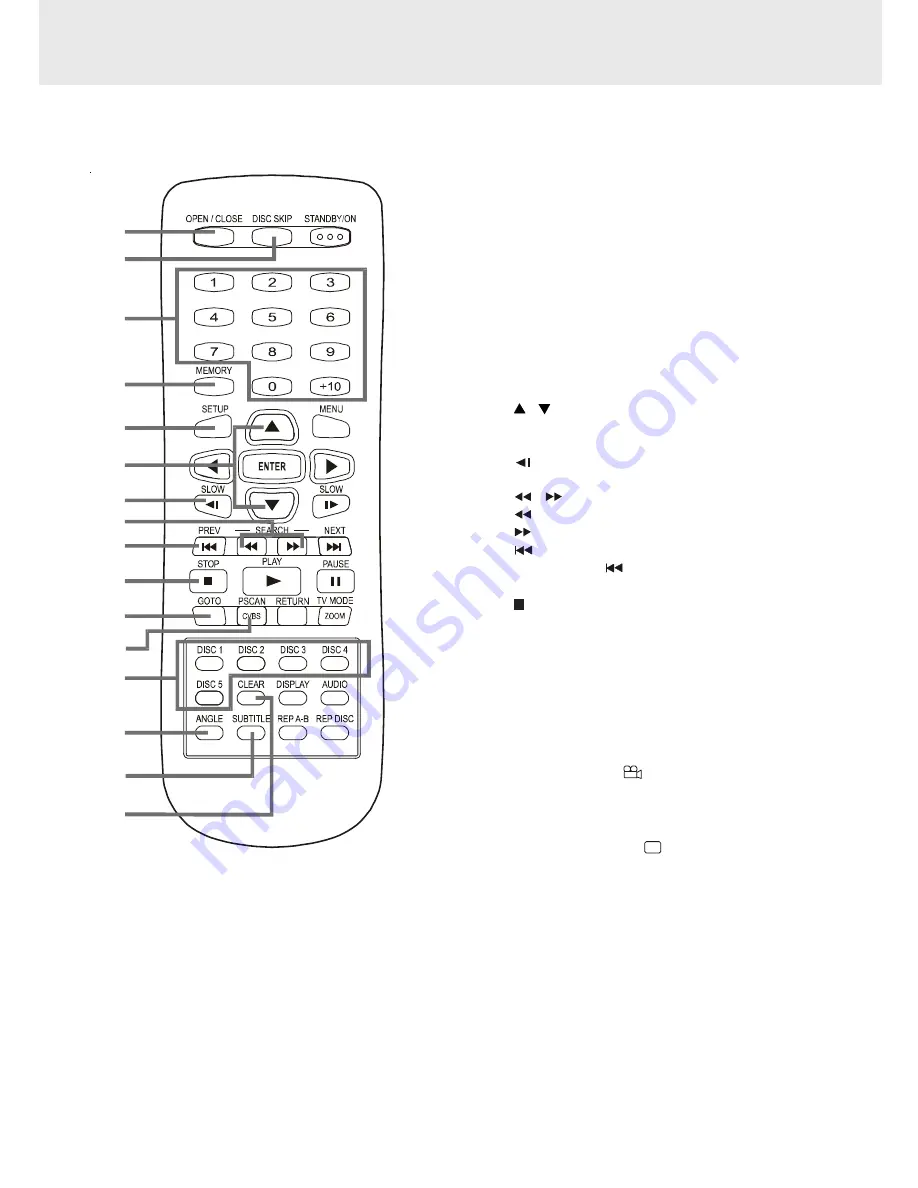
Remote Control

1)

OPEN/CLOSE button
Use to open or close the disc tray.

2)

DISC SKIP button
To change next available disc.

3)

Number (0 - 9) and (+10) buttons
Use when creating programs, and entering a
parental level password. To select numbers over 9,
press +10 button and then the second no. for
example, to enter 18, press +10 and then 8.

4)

MEMORY button
Enter the number of a selected chapter or track.

5)

SETUP button
Selects the SET UP menu screen.

6)

 /   CURSOR buttons

Use to highlight selections on a menu screen
and  adjust certain settings.

7)

 SLOW button

Perform slow reverse playback of DVDs.

8)


 SEARCH buttons

 SEARCH: Fast reverse playback.
 SEARCH: Fast forward playback.

9)

 PREV button

Press PREV 

 button to go back to previous

chapters/tracks.

10)

  STOP button

Stop playback.

11) GOTO button

Skip directly to a specific location on a DVD
disc.

12) P. SCAN/CVBS button

Changing YUV output to Progressive Scan
Video mode or back to CVBS mode.

13) DISC 1 -5 select buttons

14) ANGLE button 

S w i t c h   t h e   c a m e r a   a n g l e   o f   t h e   v i d e o
presentation when scenes with multiple camera
angles are recorded on a DVD.

15) SUBTITLE button 

.....

S e l e c t   o n e   o f   t h e   s u b t i t l e   l a n g u a g e s
programmed on a DVD.

16) CLEAR button

Clear input selections and cancel certain
playback functions.

1
2

3

4

5

6
7

8

9

10
11
12
13

14

15
16

Summary of Contents for SVP580

Page 1: ...5 DVD CD PLAYER OWNER S MANUAL CD PLAYBACK CD R R VIEWER 4 VENTURER SVP580 ...

Page 2: ... home and other limited viewing uses only unless otherwise authorized by Macrovision Corporation Reverse engineering or disassembly is prohibited On Placement Do not use the Unit in places which are extremely hot cold dusty or humid Place the Unit on a flat and even surface Do not restrict the air flow of the Unit by placing it in a place with poor air flow by covering it with a cloth or by placin...

Page 3: ...aken so that the grounding or polarization means of an appliance are not defeated 12 Power Cord Protection Power supply cords should be routed so that they are not likely to be walked on or pinched by items placed upon or against them paying particular attention to cords at plugs convenience receptacles and the point where they exit from the appliance 13 Cleaning The appliance should be cleaned on...

Page 4: ...play 9 DisplayInformation 9 Setup 10 12 ConnectingyourTV 10 11 Connectinganothersource 11 TurningontheUnitandTV 12 Powercordconnection 12 Playing a Disc 13 15 PlayingDisc 13 Pausingplayback stillmode 13 Stoppingplayback 13 Toskiptoadifferenttrack 13 FastFoward FastReverse 14 Slow motionplay 14 Skip Forward Reverse 14 Zoomingintoanimage 14 Angleselection 14 15 Audioselection 15 Subtitleselection 15...

Page 5: ...it if they were purchased from outside your geographic area or made for business purposes Title Chapter and Tracks DVDs are divided into titles and chapters If the disc has more than one movie on it each movie would be a separate title Chapters are sections of titles Audio CDs are divided into tracks A track is usually one song on an Audio CD Note Numbers identify each title chapter and track on a...

Page 6: ... avoid damage caused by battery leakage corrosion Do not mix old and new batteries Do not mix ALKALINE standard CARBON ZINC or rechargeable NICKEL CADMIUM batteries 2 Insert two AAA or UM 4 size batteries Using the Remote Control Point the Remote Control at the REMOTE SENSOR located on the Unit When there is a strong ambient light source the performance of the infrared REMOTE SENSOR may be degrade...

Page 7: ...ghlight selections on a menu screen and adjust certain settings 7 SLOW button Perform slow reverse playback of DVDs 8 SEARCH buttons SEARCH Fast reverse playback SEARCH Fast forward playback 9 PREV button Press PREV button to go back to previous chapters tracks 10 STOP button Stop playback 11 GOTO button Skip directly to a specific location on a DVD disc 12 P SCAN CVBS button Changing YUV output t...

Page 8: ...shows AUTO which means output signal depends on DVD disc either NTSC or PAL TV shows PAL or NTSC which means output signal fixed to PAL or NTSC 26 RETURN button Return to the normal operation after using the SETUP menu 27 AUDIO button Select one of the audio soundtracks programmed on a DVD or selects the audio output mode on a AUDIO CD 28 DISPLAY button Change disc status information displayed on ...

Page 9: ...ck 15 VIDEO OUT jack 16 COMPONENT VIDEO jacks Y PB CB PR CR Front Panel 7 PAUSE button Pause playback frame advance 8 PLAY button Press to start or resume playback 9 SKIP buttons PressSKIP buttontogobacktopreviouschapters tracks PressSKIP buttontoadvancetochapters tracks 10 Remote Sensor Receive the remote control unit signals 11 DISC 1 5 indicators 12 disc skip button To change next available dis...

Page 10: ...d and 1 There is no disc in the tray 2 The disc type is not playable in this Unit 3 The disc is not loaded correctly upside down etc The display changes to show other indicators Freezes the image on the screen or pauses audio playback The display changes to show other indicators Repeat a specific section The operation is not permitted by the DVD Unit or the disc TV Screen No Disc x 2 x 2 Loading D...

Page 11: ...tputs DVD Some TVs or monitors are equipped with component video inputs that are capable of reproducing a progressively scanned video signal Using the Audio cable not supplied connect the left right AUDIO OUT jacks on your Unit to the left right AUDIO IN jacks on your TV and the Component video cable not supplied connect the Green plug Y VIDEO OUT jack on your Unit to Y VIDEO IN jack on your TV th...

Page 12: ...tected When you connect the Unit to other equipment be sure to turn off the power and unplug all of the equipment from the wall outlet before making any connection Refer to the instruction manual of the connected equipment as well DolbyDigital Dolby Digital is a sound system developed by Dolby Laboratories Inc that gives movie theatre ambience to audio output when the Unit is connected to a Dolby ...

Page 13: ...nnected the Unit successfully the DVD logo start up picture will appear on your TV screen Power cord connection Make sure that all the components and speakers are connected correctly To prevent electrical shock match wide blade of plug to wide slot fully insert Be sure the AC power cord is disconnected and all functions are off before making connections When you are not going to use the Unit for a...

Page 14: ...ack Notes Use the open close button on the front panel to open or close the disc tray Do not push the disc tray or you may damage the Unit Let the disc tray open completely before removing the discs Press the open close button to close the disc tray after you remove the discs If you use the open close button on the front panel to open the disc tray the unit will stop playing The disc holder will r...

Page 15: ...aying it DVD CD Fast Forward Fast Reverse 1 Press the SEARCH or SEARCH button when a disc is playing The disc begins fast scan at x2 speed Four speeds are available Each time SEARCH or SEARCH button is pressed the speed of fast scan changes in the following sequence 2 Press the PLAY button when you reach the desired point to resume playback at normal speed Slow motion play 1 Press the SLOW or SLOW...

Page 16: ...age does not change About two seconds later playback continues with the new subtitle you selected The number of languages recorded differs depending on the disc If no button is pressed within a few seconds playback continues without changing the current subtitle This function can only be used for discs on which subtitles have been recorded in multiple languages On some DVDs subtitles are activated...

Page 17: ...on to confirm Time skip Elapsed time from the beginning of the currently playing chapter and the remaining time from the beginning of the currently playing title Press the GOTO button to set your desired point to start playback then press the ENTER button to confirm Angle setting The current angle is displayed When a disc with only one angle is played back Angle 1 1 is displayed Press the ANGLE bu...

Page 18: ...u want to play you can locate a specifc title chapter track by directly selecting a title chapter track number 1 Press the GOTO button to search your desired title chapter track 2 Press or button to highlight a title chapter track and press the corresponding number button s for the chapter you want 3 Press the ENTER button to confirm The Unit will start playback about 3 seconds later DVD CD contin...

Page 19: ...ayback DVD DVD DVD CD Locating a specific time You can move to a specific location by entering its corresponding time hours minutes seconds 1 Press the GOTO button 2 Press or button to highlight time 3 Press the corresponding number buttons for the setting point you want The first two numbers you entered represent hours The second two numbers you entered represent minutes The third two numbers you...

Page 20: ...ce the programmed selections will be cleared If you press the CLEAR button while you are entering a title or chapter the currently entered numbers will be erased and you can reset the numbers again 3 Use or button to other field 4 Repeat steps 2 to 3 5 Press the PLAY button to start the programmed playback Programmable memory Track programmed playback 1 Press the MEMORY button while the disc is st...

Page 21: ...discs 3 While the disc is playing press the REP DISC button until the Repeat All indicator displays on the screen All discs are played repeatedly To resume normal playback 4 Press the REP DISC button until the Off indicator displays on the screen Repeating a specific section You can play a specific section repeatedly 1 While the disc is playing press the REP A B button at the beginning of the sect...

Page 22: ...utton Note You can not play in Fast reverse or Fast forward during MP3 playback On screen display Turn on your TV to view the on screen display of MP3 files Press the or CURSOR button on the remote control to select the file you want to listen to then press ENTER button and this selected file is located and played back Notes The ability of this Unit to read MP3 discs is dependent on the following ...

Page 23: ...o confirm The image you selected will show on TV in Full Screen and automatically display one by one again in about 6 seconds intervals You can press the PAUSE button to interrupt playback and press the PLAY button to resume playback You also can use GOTO function or use the numbered buttons to enter the number to quickly select any image You can press the TV MODE ZOOM button to enlarge the pictur...

Page 24: ...on to select the Language then press the ENTER button 3 Use or button to Audio then press the ENTER button 4 Use or button to English then press the ENTER button 5 To exit the FUNCTION SETUP MENU and return to the normal screen press the RETURN button STEP 3 STEP 4 STEP 5 Language Video Audio Rating OSD Menu Subtitle Audio DVD Menu English English English English Language Video Audio Rating OSD Me...

Page 25: ... or button to select TV Shape then press the ENTER button 4 Use or button to shift and select the TV type then press the ENTER button 5 To exit the FUNCTION SETUP MENU and return to the normal screen press the RETURN button STEP 2 STEP 3 STEP 4 4 3 Letter Box NTSC CVBS Language Video Audio Rating TV Shape TV System Video Output 4 3 Letter Box NTSC CVBS Language Video Audio Rating TV Shape TV Syste...

Page 26: ... select When you play DVD discs recorded in the 4 3 picture size only the playback picture always appears in the 4 3 picture size regardless of the TV shape setting If you select 16 9 wide screen mode and you own a 4 3 TV set the DVD playback picture will be horizontally distorted during playback Images will appear to be horizontally compressed Always be sure that your TV shape conforms to the act...

Page 27: ...lected instead of CVBS AUDIO setting Digital Out 1 Press the SETUP button 2 Use or button to select Audio press the ENTER button 3 Use or button to select Digital Out then press the ENTER button 4 Use or button to select Digital Out type then press the ENTER button 5 To exit the FUNCTION SETUP MENU and return to the normal screen press the RETURN button Raw Use this setting when the Unit is connec...

Page 28: ...ENTER button press the CLEAR button and enter your 4 digit security code again You cannot play DVD discs rated higher than the level you selected unless you cancel the parental lock function The parental lock level is equivalent to the following ratings Level 1 Kid Safe Level 5 PG R Level 2 G Level 6 R Level 3 PG Level 7 NC 17 Level 4 PG 13 Level 8 Adult 5 To exit the FUNCTION SETUP MENU and retur...

Page 29: ...e or button to shift and select Yes then press the ENTER button 5 To exit the FUNCTION SETUP MENU and return to the normal screen press the RETURN button Customizing the Function Settings Note When you reset the Unit to the factory default the Unit will take 3 5 seconds to reset STEP 2 STEP 3 STEP 4 Language Video Audio Rating Language Video Audio Rating 8 Adult No Language Video Password Parental...

Page 30: ...o Portuguese Quechua Rhaeto Romance Kirundi Romanian Russian Kinyarwanda Sanskrit Sindhi Sangho Serbo Croatian Singhalese Slovak Language Name Slovenian Samoan Shona Somali Albanian Serbian Siswat Sesotho Sundanese Swedish Swahili Tamil Telugu Tajik Thai Tigrinya Turkmen Tagalog Setswana Tonga Turish Tsonga Tatar Twi Ukrainian Urdu Uzbek Vietnamese Volapük Wolof Xhosa Yoruba Chinese Zulu Code MG M...

Page 31: ...h a cleaning cloth NEVER use solvents such as benzine or alcohol to clean the disc Do NOT use irregular shape discs example heart shaped octagonal etc They may cause malfunctions Check that the AC power cord is connected The region number of the disc doesn t match the region number of this Unit The TV is not set to receive DVD signal output The video cable is not connected The TV is not turned on ...

Page 32: ...fecting the Unit Remove any obstacles between the remote and the Unit Use the remote near the Unit Point the remote at the remote sensor on the Unit Replace all the batteries in the remote with new ones There is no disc inside No Disc appears on the TV screen Insert the disc correctly with the playback side facing down on the disc tray Clean the disc A non NTSC or PAL disc has been inserted The Un...

Reviews: