background image

- 18 -

PLAYING A DISC

Angle Selection

Some DVDs contain scenes that have been shot from a number of different angles. For these discs, the
same scene can be viewed from each of these different angles.

1. While you are playing a DVD with different angles recorded, press the ANGLE button to view the

number of current angles available.

2. Press the ANGLE button repeatedly to change the scene to the next angle in those recorded.

• About two seconds later, playback

continues from the new angle
selected.

Notes:

• This function can only be used for discs on which scenes shot from multiple angles have been

recorded.

• If only one angle is recorded, “ 1/1 ” is displayed.

Notes:
• If only one language is recorded, the language does not change.
• About two seconds later, playback continues with the new subtitle selected.
• The number of languages recorded differs depending on the disc.
• If no button is pressed within a few seconds, playback continues without changing the current subtitle.
• This function can only be used for discs on which subtitles have been recorded in multiple languages.
• On some DVDs, subtitles are activated from the main menu of the DVD. Press the MENU button to

activate the main menu.

Subtitle Selection

1. While a DVD is playing, press the SUBTITLE button to display the current language setting, as shown

in the example below.

2. Press the SUBTITLE button repeatedly

to select the desired subtitle language.

3. Press the 

 / 

 button to select On or

Off.

• If no button is pressed within 10

seconds, playback continues without
changing the current angle.

Audio Selection

On some discs, the sound is recorded in two or more formats. Follow the directions below to select the
type of playback.
1. While a disc is playing, press the AUDIO button to show the current audio format number.
2. Press the AUDIO button repeatedly to select the desired audio format.

Notes:
• If only one audio format is recorded, the number does not change.
• Some DVDs allow you to change audio selections via the disc menu only. If this is the case, press the

MENU button and choose the appropriate language on the disc menu.

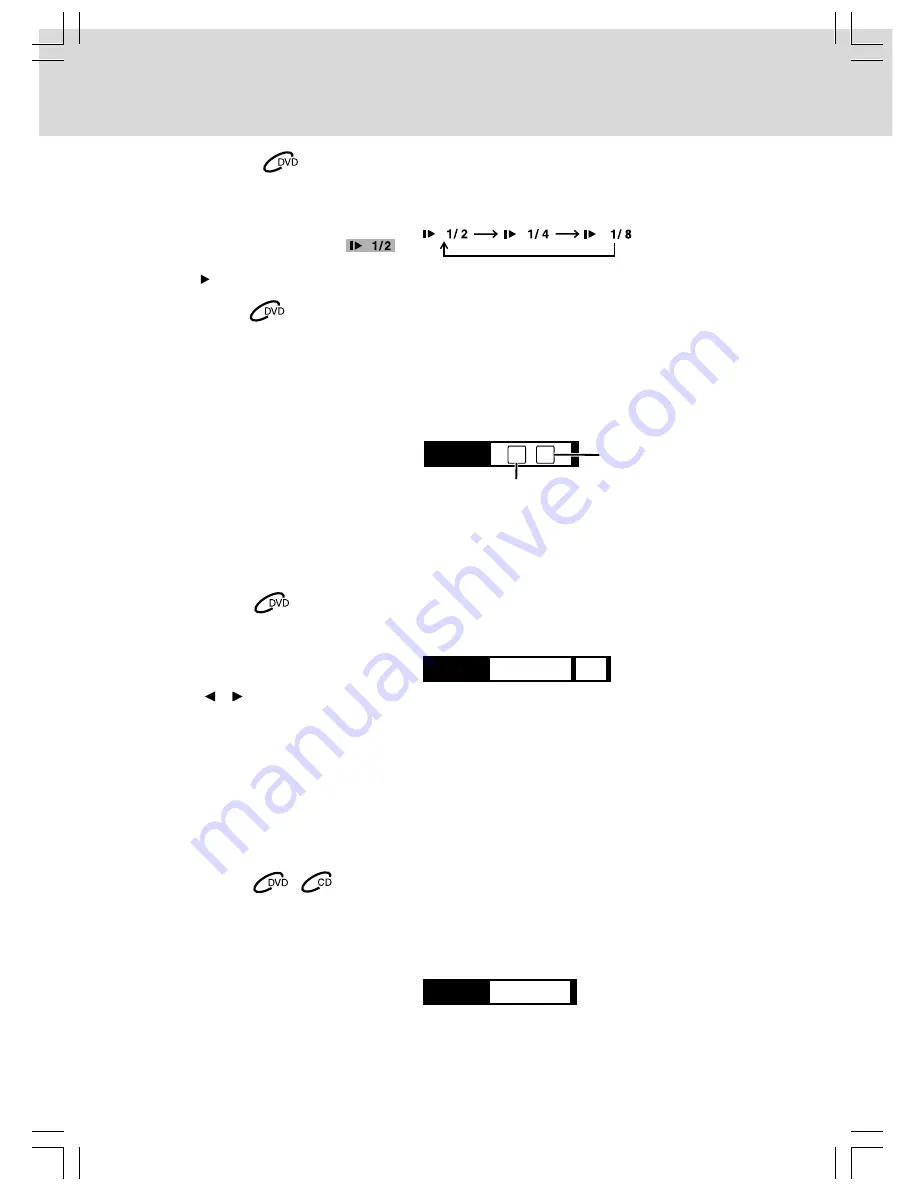
Slow-motion Play

1. Press the SLOW button on the remote in play mode.
• Three speeds are available. Each time the SLOW button is pressed, the speed of slow-motion playback

changes in the following sequence:

2. Press the   PLAY button to return to normal playback speed.

Angle

1  /  6

Subtitle

English 1

On

Number of angles in the
current title

Angle number

Audio

English 1

X

X

X

X

Summary of Contents for SHD7000

Page 1: ...HD DVD player Model SHD7000 R R TM Owner s Manual ...

Page 2: ...agnitude to constitute a risk of electric shock to persons The exclamation point within the equilateral triangle is intended to alert the user to the presence of important operating and maintenance servicing instructions in this owner s manual The following marks and symbols are located on back of the unit WARNING TO REDUCE THE RISK OF FIRE OR ELECTRIC SHOCK DO NOT REMOVE COVER OR BACK NO USER SER...

Page 3: ...o an outlet on a circuit different from that to which the receiver is connected Consult the dealer or an experienced radio TV technician for help This Class B digital apparatus complies with Canadian ICES 003 Shielded cables must be used with this unit to ensure compliance with the Class FCC limits Notes on Copyright It is forbidden by law to copy broadcast show broadcast on cable play in public o...

Page 4: ...been damaged in any way such as the power supply cord or plug is damaged liquid has been spilled or objects have fallen into the apparatus the apparatus has been exposed to rain or moisture does not operate normally or has been dropped Portable Cart Warning ADDITIONAL SAFETY INSTRUCTIONS 15 Do not overload wall outlets extension cords or integral convenience receptacles as this can result in a ris...

Page 5: ...depending on the condition and location of said equipment In such an event place the player as far away as practical from the TV radio or VCR To avoid damage to this product never place or store the unit in direct sunlight hot humid areas or areas subject to excessive dust oily smoke cigarette smoke or vibration About the volume level The volume level of some commercial HD DVD and DVD discs may se...

Page 6: ... Check the Type of Video Input on Your TV 13 Connecting to a TV 13 Connecting to an Audio System 15 LAN Connection 15 Plugging in the Unit 16 Turning on the Unit and TV 16 Playing a Disc 17 19 Playing a Disc 17 Pausing Playback 17 Playing Frame by Frame 17 Stopping Playback 17 Skipping to a Different Chapter Track 17 Fast Forward Fast Reverse 17 Resume Playback 17 Slow motion Play 18 Angle Selecti...

Page 7: ... has more than one movie on it each movie would be a separate title Chapters are sections of titles Audio CDs are divided into tracks A track is usually one song on an Audio CD Icons Used on DVDs Sample lcons Language selections for audio Language selections for subtitles Screen aspect ratio Multiple camera angles Region code indicator Note When playing a CD G Graphics or CD EXTRA disc the audio p...

Page 8: ... studio provided web enabled network content To minimize any potential compatibility and or connectivity issues before viewing such content it is recommended that you perform the firmware update process to ensure that your HD DVD player is using the latest firmware version Do not unplug or turn off the player when downloading studio provided web enabled network content Doing so may cause data stor...

Page 9: ...s remove batteries as soon as they become weak Weak batteries can leak and severely damage the remote control WARNING Do not dispose of batteries in a fire Batteries may explode or leak To Install Batteries 1 Open the battery door 2 Insert two AAA batteries REMOTE CONTROL Using the Remote Control Point the remote control at the REMOTE SENSOR located on the unit When there is a strong ambient light...

Page 10: ...s Press to select a content or position to enter 6 RESUME Button Press to resume playback while playing an HD DVD 7 PLAY Button Press to start playback 8 PAUSE Button Press to pause playback 9 PREV Button Press to move backwards through titles chapters or tracks on a disc 10 REPEAT Button Press to display the repeat mode menu 11 CURSOR Button Press to set the 8 direction buttons to move the cursor...

Page 11: ...o stop playback 21 Buttons Fast reverse playback Fast forward playback 22 NEXT Button Press to move forward through titles chapters or tracks on a disc 23 SLOW Button Press to perform slow forward playback of DVDs 24 Button Press to play frame by frame 25 SEARCH Button Press to display a window to locate a title chapter or track 26 CLEAR Button Press to clear entered information 27 DIM Button Pres...

Page 12: ... unit is turned on 3 Front Panel Display 4 STOP Button Stops playing a disc 5 OPEN CLOSE Button Opens closes the disc tray 6 Extension Port For future functions 7 The door of the Extension Port 8 Remote Sensor Receives the remote control unit signals 9 PLAY Button Starts or resumes playback of a disc 10 Disc Tray Loads a disc into the disc drive HDMI OUTPUT COMPONENT VIDEO OUTPUT VIDEO OUTPUT ANAL...

Page 13: ...ayed 9 Remaining playing time is displayed 10 Shows a chapter number 11 Shows a track number 12 Multi channel sound is output 13 2ch sound is output 14 Playing a scene recorded with multiple angles 15 Playing in repeat mode 16 HDMIconnectionisverifiedbetweentheplayer and another device 17 Displays the total playing time of the disc elapsed time remaining time title chapter or track number messages...

Page 14: ...timedia Interface HDMI transfers digital audio and uncompressed digital video on a single cable As a result audio cables and video cables don t need to be connected separately to a device Notes Refer to the owner s manual to the connected TV as well When the HDMI connection is not verified an error message appears on the front panel display In this case disconnect the HDMI cable then connect it ag...

Page 15: ...lug on your unit to the Y VIDEO IN jack on your TV the PB VIDEO OUT jack blue plug on your unit to the PB VIDEO IN jack on your TV and the PR VIDEO OUT jack red plug on your unit to the PR VIDEO IN jack on your TV To use the optical digital output use an optical cable to connect this jack to an optical audio input on a device capable of processing a DTS bitstream or PCM audio see Connecting to an ...

Page 16: ...he audio cable Sound output is in 2ch format only LAN Connection You may use the internet connection feature to update the player s firmware Some HD DVD discs may enable you to access special HD DVD sites if you connect the player to the Internet via an always on broadband connection For example if an HD DVD site includes content such as links to future movie trailers you can watch the content on ...

Page 17: ...ator on the unit illuminates in red Before plugging in the power cord make sure the voltage of the unit matches your local voltage Ensure all the components are connected correctly When you are not going to use the unit for a long period of time disconnect the power cord Caution When plugging or unplugging the LAN cable hold the plug portion of the cable When unplugging the LAN cable do not pull o...

Page 18: ...ss the STOP button at the location where you want to interrupt playback To resume playback at the position where the disc was stopped press the PLAY button If you press the STOP button twice the unit s memory will be cleared and pressing the PLAY button will reset the disc to the beginning Skipping to a Different Chapter Track Press the button repeatedly to skip to the start of the current or prev...

Page 19: ... of the DVD Press the MENU button to activate the main menu Subtitle Selection 1 While a DVD is playing press the SUBTITLE button to display the current language setting as shown in the example below 2 Press the SUBTITLE button repeatedly to select the desired subtitle language 3 Press the button to select On or Off If no button is pressed within 10 seconds playback continues without changing the ...

Page 20: ...remote control at the start point of the section you want to repeat The display changes to A B Repeat B Point To cancel the setting press the REPEAT button 2 Press the OK button on the remote control at an end point of the section where you want to repeat Playback returns to point A and repeats between A and B Notes Some discs may not permit repeat playback operation A B repeat can only be used wi...

Page 21: ...number 1 Press the SEARCH button on the remote control 2 Use the or button to select title then press the corresponding number button s for the title you want 3 Press the ENTER button to confirm The Unit will start playback about 3 seconds later Locating a Specific Chapter Track If you know the chapter track number you want to play you can locate a specific chapter track by directly selecting a ch...

Page 22: ...d network content Notes To minimize any potential compatibility and or connectivity issues before attempting to view any studio provided web enabled network content it is recommended that you perform the firmware update process to ensure that your HD DVD player is using the latest firmware version If you wish to use a wireless network to connect the player you will need to use a wireless LAN ether...

Page 23: ... when a 16 9 wide TV is connected 4 3 Select when a standard 4 3 TV is connected Displays pictures cropped to fill your TV screen Both of the picture s sides are cut off 4 3 Letter Box Select when a standard 4 3 TV is connected Displays theatrical images with masking bars above and below the picture Enhanced Black Level 1 In STOP mode press the SETUP button on the remote control 2 Use the or butto...

Page 24: ...ontent film or video of playback source and converts the signal to the appropriate progressive output format Note The player may not be able to detect the source film or video of some material If you notice undesirable picture performance try selecting Film or Video RGB Output Range 1 In STOP mode press the SETUP button on the remote control 2 Use the or button to select Picture then press the OK ...

Page 25: ... the SETUP button to exit menu You may find that setting the output resolution of the player to match as closely as possible to the native resolution of your display provides the best picture performance e g 720p for 720p and 1080i for 1080 or 1080p Picture Audio Language Ethernet General SETUP MENU TV Shape 16 9 Enhanced Black Level Off RGB Output Range Picture Mode Auto Resolution Setting up to ...

Page 26: ...ed in Dolby Digital Plus or Dolby TrueHD or DTS HD PCM is output core only for DTS HD When you play a disc recorded in Dolby Digital or DTS HD format digital audio signal bitstream audio is output If a connected HDMI device does not support Dolby Digital DTS or MPEG sound is converted into linear PCM to output PCM Select this when an HDMI device that has multi channel input is connected to this pl...

Page 27: ...ume during late hour playback 1 In STOP mode press the SETUP button on the remote control 2 Use the or button to select Audio then press the OK button 3 Use the or button to select Dynamic Range Control then press the OK button 4 Use the or button to select the options Auto On or Off then press the OK button 5 Press the SETUP button to exit menu Auto While playing an HD DVD recorded in Dolby TrueH...

Page 28: ...ss the OK button 4 Use the or button to select language then press the OK button 5 Press the SETUP button to exit menu Notes Some discs may be set to display subtitles in a different language from that you selected as the disc may contain alternate language Some discs allow you to change subtitle selections via the disc menu only In this case press MENU button and choose the appropriate subtitle l...

Page 29: ...tton to exit menu Audio Language To select a preferred language for disc menus 1 In STOP mode press the SETUP button on the remote control 2 Use the or button to select Language then press the OK button 3 Use the or button to select Audio Language then press the OK button 4 Use the or button to select language then press the OK button 5 Press the SETUP button to exit menu Note Some discs may be pl...

Page 30: ...ct OK then press the OK button Proxy Setting Enter the proxy server address when your provider requires proxy setting 1 Set Proxy to On and press the OK button 2 Enter the specified data from the provider Refer to the instructions below for inputting characters Server Port 3 Select OK then press the OK button DHCP Off Proxy Setting Off MAC Address NTP Server Off Network Speed 56kbps Modern Cookie ...

Page 31: ...DHCP Off Proxy Setting Off MAC Address NTP Server Off Network Speed 56kbps Modern Cookie Setting Accept DHCP Off Proxy Setting Off MAC Address NTP Server Off Network Speed 56kbps Modern Cookie Setting Accept Network Speed 28 8kbps Modern 56kbps Modern 128kbps ISDN Other 384kbps DSL Cable 1 5Mbps T1 768kbps DSL Cable 33 6kbps Modern 64kbps ISDN 256kbps DSL Cable 512kbps DSL Cable Over 10Mbps 1Mbps ...

Page 32: ...ff by pressing the or button On Select this to activate Parental Lock function or to change the setting Off Deactivate the Parental Lock function Skip to step 6 b Press the or button to enter the code of a country area whose standards were used to rate a disc referring to the list below c Select the desired limitation level Unless the Parental Lock function is set to Off a disc that has a higher l...

Page 33: ...ral then press the OK button 3 Use the or button to select OSD On Off then press the OK button 4 Use the or button to select the options On or Off then press the OK button 5 Press the SETUP button to exit menu Parental Lock Off Clock Set OSD On Off Remote Controller Sound Off On Screen Saver Off Maintenance Twin Format Disc HD DVD Clock Set GMT 4 00 Atlantic Time 01 Time Zone Year Month OK Cancel ...

Page 34: ...r press any button on the player or the remote control When an HD DVD is used this function activates only in stop mode Parental Lock Off Clock Set OSD On Off Remote Controller Sound Off On Screen Saver Off Maintenance Twin Format Disc HD DVD Screen Saver Auto Power Off On Off Remote Controller Sound 1 In STOP mode press the SETUP button on the remote control 2 Use the or button to select General ...

Page 35: ... HD DVD Twin Format Disc HD DVD DVD HD DVD Only the HD DVD layer is played DVD Only the DVD layer is played Note For combination discs select the desired version by disc side see label for information Initialize To reset all the settings to factory set default Update Firmware update If you have broadband internet service you may obtain firmware updates over the internet using the LAN port on the b...

Page 36: ...player is watched via a video recorder or on a TV with a built in video recorder the copy guard may prevent images from being displayed properly Be sure to connect the player directly to the TV Remove any obstacles between the remote and the unit Use the remote near the unit Point the remote at the remote sensor on the unit Replace the batteries in the remote There is no disc inside No Disc appear...

Page 37: ... the applicable EULAs carefully before using these software components The EULAs are exhibited in their original text English as exactly written by the respective parties Pre installed software EULA Pre installed software EULA Linux Kernel Busybox Exhibit A OpenSSL Exhibit C glibc Exhibit B freetype Exhibit D Exhibit A GNU GENERAL PUBLIC LICENSEVersion 2 June 1991 Copyright 1989 1991 Free Software...

Page 38: ...t or display an announcement including an appropriate copyright notice and a notice that there is no warranty or else saying that you provide a warranty and that users may redistribute the program under these conditions and telling the user how to view a copy of this License Exception if the Program itself is interactive but does not normally print such an announcement your work based on the Progr...

Page 39: ...ection as a whole is intended to apply in other circumstances It is not the purpose of this section to induce you to infringe any patents or other property right claims or to contest validity of any such claims this section has the sole purpose of protecting the integrity of the free software distribution system which is implemented by public license practices Many people have made generous contri...

Page 40: ...et your employer if you work as a programmer or your school if any to sign a copyright disclaimer for the program if necessary Here is a sample alter the names Yoyodyne Inc hereby disclaims all copyright interest in the program Gnomovision which makes passes at compilers written by James Hacker signature of Ty Coon 1 April 1989 Ty Coon President of Vice This General Public License does not permit ...

Page 41: ...ther cases permission to use a particular library in non free programs enables a greater number of people to use a large body of free software For example permission to use the GNU C Library in non free programs enables many more people to use the whole GNU operating system as well as its variant the GNU Linux operating system Although the Lesser General Public License is Less protective of the us...

Page 42: ...ify that version instead if you wish Do not make any other change in these notices Once this change is made in a given copy it is irreversible for that copy so the ordinary GNU General Public License applies to all subsequent copies and derivative works made from that copy This option is useful when you wish to copy part of the code of the Library into a program that is not a library 4 You may cop...

Page 43: ...and distribute such a combined library provided that the separate distribution of the work based on the Library and of the other library facilities is otherwise permitted and provided that you do these two things a Accompany the combined library with a copy of the same work based on the Library uncombined with any other library facilities This must be distributed under the terms of the Sections ab...

Page 44: ... EXPRESSED OR IMPLIED INCLUDING BUT NOT LIMITED TO THE IMPLIED WARRANTIES OF MERCHANTABILITY AND FITNESS FOR A PARTICULAR PURPOSE THE ENTIRE RISK ASTOTHE QUALITY AND PERFORMANCE OF THE LIBRARY IS WITH YOU SHOULD THE LIBRARY PROVE DEFECTIVE YOU ASSUME THE COST OF ALL NECESSARY SERVICING REPAIR OR CORRECTION 16 IN NO EVENT UNLESS REQUIRED BY APPLICABLE LAW OR AGREED TO IN WRITING WILL ANY COPYRIGHT ...

Page 45: ...cense Copyright 1995 1998 EricYoung eay cryptsoft com All rights reserved This package is an SSL implementation written by Eric Young eay cryptsoft com The implementation was written so as to conform with Netscapes SSL This library is free for commercial and non commercial use as long as the following conditions are aheared to The following conditions apply to all code found in this distribution b...

Page 46: ...ll rights reserved This product includes software developed by the OpenSSL project Reverse engineering disassembling decompiling dismantling or otherwise attempting to analyze or modify the software included in this product is prohibited LICENSE INFORMATION ON THE SOFTWARE USED IN THIS HD DVD PLAYER ...

Page 47: ... compartment Cleaning the Disc A defective or soiled disc inserted into the unit can cause sound to drop out during playback Handle the disc by holding its inner and outer edges Do NOT touch the surface of the unlabeled side of the disc Do NOT stick paper or tape on the surface Do NOT expose the disc to direct sunlight or excessive heat Clean the disc before playback Wipe the disc from the center ...

Page 48: ... 47 Printed in China 811 HD7091W011 ...

Reviews: