background image

E - 16

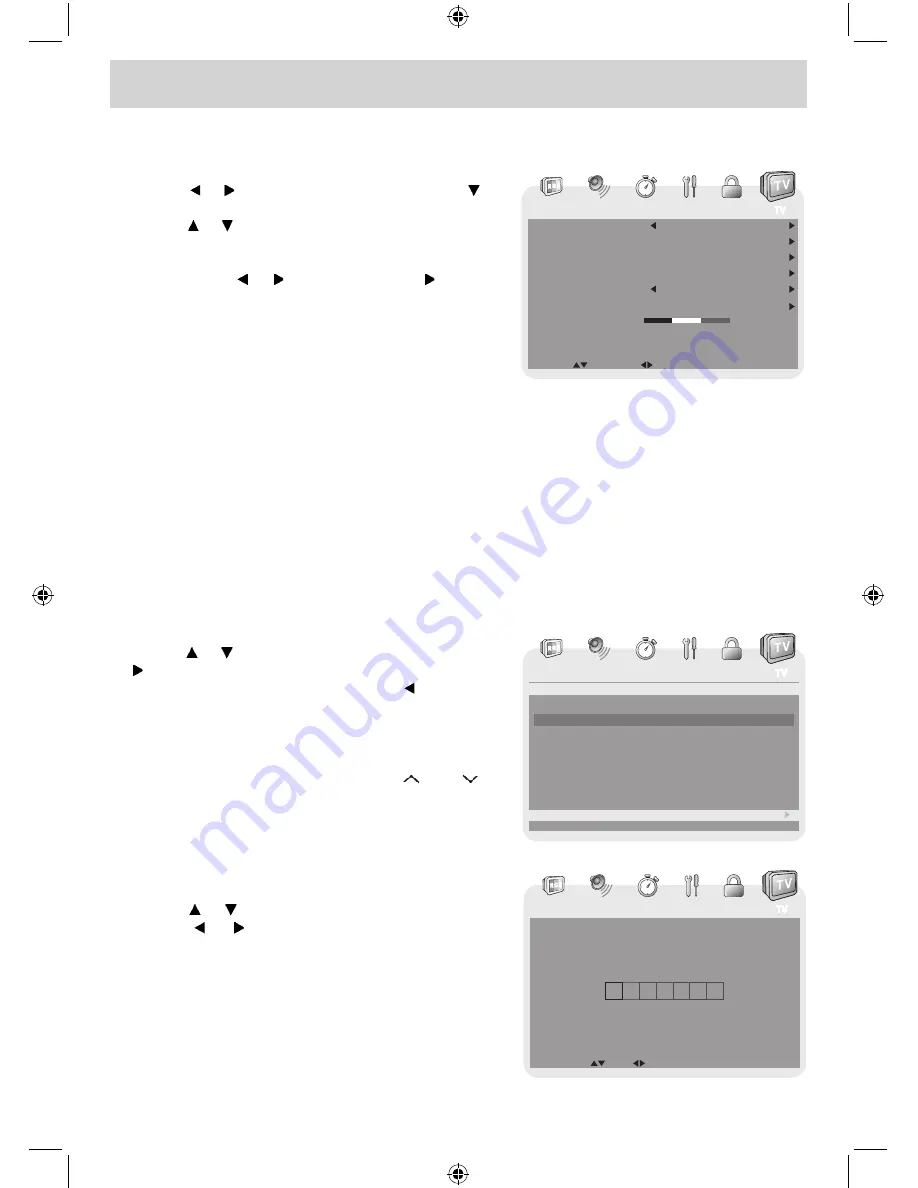
TV SETUP

Antenna


:  Air (over-the-air broadcasts, Ch 2-69) or CATV (cable/satellite broadcasts, CH 1-135) 

mode are available.

Auto Scan


:  Search for usable stations and store them in memory.

Auto Scan Add CH

  :  Search for more usable stations and add them in memory. The stations stored before 

are still kept.

Channel Skip  

:


Skip weak channels and the channels you don’t like.

Channel No.


:  Select a different TV channel.

Channel Label


:  Display and edit the channel label.

DTV Signal


:  Display the signal strength (for digital TV channels only). 

TV MENU (For TV Mode Only)

1.  Press the 

MENU

 button.

2.  Use the   or   button to select 

TV, 

then press the 


button to enter the TV settings. 

3.  Use the   or   button to select the options (

Antenna, 

Auto  Scan, Auto  Scan Add  CH,  Channel  Skip, 

Channel No. Channel Label 

or

 DTV Signal

). Adjust 

them using the   or   button, or press the   button 

to go into the detailed settings.

4.  Press  the 

MENU

  button  to  return  to  the  previous 

menu.

5.  Repeat steps 3 and 4 to adjust other options.

6.  To  exit  the  MAIN  MENU  and  return  to  the  normal 

screen, press the 

EXIT 

or 

MENU

 button repeatedly.

Channel Skip

1.  Use the   or   button to select a channel. (Press the 

 button to select the last channel of the page; press 

again to go to the next page. Press the   button to 

select  the  first  channel  of  the  page;  press  again  to 

return to the previous page.)

2.  Press  the 

ENTER

  button  to  shift  between  On  /  Off. 

(Select On to skip the selected channel. The channel 

will not appear when you press the 

CH   

/

 CH 


button.)

PICTURE AUDIO

TIME

SETUP PARENTAL

TV

Antenna
Auto Scan
Auto Scan Add CH
Channel Skip
Channel No.
Channel Label
DTV Signal

Air

5-5

XXX

UP/DOWN

ADJUST "MENU":EXIT

Good

PICTURE AUDIO

TIME

SETUP PARENTAL

TV

"MENU":EXIT

"ENTER":SELECT

Skip

On

On

Off
Off
Off

On

Off

No.

3

2

4
5
5-1
6
7

Program Name

XXXX

XXX

XX
XX
XXXX
XXXXX
XXXX

NEXT

PICTURE AUDIO

TIME

SETUP PARENTAL

TV

EDIT

SELECT "MENU":EXIT

X

Channel Label

You can edit a label for each channel.

1.  Use the   or   button to select the number or letter. 

Use  the    or    button  to  move  and  edit  the  next 

character.

2.  After editing, the Channel and Channel Label will be 

shown on the screen when you press the 

DISPLAY


button.

PLV36199.indd   16

8/28/2007   3:16:05 PM

Summary of Contents for PLV36199S1

Page 1: ......

Page 2: ...e it and create a hazard When you are not going to use the unit for a long period of time disconnect the AC power cord CONDENSATION INFORMATION When left in a heated room where it is warm and damp water droplets or condensation may form inside the equipment When there is condensation inside the unit the unit may not function normally Let the unit stand for 1 2 hours before turning the power on or ...

Page 3: ... specified by the manufacturer or sold with the apparatus When a cart is used use caution when moving the cart apparatus combination to avoid injury from tip over 13 Unplug this apparatus during lightning storms or when unused for long periods of time 14 Refer all servicing to qualified service personnel Servicing is required when the apparatus has been damaged in any way such as the power cord or...

Page 4: ...scanning has finished the system will return to the first TV channel scanned Make sure the RF aerial has been connected properly to the TV antenna input jack on the rear of the system 2 3 8 2 3 8 2 3 8 When you turn on your television set for the first time be sure to place it on a solid stable surface To avoid danger do not expose the TV to water or a heat source e g lamp candle radiator Do not o...

Page 5: ...the universal remote control manufacturer for assistance or refer to the instructions included with the universal remote control We cannot offer assistance in programming universal remote controls BATTERY REPLACEMENT When the batteries become weak the operating distance of the remote control is greatly reduced and you will need to replace the batteries CAUTION Danger of explosion if battery is inc...

Page 6: ...udio Program SAP 10 CC Button Press to activate the Closed Captioning feature This function only works on programs broadcasted with captions 11 TV Button Press to switch to TV mode 12 AV IN Button Press to switch to source connected to AV composite inputs 13 HD Button Press to switch to source connected to YUV in component inputs 14 SOUND Button Press to select from preset sound settings to match ...

Page 7: ...olume level 6 Remote Sensor Receives the remote control signal Standby Indicator 7 Color LCD Screen 8 Speakers 9 Removable Stand 10 AC Power Cord 11 VIDEO OUT Jack 12 AUDIO OUT Left Right Jacks 13 VIDEO IN Jack AV IN 14 AUDIO IN Left Right Jacks AV IN 15 MONITOR VGA Jack PC IN 16 AUDIO Jack PC IN 17 COMPONENT VIDEO IN Y PB PR Jacks YUV IN 18 AUDIO IN Left Right Jacks YUV IN 19 S VIDEO IN Jack 20 H...

Page 8: ...Connecting a Digital Antenna ThetunerinthisTVreceivesATSC TV signals from an antenna This digital TV can receive standard SDTV and high definition HDTV over the air broadcasts Connecting an Analog Antenna or Device The tuner in this TV receives NTSC TV signals analog cable signals or the RF output from a satellite receiver VCR or cable box To S VIDEO OUT AUDIO OUT jacks Satellite cable or TV anten...

Page 9: ...IN NOTE Please refer to the user manual for the other equipment for more information To AUDIO VIDEO IN jacks AV IN To AUDIO VIDEO OUT jacks CONNECTING DEVICES WITH A COMPOSITE YELLOW RCA TYPE VIDEO INPUT To connect A V devices such as a VCR PVR or camcorder Connecting to a VCR PVR Camcorder Connect the AUDIO VIDEO cable not included as shown Make sure you connect the cable from the other equipment...

Page 10: ...olution is solely dependent upon the resolution supported by the DVD player attached DVD player resolutions vary from 480i to 1080i and this unit can support DVD players up to a maximum resolution of 1080i To AUDIO IN jacks YUV IN To AUDIO OUT jacks To COMPONENT VIDEO IN jacks YUV IN To COMPONENT VIDEO OUT jacks May require a subscription for receiving HD channels Check with your cable satellite s...

Page 11: ...from the other equipment AUDIO IN to this unit AUDIO OUT To AUDIO OUT jacks To AUDIO IN jacks CONNECTING THE AC POWER CORD Connect the AC power cord into a wall outlet Press the STANDBY ON button on the left side of the unit or use the remote control to turn on the unit NOTES TO PREVENT ELECTRIC SHOCK MATCH WIDE BLADE OF PLUG TO WIDE SLOT OF WALL OUTLET THEN FULLY INSERT To AC wall outlet When the...

Page 12: ...ing the base stand Be sure that no hard or sharp object or anything that could scratch or damage the LCD display comes into contact with it Do NOT place pressure on the front of the unit at any time because the screen could crack 1 Disconnect any cables or cords connected to the unit 2 Lay the unit down on a flat surface so the backside is facing up making sure to place a soft cushioned material s...

Page 13: ...button to select Audio then press the button to enter the Audio settings 3 Use the or button to select the options Sound Mode Bass Treble Balance Audio Language or MTS Adjust them using the or button 4 Repeat step 3 to adjust other options 5 To exit the MAIN MENU and return to the normal screen press the EXIT or MENU button repeatedly Sound Mode Select from preset sound settings Standard Music Mov...

Page 14: ...T UP settings 3 Use the or button to select the options OSD Language Color Mode PC SetUp Closed Caption or Restore Setting Adjust them using the or button Screen will change to your desired setting or press the button to go into the detailed settings 4 Press the MENU button to return to the previous menu 5 Repeat steps 3 and 4 to adjust other options 6 To exit the MAIN MENU and return to the norma...

Page 15: ...e caption style items and set your desired detailed settings Note This function only works on ATSC programs broadcast with captions PARENTAL MENU Password 1 Press the MENU button 2 Use the or button to select PARENTAL then press the button to enter the PARENTAL settings The menu locked screen will be displayed 3 Enter a 4 digit password Once entered the screen will enter the Parental menu The pres...

Page 16: ...IENCES Suitable for all ages PG PARENTAL GUIDANCE SUGGESTED Some material may not be suitable for children PG 13 PARENTS STRONGLY CAUTIONED Some material may be inappropriate for children under 13 R RESTRICTED Under 17 requires accompanying parent or adult guardian for viewing in movie theaters NC 17 No one 17 or under admitted in movie theaters X Adults Only E Exempt C Children C8 Recommended for...

Page 17: ... exit the MAIN MENU and return to the normal screen press the EXIT or MENU button repeatedly Channel Skip 1 Use the or button to select a channel Press the button to select the last channel of the page press again to go to the next page Press the button to select the first channel of the page press again to return to the previous page 2 Press the ENTER button to shift between On Off Select On to s...

Page 18: ...mote with new ones Check the location of the antenna and adjust it if necessary Make sure the antenna cable is firmly connected Make sure all input cables are firmly connected TV Bad Picture snow multipe images distortion blurry Check the PICTURE MENU within the TV SETUP MENU Check to make sure the program you are watching is broadcast in Color and not black and white Black and white picture Make ...

Page 19: ...E 18 Unit INCH 11 18 4 6 5 8 16 5 8 7 10 15 16 8 5 8 12 14 7 8 PLV36199 indd 18 8 28 2007 3 16 07 PM ...

Page 20: ...ed or damage to product or parts caused by misuse accident improper operation or maintenance or use in violation of instructions provided with the product or to product which has been altered or modified without authorization of VENTURER or to products or parts thereof which have had the serial number removed or changed Out of Warranty In the event your product requires repair after the limited wa...

Reviews: