background image

E - 5

diSc forMatS

This unit can playback:

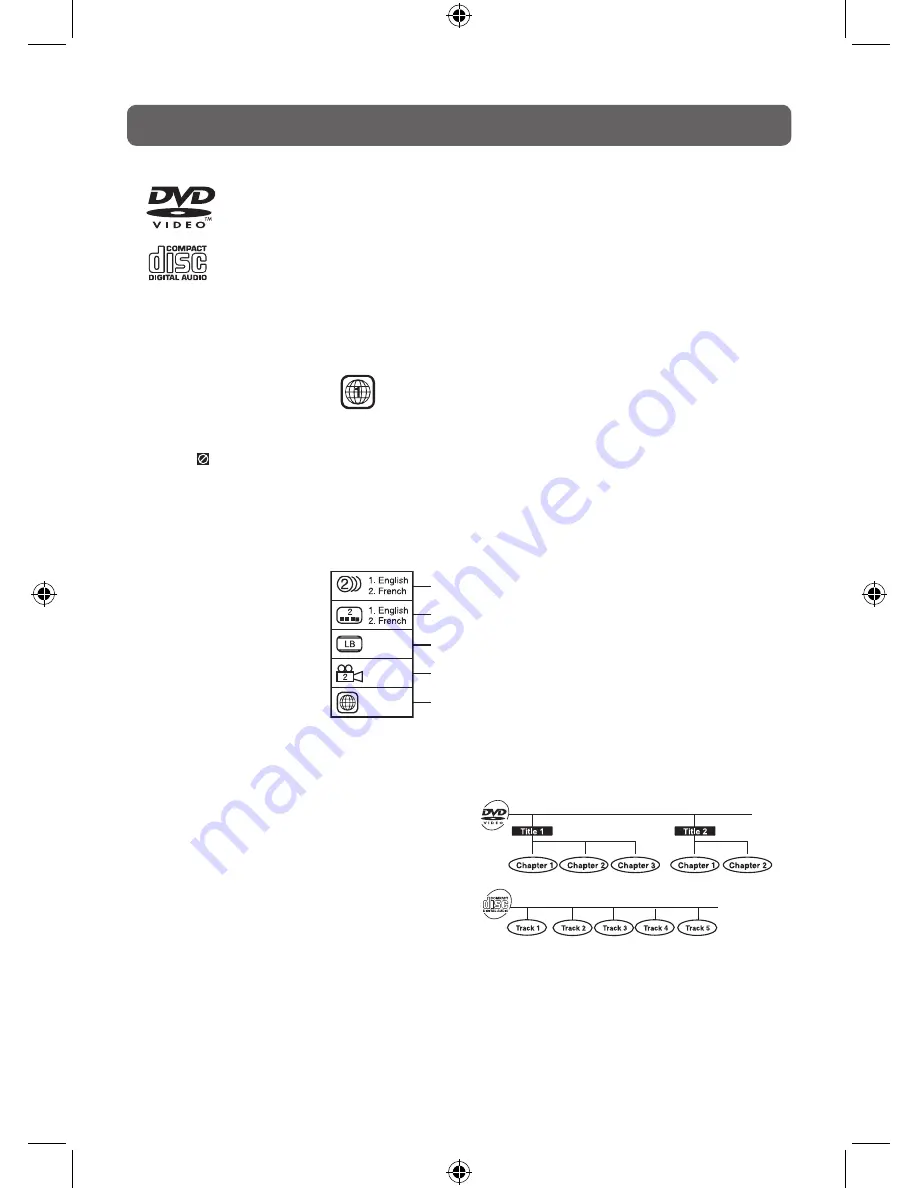
tItle, cHaPteR and tRacKS

•  DVDs  are  divided  into  “titles”  and  “chapters”

If the disc has more than one movie on it, each 
movie would be a separate “title”“chapters” are 
sections of titles.

 
•  Audio CDs are divided into “tracks”. A “track” is 

usually one song on an Audio CD.

IcOnS USed On dVdS

Sample lcons

Language selections for audio

Language selections for subtitles

Screen aspect ratio

Multiple camera angles

Region code indicator

note:
•  When playing back a CD-G (Graphics) or CD EXTRA disc, the audio portion will be  played, but the 

graphic images will not be shown.

dVdS

[8cm/12cm dISc]

aUdIO cdS

[8cm/12cm dISc]

cd-r/cd-rW

compatible

ReGIOn manaGement InFORmatIOn

Region  Management  Information: This  unit  is  designed  and  manufactured  to  respond  to  the  Region 
Management Information that is encoded on DVDs. If the region number printed on the DVD does not 
correspond to the region number of this unit, this unit cannot play that disc.

The region number of this unit is 

 .

note:
•  Numbers identify each title, chapter, and track on a disc. Most discs have these numbers recorded on 

them, but some do not.

notes on Unauthorized discs

you may not be able to play back some DVDs on this unit if they were purchased from outside your 
geographic area or made for business purposes.

JPg-cd 

picture viewer

dISc FUnctIOn OR OPeRatIOn tHat IS nOt aVaIlaBle

When the   symbol appears on the  screen, it indicates that the function or operation attempted is not 
available  at  that  time. This  occurs  because  the  DVD  manufacturer  determines  the  specific  functions. 
Certain functions may not be available on some discs. Be sure to read the documentation provided with 
the DVD.

1

Summary of Contents for PLV3117i

Page 1: ...E 1 OWNER S MANUAL 17 DIGITAL LCD TV with Docking for iPod PLV3117i ...

Page 2: ... cause harmful interference to radio or television reception which can be determined by turning the equipment off and on the user is encouraged to try to correct the interference by one or more of the following measures Reorient or relocate the receiving antenna Increase the separation between the equipment and receiver Connect the equipment into an AC power outlet on a circuit different from that...

Page 3: ...e only with the cart stand tripod bracket or table specified by the manufacturer or sold with the apparatus When a cart is used use caution when moving the cart apparatus combination to avoid injury from tip over 13 Unplug this apparatus during lightning storms or when unused for long periods of time 14 Refer all servicing to qualified service personnel Servicing is required when the apparatus has...

Page 4: ...8 Playing a Disc 17 Pausing Playback Still Mode 17 Stopping Playback 17 Skip Forward Reverse 17 Fast Forward Fast Reverse 17 Slow motion Play DVD 17 Audio Selection DVD 18 Subtitle Selection DVD 18 Angle Selection DVD 18 SPECIAL FUNCTIONS 19 Display Function DVD 19 Locating a Specific Title DVD 19 Locating a Specific Chapter Track 19 Locating a Specific Time 19 CD DVD PROGRAMMABLE MEMORY 20 REPEAT...

Page 5: ...igned and manufactured to respond to the Region Management Information that is encoded on DVDs If the region number printed on the DVD does not correspond to the region number of this unit this unit cannot play that disc The region number of this unit is Note Numbers identify each title chapter and track on a disc Most discs have these numbers recorded on them but some do not Notes on Unauthorized...

Page 6: ...the battery door 2 Insert two AAA batteries BATTERY REPLACEMENT When the batteries become weak the operating distance of the remote control will be greatly reduced and you will need to replace the batteries Note If the remote control is not going to be used for a long time remove the batteries to avoid damage caused by battery leakage corrosion Do not mix old and new batteries Do not mix ALKALINE ...

Page 7: ...n Press to select previous titles chapters or tracks on a disc 10 SUBTITLE Button Press to select one of the subtitle languages programmed on a DVD 11 ANGLE Button Press to switch the camera angle of the video presentation when scenes with multiple camera angles are recorded on a DVD 12 TITLE Button Press to show title menu 13 GOTO Button Press to skip directly to a specific location on a DVD CD 1...

Page 8: ...nge the output mode of a CD 24 SLOW Button Press to perform slow forward playback of a DVD 25 DVD MENU Button Press to enter the main menu of the DVD 26 SETUP Button In stop DVD door open mode press to enter and exit the SETUP menu of the DVD 27 A B Button Press to perform point to point repeat playback on a DVD or CD REPEAT Button Press to repeat a chapter or title of a DVD Press to repeat a sing...

Page 9: ...TANDBY OFF mode Light On The unit is in STANDBY Light Off The unit is turned ON BACK VIEW 6 7 8 9 10 11 12 13 14 15 16 17 6 AC Power Cord 7 VIDEO OUT Jack AV OUT 8 AUDIO OUT Left Right Jacks AV OUT 9 VIDEO IN Jack AV IN 10 AUDIO IN Left Right Jacks AV IN 11 MONITOR VGA Jack PC IN 12 AUDIO Jack PC IN 13 COMPONENT VIDEO IN Y PB PR Jacks YUV IN 14 AUDIO IN Left Right Jacks YUV IN 15 S VIDEO Jack AV I...

Page 10: ...N button Select TV AV S Video YUV DVD iPod or PC 23 CH buttons Press to change the TV channels and highlight selections Up Down on the menu screen button Press to select previous chapters or tracks on a disc button Press to select next title chapter or track on a disc 24 VOLUME controls Adjust the volume level 25 iPod woofer 26 Disc Door Push gently to close the disc door 27 PUSH OPEN button Press...

Page 11: ...sure that all the components are connected correctly To prevent electrical shock match wide blade of AC power cord to wide slot of AC power outlet then fully insert When you are not going to use the unit for a long period of time disconnect the AC power cord CONNECTING THE AC POWER CORD Note For receiving over the air TV broadcasts we recommend that you use an external fixed antenna Should you req...

Page 12: ... AUDIO OUT and S VIDEO OUT to this unit AUDIO IN and S VIDEO IN Note Please refer to the user manual for the other equipment for more information To connect A V devices such as a VCR video game system or camcorder Connecting to a VCR Video Game System Camcorder Connect the AUDIO VIDEO cable not included as shown Make sure you connect the cable from the other equipment AUDIO and VIDEO OUT to this u...

Page 13: ...amcorder for more information Notes The video out function only works in DVD mode For the reason of copyright protection the resulting copy may have bad picture and or sound Connecting a VCR PVR Connect the right red and left white audio input from the VCR PVR to the right red and left white output on this unit Audio cable not included Connect the video yellow input from theVCR PVR to the video ou...

Page 14: ...s unit and the other end to the AUDIO OUT jack on your computer s sound card To operate the connected device first press the FUNCTION button to select the PC mode Notes If the TV is cold there may be a small flicker when the set is switched on This is normal there is nothing wrong with your TV If possible use the VESA 1440 x 900 60Hz video mode to obtain the best image quality for your LCD monitor...

Page 15: ...nd CONNECTIONS Dolby Digital for DVD Dolby Digital is a sound system developed by Dolby Laboratories Inc This unit automatically recognises DVDs that have been recorded with Dolby Digital Not all Dolby Digital sources are recorded with 6 channels Some sources marked Dolby Digital may be recorded in Dolby Surround a 2 channel system Look for this logo on your unit Manufactured under license from Do...

Page 16: ...l enter Virgin mode You can easily follow up prompt message on screen to finish basic TV settings of the system 1 Press the button to select Tuning mode AIR over the air broadcasts CH 2 69 CATV cable satellite broadcasts CH 1 125 HRC CH 1 125 or IRC CH 1 125 mode are available 2 Use the button to highlight Auto Tune 3 Press the button to begin auto scan The system will automatically start to scan ...

Page 17: ...e normal playback press the button Each time you press the button the picture advances one frame on DVD Stopping playback Press the button at the location where you want to interrupt playback To resume playback at the position where the disc was stopped press the button If you press the button twice the unit s memory will be cleared and pressing the button will reset the disc to the beginning SKIP...

Page 18: ...iffers depending on the disc If no button is pressed within a few seconds playback continues without changing the current subtitle This function can only be used for discs on which subtitles have been recorded in multiple languages On some DVDs subtitles are activated from the main menu of the DVD Press the DVD MENU button to activate the main menu Angle selection DVD Some DVDs contain scenes that...

Page 19: ...title DVD If a DVD contains title numbers you can locate a specific title by directly selecting a title number 1 Press the GOTO button 2 Press the or button to highlight a specific field and press the corresponding number button s for the title you want 3 Press the ENTER OK button to confirm The Unit will start playback about 3 seconds later Locating a specific time You can move to a specific loca...

Page 20: ...er DVD You can play the same chapter repeatedly 1 While the disc is playing press the REPEAT button until the indicator displays on the screen The current chapter is played repeatedly Repeating a title You can play the same title repeatedly 2 While the disc is playing press the REPEAT button until the indicator displays on the screen The current title is played repeatedly To resume normal playback...

Page 21: ...scs Playing a Picture file disc 1 Press the PUSH OPEN button to open the disc door 2 Hold a Picture file disc by its edges and gently push it onto the spindle with the label side facing up until you hear a click 3 Push the disc tray to close the disc door 4 The unit will load the disc and automatically display the contents of the disc on the screen while also beginning to play the Picture file The...

Page 22: ...stop mode 2 Use the button to change the highlight cursor Use the or button to select an option then press the and button to select your preferred language then press the ENTER OK button The screen will change to your selected language immediately 3 To exit the DVD SETUP MENU and return to the normal screen press the SETUP button VIDEO SETUP 1 Press the SETUP button in stop mode 2 Press the or but...

Page 23: ...just the color of the picture Sharpness Adjust the sharpness level to improve detail in the picture Hue Adjust the hue of the picture Toward purple Toward green Color Temp Adjust the three color temperature of the picture Select Normal balanced Warm red white Cold blue white mode Preset Select from preset screen display settings to match the type of show you are watching Personal Standard Dynamic ...

Page 24: ...nal mode to recall your customed settings on contrast and brightness SOUND MENU 1 Press the TV MENU button 2 Use the or button to select the Sound menu then press the button to enter the setting 3 Use the or button to select the options Balance Bass Treble Preset and adjust them using the or buttons 4 Press the TV MENU button to return to previous menu repeat step 3 to adjust other settings 5 To e...

Page 25: ...tal Press the button then input the 4 digit password to enter Parental setup Initial password is 0000 Refer to the next page Parental for details Restore Setting Reset the TV AV mode to the factory settings In YUV DVD PC mode Language Select the language your prefer Background Select the menu from translucent opaque on the screen Sleep Timer Select the time to turn the unit to Standby mode automat...

Page 26: ...e material may not be suitable for children 14 Viewers 14 years and older 18 Adult Programming E Exempt G GENERAL AUDIENCES Suitable for all ages 8 ans Not recommended for young children 13 ans Not suitable for children under the age of 13 16 ans Not suitable for children under the age of 16 18 ans Adult Programming U S TV Ratings Canadian English Ratings Canadian French Ratings Password To change...

Page 27: ...adcasts CH 1 125 HRC CH 1 125 IRC CH 1 125 or AIR over the air broadcasts CH 2 69 or mode are available Auto Tune Search for usable stations and stores them in memory MTS Select the Mono sound Stereo sound Secondary Audio Program SAP Skip On Skip weak channels Off No channel skip Fine Tune The frequency changes to allow fine tuning Note The SAP Secondary Audio Programs feature allows a TV station ...

Page 28: ... the iPod menu lists and select a song press the ENTER OK button to begin playback You may also use the control wheel and keys on your iPod to operate it Press the PAUSE button to pause press the PLAY button to resume Press the button to skip to the previous next song iPod DOCK ADAPTOR Before connecting your iPod you need to install the appropriate iPod Dock Adaptor supplied with the iPod in the d...

Page 29: ...end the photo viewing and go back to the previous menu Using a iPod Classic iPod Nano to view the photo 1 In iPod Home menu use the button to select Photos and press the ENTER OK button Navigate your iPod Photo Library directly from your iPod will appear on the screen 2 Press the button to select Photos and then press the ENTER OK button to confirm 3 Use the button to select a photo press the ENTE...

Page 30: ...ton to confirm 4 Press the iPod RETURN button to go back to the previous menu Shuffle Select from Shuffle Off Shuffle Songs and Shuffle Albums Repeat Select from Repeat Off Repeat One and Repeat All Language Select OSD language WARNING Due to the i Pod limitation not all functions of some i Pod models can be controlled via the remote control Please Navigate directly on your iPod OR Press The CLEAR...

Page 31: ...vents such as benzine or alcohol to clean the disc Do NOT use irregular shaped discs example heart shaped octagonal etc They may cause malfunctions Cleaning the unit Be sure to turn the unit off and disconnect the AC power cord before maintaining the unit Wipe the unit with a dry soft cloth If the surfaces are extremely dirty wipe clean with a cloth that has been dipped in a weak soap and water so...

Page 32: ... This unit is too hot Power off the unit for 30 minutes to cool down The region number of the disc doesn t match the region number of this unit Clean the disc The disc is scratched The plugs and jacks are dirty Wipe them with a cloth slightly moistened with alcohol Clean the disc There is no disc inside No Disc appears on the screen Insert the disc correctly with the playback side facing down Clea...

Page 33: ...roadcast in Color and not Black White Make sure the unit is plugged in and turned on Make sure that the TV mode is selected Try a new channel to check for possible station trouble Make sure the antenna is connected properly Increase the volume Make sure the antenna or audio video source device is working properly Make sure all cables are firmly connected Check for local interference Make sure ther...

Page 34: ...e been lost or discarded or damage to product or parts caused by misuse accident improper operation or maintenance or use in violation of instructions provided with the product or to product which has been altered or modified without authorization of Venturer or to products or parts thereof which have had the serial number removed or changed Out of Warranty Model no Product name Type of set Serial...

Page 35: ...E 35 Printed in China 811 311791W371 ...

Reviews: