background image

 TV SETUP

E-19

When you set the ‘

Time

’, the option will be shown:

Auto Synchronization

: Select On to synchronize time with the digital TV channel signal. Select Off to keep the 

time unsynchronized.

Date


: Press the   or   button to locate the position, and press the number buttons to input 

date.

Time


: Press the   or   button to locate the position, and press the number buttons to input 

time.

Timer


: Select On to activate automatically power on/off.

Power On Timer


: Press the   or   button to locate the position, and press the number buttons to input 

power on time.

Power Off Timer


: Press the   or   button to locate the position, and press the number buttons to input 

power off time.

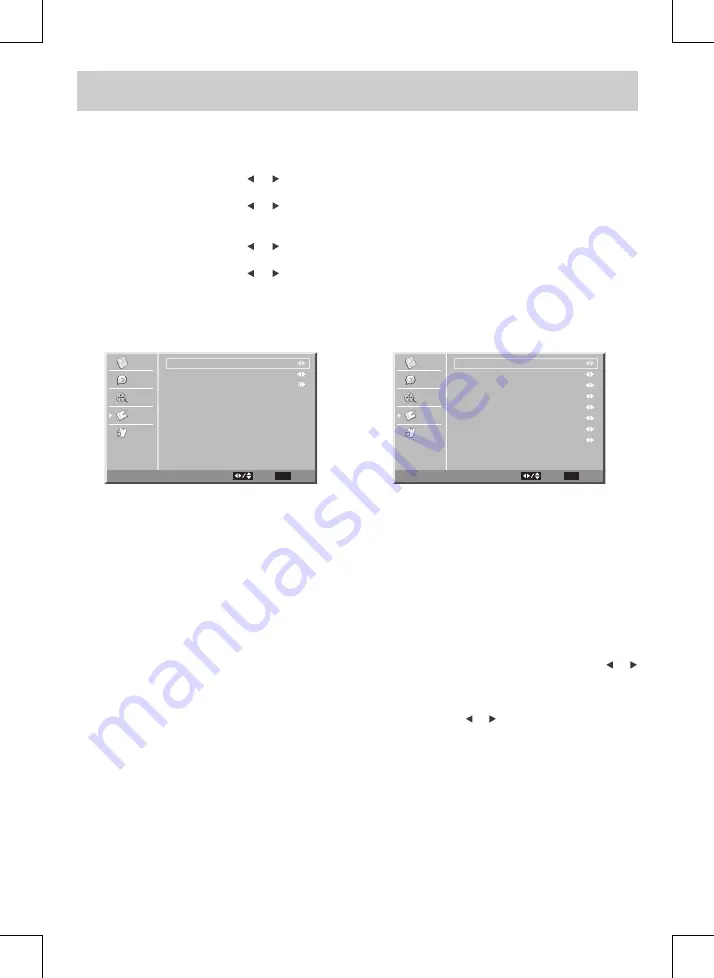
Caption Setting

Analog Closed Caption

  :  Select the analog closed caption.

Digital Closed Caption

  :  Select the digital closed caption or turn it off.

Digital Caption Style


:  Select as Broadcaster to use the default digital caption style of the broadcaster. Select 

Custom to activate the caption style items and set your preferred detailed settings.

NOTE

This function only works on ATSC programs broadcasted with captions.

Gamma Setting

High gamma values display whitish images and low gamma values display high contrast images. Use the   or   

button to select the options (

Middle

Bright

 or 

Dark

).

Power Saving Setting

This function allows you to reduce the power consumption of the TV.  Use the   or   button to select the desired 

power saving level (

Level 0~4

).

ISM(Image Sticking Minimization) Mode Setting

A frozen or still picture from a PC/video game displayed on the screen for prolonged periods will result in a ghost 

image remaining even when you change the image. This option avoids allowing a fixed image to remain on the 

screen for prolonged periods. There are 4 options (

Standard

White Screen

Screen Saver

 or 

Inversion

) for your 

choice.

Restore Setting

If you reset the TV to the factory settings, all your present settings on Video & Audio will be erased and replaced 

by the factory’s default settings. However, picture settings in PC mode and Parental settings will not be erased.

Video

Audio

TV

Setup

Parental

Analog Closed Caption

Digital Closed Caption

Digital Caption Style

Caption

EXIT

Return

Select

CC1

Off

Video

Audio

TV

Setup

Parental

Caption Style

Font Size

Font Color

Font Opacity

Background Color

Background Opacity

Window Color

Window Opacity

Digital Caption Style

EXIT

Return

Select

As Broadcaster

Small

Green

Solid

Black

Translucent

White

Transparent

Summary of Contents for PDV28420C

Page 1: ...Owner s Manual PDV28420C 42 Plasma TV 811 284291W021 Printed in China ...

Page 2: ... before use RATING PLATE LOCATION The rating plate is located on the rear of the unit FCC STATEMENTS NOTE This unit has been tested and found to comply with the limits for a Class B digital device pursuant to Part 15 of the FCC Rules These limits are designed to provide reasonable protection against harmful interference in a residential installation This unit generates uses and can radiate radio f...

Page 3: ... not fit into your wall outlet consult an electrician for replacement of the obsolete outlet 10 Protect the AC power cord from being walked on or pinched particularly at plugs convenience receptacles and the point where they exit from the apparatus 11 Only use attachments accessories specified by the manufacturer 12 Use only with a cart stand tripod bracket or table specified by the manufacturer o...

Page 4: ...Composite Yellow RCA Type Video Input 10 Connecting a High Definition HD Source Using HDMI Connection 11 Connecting a High Definition HD Source Using Component Connection 11 Connecting a PC 12 Connecting an Audio Amplifier 12 Connecting the AC Power Cord 13 USING HEADPHONES 13 INSTALLATION 14 Installing the Base Stand 14 Mounting on the Wall 14 TV SETUP 15 21 Video Menu 15 Audio Menu 16 TV Menu 17...

Page 5: ...ly to the setup mode Simply follow the screen prompts as shown below to tune in the channels 1 When the screen appears as below press the ENTER button to start the wizard 2 Use the button to move to different language press the ENTER button to select the desired language QUICK INSTALLATION 3 Use the button to select the tuner mode and press the ENTER button to confirm 4 Use the button to select th...

Page 6: ...e remote control is not going to be used for a long time remove the batteries to avoid damage caused by battery leakage corrosion Do not mix old and new batteries Do not mix ALKALINE standard CARBON ZINC or rechargeable NICKEL CADMIUM batteries Always remove batteries as soon as they become weak Weak batteries can leak and severely damage the remote control WARNING Do not dispose of batteries in a...

Page 7: ...ptioning feature This function only works on programs broadcasted with captions 9 EXIT Button Press to exit the TV SET UP menu and return directly to normal viewing 10 SLEEP Button Press to set the SLEEP timer The unit will remain on for the time that is set and will automatically shut off afterwards 11 FUNCTION Button Press to switch between TV AV 1 AV 2 YUV in PC in HDMI 1 HDMI 2 12 LAST CH Butt...

Page 8: ...n screen TV menu 3 FUNCTION Button Selects TV AV 1 AV 2 YUV in PC in HDMI 1 HDMI 2 4 CH CH Buttons Confirms selections on the TV menu screen and changes the TV channels 5 VOL Controls Adjusts the volume level 6 Removable Stand 7 Color Screen 8 Speaker 9 Remote Sensor Receives the remote control signal Standby Indicator ...

Page 9: ... Jacks HDMI IN 1 HDMI IN 2 14 AUDIO Jack PC IN 15 COMPONENT VIDEO IN Y PB PR Jacks YUV IN 16 AUDIO IN Left Right Jacks AV IN 2 17 VIDEO IN Jack AV IN 2 18 AUDIO IN Left Right Jacks YUV IN 19 VIDEO IN Jack AV IN 1 20 PHONES Jack 21 TV ANTENNA Terminal 22 AUDIO IN Left Right Jacks AV IN 1 23 S VIDEO Jack AV IN 1 10 11 12 13 14 15 18 19 20 21 22 23 ...

Page 10: ...is TV can also receive analog cable signals or the RF output from a satellite receiver VCR or cable box CONNECTING AN A V DEVICE To connect to other equipment such as a VCR camcorder satellite system or cable etc Connecting to a VCR Camcorder Satellite System Cable Connect the AUDIO and S VIDEO cable not included as shown Make sure you connect the cable from the other equipment AUDIO OUT and S VID...

Page 11: ... AUDIO and VIDEO IN NOTE Please refer to the user manual for the other equipment for more information CONNECTING DEVICES WITH A COMPOSITE YELLOW RCA TYPE VIDEO INPUT To connect A V devices such as a VCR PVR or camcorder Connecting to a VCR PVR Camcorder Connect the AUDIO VIDEO cable not included as shown Make sure you connect the cable from the other equipment AUDIO and VIDEO IN to this unit AUDIO...

Page 12: ... top boxes and other digital AV devices HDMI was developed to provide the technologies of High Bandwidth Digital Content Protection HDCP as well as Digital Visual Interface DVI in one specification HDCP is used to protect digital content transmitted and received by DVI compliant or HDMI compliant displays HDMI has the capability to support standard enhanced or high definition video plus standard t...

Page 13: ...ect the 15 pin D SUB PC VGA connector from your computer to the 15 pin D SUB PC VGA input on this unit using a monitor cable and audio cable not included as shown Make sure you connect the cable from the computer PC Connector and PC AUDIO to this unit PC IN MONITOR VGA and AUDIO NOTE When connecting a DVD player to the television the picture resolution is solely dependent upon the resolution suppo...

Page 14: ...the unit is not completely disconnected from the main power even when the power is turned off Be sure the AC power cord is disconnected and all functions are off before making connections Make sure all components are connected correctly When not being used on mains the AC Cord should be unplugged from the unit USING HEADPHONES Turn down the volume before connecting headphones to the unit then adju...

Page 15: ... down on a flat surface so the back side is facing up making sure to place a soft cushioned material such as a blanket or thick piece of foam beneath the screen 3 Put the stand into the hole at the bottom of the TV 4 Insert screw into the hole and tighten MOUNTING ON THE WALL This unit is VESA compliant and is designed to be wall mounted with a VESA compliant 15 3 4 x 7 7 8 400mm x 200mm mounting ...

Page 16: ...righten or darken the whole picture Contrast Adjust to sharpen the picture quality The black portions of the picture become richer in darkness and the white become brighter Saturation Adjust the color saturation of the picture Tint Adjust the tint of the picture Toward purple Toward green Sharpness Adjust the sharpness level to improve detail in the picture Color Temperature Adjust the three color...

Page 17: ...the MAIN MENU and return to the normal screen press the EXIT button repeatedly NOTE Experiment with different sound settings until you find the settings you prefer Balance Adjust the balance level toward the left or right speakers Bass Adjust the bass range Treble Adjust the treble range Virtual Surround Switch on or off the virtual surround effect Reverb Select from preset sound settings Concert ...

Page 18: ...memory The stations stored before are still kept Channel Skip Skips weak channels and the channels you do not like MTS Select from Stereo SAP Secondary Audio Program Mono Audio Language Select from English Spanish French Available for digital channels if multiple audio languages are broadcasted NOTE The SAP Secondary Audio Program feature allows a TV station to broadcast other information which co...

Page 19: ...eps 3 and 4 to adjust other options 6 To exit the MAIN MENU and return to the normal screen press the EXIT button repeatedly OSD Language Select from English Español Français Time Setup Setting Time Zone Select the time zone from Eastern Time Indiana Central Time Mountain Time Arizona Pacific Time Alaska Hawaii Sleep Timer Select the time to turn the unit to Standby mode automatically Off 5 Minute...

Page 20: ...isplay whitish images and low gamma values display high contrast images Use the or button to select the options Middle Bright or Dark Power Saving Setting This function allows you to reduce the power consumption of the TV Use the or button to select the desired power saving level Level 0 4 ISM Image Sticking Minimization Mode Setting A frozen or still picture from a PC video game displayed on the ...

Page 21: ...o go into the detailed settings 2 Use the and buttons to move among the rating levels Press the ENTER button to change the mode between Blocked and Allowed 3 Press the EXIT button to return to the previous menu 4 Repeat steps 1 3 to adjust other options 5 To exit the MAIN MENU and return to the normal screen press the EXIT button repeatedly Rating Enable Select On to edit the following parental it...

Page 22: ... Some material may be inappropriate for children under 13 R RESTRICTED Under 17 requires accompanying parent or adult guardian for viewing in movie theaters NC 17 No one 17 or under admitted in movie theaters X Adults Only C Children C8 Recommended for children age 8 and older G GENERAL AUDIENCES Suitable for all ages PG PARENTAL GUIDANCE SUGGESTED Some material may not be suitable for children 14...

Page 23: ...ly connected Make sure all input cables are firmly connected Check the VIDEO MENU within the TV SETUP MENU Check to make sure the program you are watching is broadcast in color and not black white Make sure the unit is plugged in and turned on Make sure that TV mode is selected Try a new channel to check for possible station trouble Make sure the antenna is connected properly Increase the volume M...

Page 24: ...es Important Also keep your Bill of Sale as proof of purchase Model no Product name Type of set Serial no Invoice no Date purchased Dealer name FOR SERVICE AND REPAIR PLEASE VISIT www venturer com 2008 VENTURER Electronics Inc ...

Page 25: ...aterial or workmanship and do not extend to any product or parts which have been lost or discarded or damage to product or parts caused by misuse accident improper operation or maintenance or use in violation of instructions provided with the product or to product which has been altered or modified without authorization of VENTURER or to products or parts thereof which have had the serial number r...

Page 26: ...na will need a TV Converter to receive over the air digital programming but should continue to work as before for other purposes e g for watching low power TV stations still broadcasting in analog watching pre recorded movies or playing video games For more information please see www DTV gov or call our number below For information on the TV Converter program and on government coupons that may be ...

Page 27: ...E 26 UNIT INCH 41 1 8 3 1 4 29 1 8 12 1 5 10 1 2 18 3 8 12 3 4 28 1 2 Printed in China 811 284291W021 ...

Reviews: