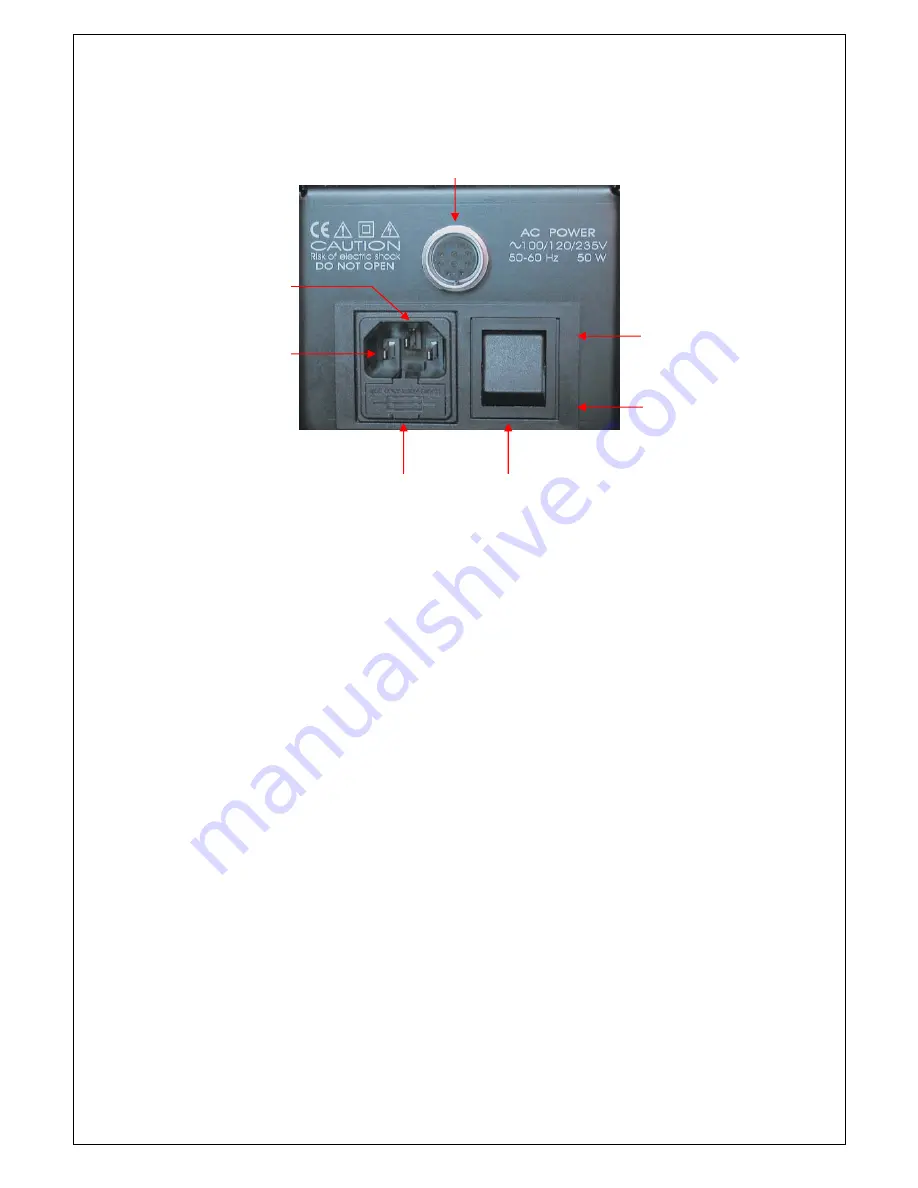
venture VP100 Reference User Instructions Download Page 10

4. P

OWER SUPPLY UNIT


Page 10 / 22 


(1)

(5) 

(4) 

(7) 

(3) 

(6)

(2)


(1) 

10-Pins Power-supply plug to connect to the VP100 preamplifier 

(2) 

On/Off switch 

(3) 

ON position. 

(4) 

OFF position. 

(5) 

Mains plug inlet. 

(6) 

500mA mains fuse 

(7) 

Mains phase input pin.


Summary of Contents for VP100 Reference

Page 1: ...USER INSTRUCTIONS VP100 Reference HIGH END PREAMPLIFIER VENTURE bvba Hanendreef 23 2930 Brasschaat Belgium Tel 32 36530732 Fax 32 36531349 Email info ventureaudio com Website www venture audio com...

Page 2: ...DO NOT EXPOSE THIS APPLIANCE TO RAIN OR MOISTURE This product uses high voltage There are no operator serviceable parts inside Refer servicing to qualified personnel only Observe all warnings and ins...

Page 3: ...PPLIANCE ELEMENTS 7 1 FRONT PANEL 7 2 REAR PANEL 8 3 REMOTE CONTROL 9 4 POWER SUPPLY UNIT 10 V OPERATION INSTRUCTIONS 11 1 POWER SWITCH 11 2 INSTALLED CARDS 11 3 PHONO SECTION RIAA MM MC 12 4 OPERATIO...

Page 4: ...he first Tube Amplifier VENTURE REFERENCE ONE a Single Ended mono block amplifier with a special designed high power 300B tube family Venture 6300B was born and after followed by its brother REFERENCE...

Page 5: ...fore operating your VENTURE AUDIO appliance please read all instructions and cautions carefully and completely 1 ALWAYS disconnect your entire system from the AC mains before connecting or disconnecti...

Page 6: ...reamplifier must be installed in a place far from about 10cm from the other appliances This will guarantee the best signal to noise ratio In the same manner please allow at least 50 cm between the pow...

Page 7: ...PTION OF APPLIANCE ELEMENTS 1 FRONT PANEL 2 Page 7 22 3 4 1 c Selection and Set Down end of set up knob d Preamplifier offset security LED default off e Digital display f Volume and Set Up begin of se...

Page 8: ...t Input 8 XLR 6 Right Input 9 RCA 7 Right Input 10 XLR 8 Right Input LEFT CHANNEL 11 RCA Left output 12 XLR Left output 13 RCA 1 Left Input 14 XLR 2 Left Input 15 RCA 3 Left Input 16 XLR 4 Left Input...

Page 9: ...4 8 1 Switch on off the digital display 2 Mutes the sound or back to previous volume 3 Selects inputs 4 Lowers sound volume 5 Sets the amplifiers in Stand By mode 6 Wakes the amplifiers up Stand by of...

Page 10: ...SUPPLY UNIT Page 10 22 1 5 4 7 3 6 2 1 10 Pins Power supply plug to connect to the VP100 preamplifier 2 On Off switch 3 ON position 4 OFF position 5 Mains plug inlet 6 500mA mains fuse 7 Mains phase i...

Page 11: ...ully and instantly benefit from its maximum musical quality However if you are meant to keep away for a long time as for holidays for instance or in the case of any storm risk it is considered safe to...

Page 12: ...his is safe this is easy and this will sound perfectly to the taste of your cell For the MM input there is set of 4 capacitors within the preamplifier changeable by switches No capacitor default 47pF...

Page 13: ...he remote control permits to switch the digital display on or off Set up is accessed through a light push on the Volume knob It allows to tune some parameters at initial set up of your preamplifier or...

Page 14: ...C input is selected as the 10th input of the preamplifier after MM By turning the Selection knob right or using the remote control we process to the pink noise generator volume adjustment It shows ini...

Page 15: ...this functionality select ON then exit the set up The screen displays LEARN RC5 ERROR Now press any key from the remote control The operation is complete The preamplifier displays back its welcome sc...

Page 16: ...e is fixed In case of mains over voltage for instance the fuse within the external power supply unit may have been blown Please only replace the fuse with the same one as described here under In case...

Page 17: ...rfectly with no specific setting or maintenance for a large number of years In case of dust removal plainly process using a clean dry rag In case of a dirty mark DO NOT uses any detergent or solvent b...

Page 18: ...puts 4 XLR inputs 4 RCA inputs 2 Phono RCA MM MC Output 1 XLR Max level 9Veff 600 Ohms Output 2 RCA Max level 4 5Veff 600 Ohms Inter cards balance 9dB 2 channels Dimensions 483 x 110 x 330 mm Weight 9...

Page 19: ...ordance with the instructions in the owner s manual abused or misused damaged by accident or neglect or in being transported or if the defect is due to the product being repaired or tampered with or m...

Page 20: ...bsolutely While it is not specific to VENTURE products Always switch on the source elements first they sometimes emit a spark at switch on and this must not be amplified and pushed to the speakers The...

Page 21: ...cable is connected to a wall outlet AC alimented 3 Check that your mains cable is connected to the VP100 Reference inlet 4 Check that your appliance voltage is compliant with your domestic one 5 Check...

Page 22: ...ments such as CD players Unplug all Switch the appliance back on It must operate perfectly alone In that case have your faulty element fixed repaired accordingly Appliance internal failure internal DC...

Reviews: