SERVICE
Service - 48
Switching Speedometer (MPH or Km/H)
1. Park the power unit on a level surface.
2.
Engage the parking brake, shut off the engine,
and remove the key from the ignition switch.
3. Remove the steering column cover to access
the wiring for the gauges. Follow the harness
from the fuel cluster gauge to locate the green
wire (labeled A-013) with the single plug.
4. For speedometer readout in miles per hour, the
green wire (A-013) should be connected to the
wire from the gauge labeled A-020.
5. For speedometer readout in kilometers per hour,
the green wire (A-013) should be connected to
the wire from the gauge labeled A-021.
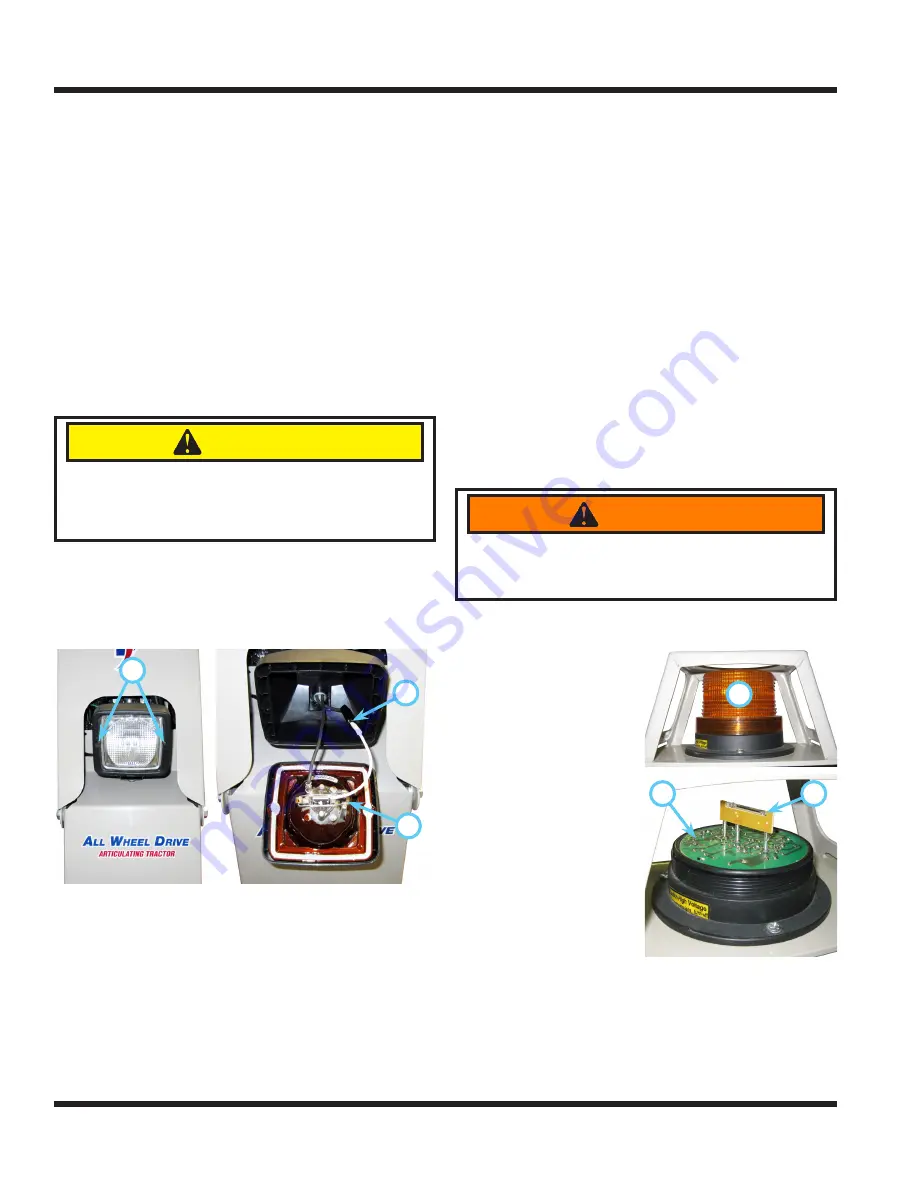
Replacing Light Bulbs (Headlights)
1.
CAUTION
The light bulb contains gases under pressure.
The bulb may shatter if the glass is scratched or
dropped. Wear eye protection and handle bulb
with care.
Park the power unit on a level surface.
2.
Engage the parking brake and shut off the engine.
3. Remove the key from the ignition switch.
4. Remove the two screws (A) from the light cover
and remove the cover.
5.
A
B
C
Disconnect the light bulb wire from the plug (B).
6. Pinch the wire spring fastener (C) and lift away
from the light bulb.
7. Remove the defective light bulb.
8. Install the new light bulb and secure with the
wire spring fastener.
9. Connect the light bulb wire to the plug.
10. Reinstall the light cover.
Replacing The Taillights
The taillights are equipped with LEDs and do not
use a replaceable bulb. If a taillight no longer func-
tions, the entire taillight must be replaced.
Replacing the Work Lights
The work lights are equipped with LEDs and do not
use a replaceable bulb. If a work light no longer
functions, the entire work light must be replaced.
Replacing The Turn Signal Lights
The signal lights used for the turn signal / hazard
flasher kit are equipped with LEDs and do not use
a replaceable bulb. If a signal light no longer func-
tions, the entire light must be replaced.
Replacing The Strobe Light Bulb
1. Park the power unit on a level surface.
2.
Engage the parking brake and shut off the engine.
3. Remove the key from the ignition switch.
4.
WARNING
High Voltage!
Before removing strobe light lens, turn off power and
wait five minutes for the capacitor to discharge.
Turn the battery disconnect switch to the Off
position and wait five minutes for the capacitor to
A
B
C
discharge.
5. Unscrew the strobe
lens (A) from the
base.
6. Hold the circuit board
(B) in place with one
hand and remove the
strobe bulb (C).
7. Install the new strobe
bulb, pushing it
securely onto the cir-
cuit board connectors.
8. Ensure the circuit
board and the o-ring
are in place and rein-
stall the strobe lens.
9. Turn the battery dis-
connect switch to the On position.


