background image

Step 

6

Record Video 

NOTE

The BCR records both Audio and Video in the video recording mode

Date, Time, Officer and Camera ID are watermarked onto video recording

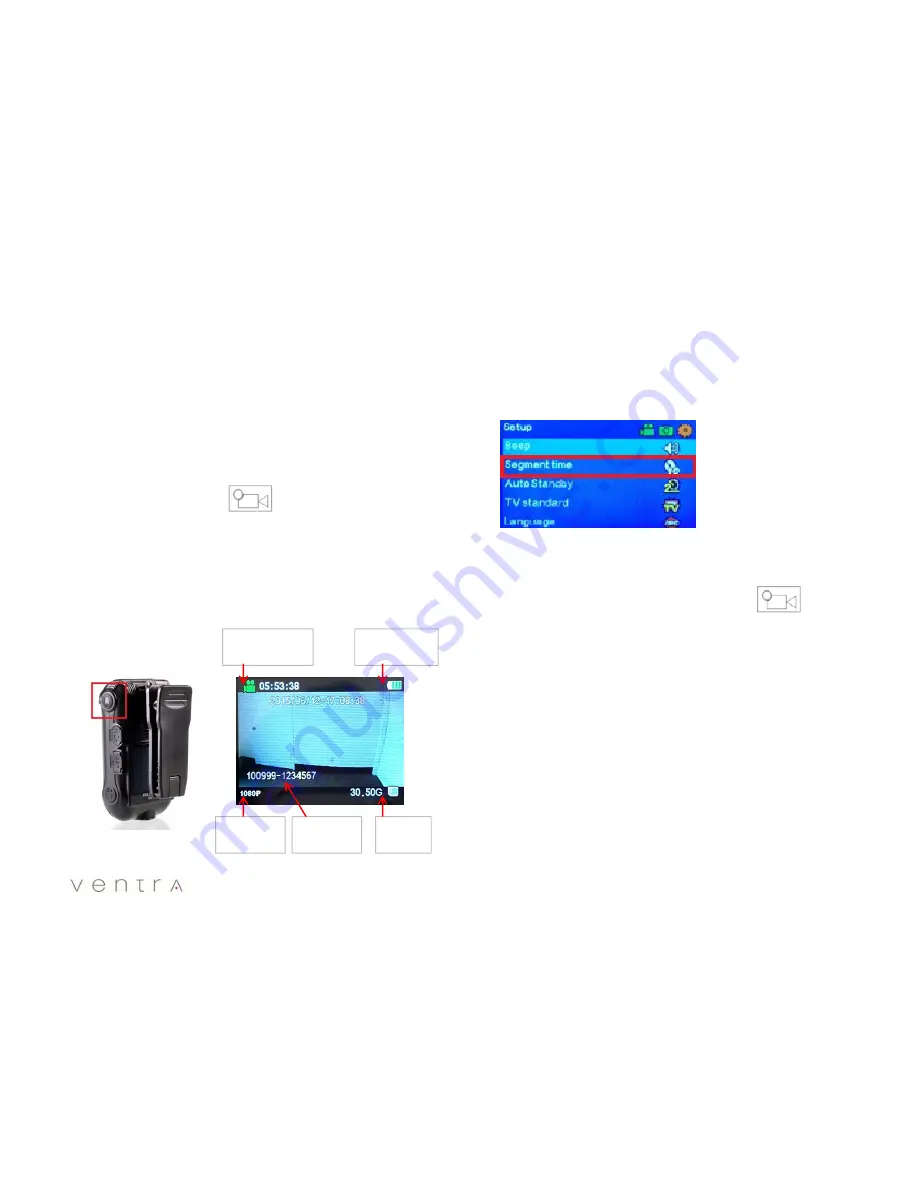
The screen will display recording time capacity based on the recoding
resolution and size of the SD card

• Press the Video Record Button (                  ) once if the screen is already 

on.  If not, press twice to record

• To stop recording, press Record Button again

Bookmark

: During video recording, press 

( OK  ) 

button to book mark 

the recording, file will be displayed in Red in the playback menu

• A camera icon is located on the top left hand corner of the screen.  

Event Recording / Continuous Recording

The BCR records video in 2 methods: 

Event 

or 

Continuous 

Mode 

Settings for Continuous Recoding  

10

/

20

/

30 min

can be programmed in  

the system setting  > 

SEGMENT TIME

Event Recording:  

While the BCR is on (standby), press the Video Record 

(                    )

button 

• A camera icon is located on the top left hand corner of the screen.  

Green

– standby status

Red

– Recording

While the BCR is on (standby), press the Video Record 

(                    )

button 

to start recoding and press again to stop recording.

Continuous  Recording:  10 / 20 / 30 Minute

Recoding  time per file before automatically starting a new file

While the BCR is on (standby), press the Video Record button to start 

recording. If no other action is taken, the BCR will continuously record up 

until the preprogrammed time and automatically start recording a new 

video file.

The recording can be stopped at anytime by pressing the Video Record 
button.   

10

Recording  
time remaining  

Battery Level 
Indicator

Video 
Resolution

SD card 
capacity

Officer -
Camera ID

Summary of Contents for BCR-300

Page 1: ...BCR 300 Body Worn Camera User Guide Please read and follow all instructions and features before use Save for future reference For latest update and specs please visit www ventrainc com Manual Ver 06 15 ...

Page 2: ... Step 1 Charge Battery 7 Step 2 Insert SD card 7 Step 3 Power On Off 8 Step 4 Connect External Camera IR Mode 8 Step 5 System Configuration 9 3 3 3 3 Recording Recording Recording Recording 4 4 4 4 Playback Upload Playback Upload Playback Upload Playback Upload 5 5 5 5 Warranty RMA Warranty RMA Warranty RMA Warranty RMA Step 6 Recording Video 10 Step 7 Recording Audio Still Image 11 Step 8 Playbac...

Page 3: ...l software Simply record and playback directly on the camera or connect it to a PC and view recordings via standard media player With its innovative dual camera design the BCR is equipped with an External HD detachable camera This provides maximum flexibility optimal recording angle and comfort through extended use BCR 300 operates in 2 modes Main Camera only Recording from the main camera Main Ca...

Page 4: ... LCD Screen Built in 2 LCD Screen 16 9 ratio LED Status Indicator 2 LED Battery Rechargeable 3 7V 2700mA High Capacity Li Rechargeable Battery Video Recording Recording Mode Event Continuous 10 20 30min file Audio Recording Recording Mode Event Still Image Recording Mode Event Power Consumption Recording Time Approx 4 hours Recording time varies dependent upon IR usage and recording source Main or...

Page 5: ...System Layout Main Camera Front Main Camera Rear External Camera 5 ...

Page 6: ...d Green Solid Blue Standby Mode None Blue Blink Charging Camera Off None Red Charging Camera On Green Red Blink Solid Blue Fully Charged Solid Green None Connected to PC USB Solid Green Solid Pink System On Monitor on Green Red Blink Solid Blue Record Video Red Blink Solid Blue Record Still Image Red Blink Solid Blue Record Audio Red Blink Solid Blue 6 ...

Page 7: ...Option 2 Leave battery in the main camera Connect the USB cable directly into the USB port on the main camera Connect the USB cable to the wall charger and into wall outlet or to an USB port device such as PC Charge time approximately 1 1 2 hours Remove battery from the main camera and insert into the charger provided Connect the charger to an USB cable and wall outlet charger Charge time approxim...

Page 8: ...n Press the Power button for 3 seconds LCD screen will then display live video Turn Off Press the Power button for 3 seconds IR Night Vision Mode The Main Camera has an IR button to switch to night vision Step 4 Connect external camera cable into HDIN slot on the main camera Ensure the connection is secure 8 The Main Camera has an IR button to switch to night vision viewing recording mode The Exte...

Page 9: ...in Auto Standby Time before BCR goes into standby mode monitor Off Never 2 Min 5 Min 10 Min TV Standard NTSC PAL USA NTSC Language English Set Time Year Month Day Hour 24H Minute Second Set ID This programs the Officer ID Dev ID This programs the Camera Device ID Camera Setup Triple Shot Record single or 3 images when a snapshot is taken Resolution Select picture resolution 3M 12M 16M Digital Enha...

Page 10: ...de Settings for Continuous Recoding 10 20 30 min can be programmed in the system setting SEGMENT TIME Event Recording While the BCR is on standby press the Video Record button A camera icon is located on the top left hand corner of the screen Green standby status Red Recording While the BCR is on standby press the Video Record button to start recoding and press again to stop recording Continuous R...

Page 11: ...information are included or watermarked The screen will display recording time remaining based on the size of the SD card Press the Audio Record Button AUD once if the screen is already on If not press twice to record To stop recording press AUD Button again A picture of microphone is displayed when audio recording is activated Bookmark During audio recording press OK button to bookmark is already...

Page 12: ...he OK button for 1 second to access Playback Menu Playback Audio While in playback Adjust Volume via arrow key To pause press OK Return to Menu press AUD To navigate playback category press M To select the category press OK Scroll Top Down Recording list via arrow key To select the file press OK NOTE Each file name is saved displayed based on Date and Time i e 20150609181511 12 Playback Images Scr...

Page 13: ...se press OK Fast Forward 1 4X 1 2X 2X 4X 8X and 16X by pressing Rewind 1 4X 1 2X 2X 4X 8X and 16X by pressing M To stop FF or Rewind press OK Return to Menu press AUD Date Time of recording Duration of recording 13 Videos files that were bookmarked during recording OK Button are listed in Red ...

Page 14: ...C 5 Locate the SD card Drive on the PC click to open Drive 6 Select DCIM then Media to view all files on SD Card 7 View or Copy files to server or desired location 3 Turn on the main camera by pressing the Power button for 3 seconds 4 An USB connection screen is displayed Option 2 Remove SD card from BCR to a card reader Using a thin object to open the battery cover tab on the bottom of camera Ref...

Page 15: ...be viewed through Windows Media Player or VLC Media Player Video Format MP4 Audio Format WAV Image Format JPG Date Time Officer ID are watermarked in the recordings Video viewed via VLC media player 15 Video viewed via VLC media player Image viewed via Windows Photo Viewer ...

Page 16: ...NITIVE PUNITIVE PUNITIVE OR OR OR OR CONSEQUENTIAL CONSEQUENTIAL CONSEQUENTIAL CONSEQUENTIAL DAMAGES DAMAGES DAMAGES DAMAGES INCLUDING INCLUDING INCLUDING INCLUDING WITHOUT WITHOUT WITHOUT WITHOUT LIMITATION LIMITATION LIMITATION LIMITATION INFRINGEMENT INFRINGEMENT INFRINGEMENT INFRINGEMENT OF OF OF OF THIRD THIRD THIRD THIRD PARTY PARTY PARTY PARTY RIGHTS RIGHTS RIGHTS RIGHTS LOST LOST LOST LOST...

Page 17: ...1578 W San Bernardino Rd E Covina CA 91722 USA www ventrainc com info ventrainc com Tel 888 418 3833 Innovative solutions in vehicle and mobile video technology ...

Reviews: