
3
B.
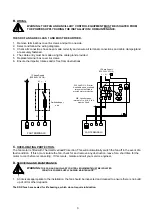
WIRING.
WARNING: THE FAN AND ANCILLARY CONTROL EQUIPMENT MUST BE ISOLATED FROM
THE POWER SUPPLY DURING THE INSTALLATION / OR MAINTENANCE.
THE SDX FANS ARE CLASS 1 AND MUST BE EARTHED.
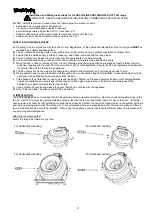
1. Remove terminal box cover & screws and put to one side.
2. Select and follow the wiring diagrams.
3. Check all connections have been made correctly and ensure all terminal connections and cable clamps/gland
are securely fastened.
4. The cable entry must be made using the cable gland provided.
5. Replace terminal box cover & screws.
6. Ensure the impeller rotates and is free from obstructions
C.
OVER-HEATING PROTECTION.
The fan motor is fitted with Thermal Overload Protection. This will automatically switch the fan off in the event of a
fault condition. If this occurs isolate the fan, check for and remove any obstruction, leave for a short time for the
motor to cool before reconnecting. If this recurs, Isolate and call your service engineer.
D.
SERVICING AND MAINTENANCE.
WARNING:
THE FAN AND ANCILLARY CONTROL EQUIPMENT MUST BE ISOLATED
FROM THE POWER SUPPLY DURING MAINTENANCE.
1. At intervals appropriate to the installation, the fan should be inspected and cleaned to ensure there is no build
up of dirt or other deposits.
The SDX fans have sealed for life bearings, which do not require lubrication.
230 Volt D.O.L. Starter
A suitable sized overload
relay must be fitted to
provide motor protection.
4
2
N.B. Links between
terminals 1 to A1 & 3 to 6,
must be fitted.
6
1
3
5
23
95
96
24
A1
A2
E
N
~
E
L
1 Phase Supply
(220-240V 50 Hz).
N
E
FAN TERMINALS
L
E
N
~
E
L
1 Phase Supply
(220-240V 50 Hz).
N
E
FAN TERMINALS
L
L
N
Switched spur
unit