


English
English
18 VELUX
®
VELUX
®
19
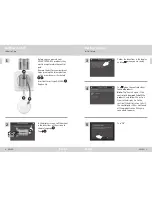
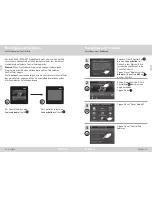
Tap in control pad
A
followed
by in control pad
B
.
If the display shows "No products
found", tap "Search again" to try
again.
Tap "OK" in control pad
B
.
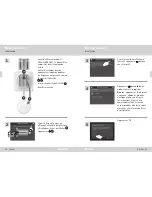
Adding products
Adding control pad
All the rest
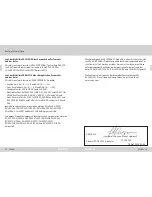
Resetting control pad
If you want to delete all registered products and personal settings and
start afresh, you can reset the control pad to the initial factory settings.
Note:
If you have one control pad only, all the products must be reset
before they can be registered in the control pad again (see the section
If initial set-up fails
). If you have a second control pad, you can copy this
to the control pad you are resetting instead (see the section
Adding
control pad
).
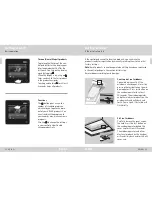
Remove the battery compartment
lid by pressing the release button
with a screwdriver as illustrated
1
,
2
.
Press the RESET button on the
back of the control pad with
a pointed object for at least
5 seconds
3
.
Replace lid.
In the display screen, tap "Yes" to
conirm that you want to reset the
control pad.
The control pad has now been
reset. To use the control pad again,
see the section
Initial set-up
.
5
6
A
B
B
1
2
1
2
3
Summary of Contents for INTEGRA KLR 200
Page 85: ...168 VELUX VELUX 169 VELUX INTEGRA 1 2 AA LR6 3 1 2 O 1 2 3 1 2 5 4 3 1 2...
Page 86: ...170 VELUX VELUX 171 1 2 3 4 5 0 100 6 O 1 2 3 4 0 100 5 0 100 1 2 3 5 4 6 3 2 1 5 4 5 5...
Page 87: ...172 VELUX VELUX 173 H 3 VELUX 10 10...
Page 88: ...174 VELUX VELUX 175 200 1 3 5 2 4...
Page 89: ...176 VELUX VELUX 177 VELUX INTEGRA B 1 3 5 2 4 A A B 1 2 A A B B 3 4 A A...
Page 90: ...178 VELUX VELUX 179 A B O B 1 2 RESET 5 3 5 6 A B B 1 2 1 2 3...
Page 133: ......
Page 134: ......


