background image

P

R E P A R E F O R

I

N S T A L L A T I O N

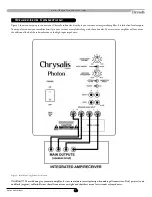
Your new Chrysalis subwoofer provides for a number of installation options. Read all the installation information below in order to
determine which installation option is best for your system.

Remember to perform all installation procedures with system power turned

off to prevent  possible damage. 

P l a c e m e n t  

The first step in installing your new Photon is to determine where it will be placed in the room. Unpack the system carefully and use the
following guidelines in order to find the best room placement option.

True subwoofers operate at extremely low frequencies which are primarily omni-directional. Keep in mind that frequency response and
output level can be 

drastically

influenced by placement, depending on the acoustic properties of the listening room. To obtain optimum

output from your subwoofer, place it within a foot of a corner. This location will offer the greatest output levels and optimum low frequency
extension. If at all possible, your subwoofer should be placed along a wall. The worst location for a subwoofer is typically far away from any
walls and close to the center of your room. Avoid these locations when possible. When using a pair of Chrysalis subwoofers in stereo, it is
preferable to place each subwoofer near the satellite of the same channel.

Depending on the size and type of furnishings in the room, perfect placement may not be possible. Finding the best location within your
environment will likely require some experimentation. We suggest you experiment with the location during setup to find what sounds best to
you when seated in your typical listening position.

Regardless of where you install your Chrysalis subwoofer, it must remain in an upright position (woofer facing forward). Using, shipping or
storing the subwoofer in any other position for an extended period of time may result in damage to the unit not covered by warranty.

Caution!

This subwoofer has electronics built into the cabinet.  Do not place the cabinet next to sources of heat such as furnace registers, radiators, etc.
Do not place the unit near sources of excessive moisture, such as evaporative coolers, humidifiers, etc.  The power cord should be routed in such
a way that it will not be walked on, pinched or compressed in any way that could result in damaging the insulation or wire.

Photon Series Manual

w w w . c h r y s a l i s a c o u s t i c s . c o m

2

Summary of Contents for Chrysalis PHOTON-8

Page 1: ...PHOTON 8 8 Inch Powered Subwoofer PHOTON 10 10 Inch Powered Subwoofer w w w c h r y s a l i s a c o u s t i c s c o m S E R I E S...

Page 2: ...Photon Series Manual i...

Page 3: ...lations 1 Prepare for Installation 2 Installation 3 Line Level Connection Option A 4 Line Level Connection Option B 6 Speaker Level Connections 7 Subwoofer Outputs 8 Interconnnect Cables 8 Care of You...

Page 4: ...e system carefully This unit is heavy Use caution when lifting or moving to avoid injury Please save the carton and all packaging materials for future use Packing this unit in any other carton may res...

Page 5: ...any walls and close to the center of your room Avoid these locations when possible When using a pair of Chrysalis subwoofers in stereo it is preferable to place each subwoofer near the satellite of th...

Page 6: ...crossover control allows you to adjust the upper limit of the subwoofer s frequency response from 40 to 120 Hz The subwoofer s response will begin rolling off above the frequency you set this control...

Page 7: ...oofer out jack that is internally filtered and designed to be used with a conventional amplifier and speaker In some rare cases combining both an external crossover and the one internal to the subwoof...

Page 8: ...round sound processor s subwoofer out or LFE the auto on off circuit sensitivity will be affected When one input channel is used instead of two the unit will see lower signal levels present at the inp...

Page 9: ...back of your amplifier When the subwoofer is installed in this fashion your satellite speakers will be crossed over at 80 Hz which removes the lower bass frequencies from your external amplifier and...

Page 10: ...ve to red and black negative to black Be sure that all connections are tight and that there are no loose strands or frayed wires Figure 3 shows an easy way to connect your Chrysalis subwoofer directly...

Page 11: ...rked INTERNAL X OVER SUBWOOFER DIRECT on the rear panel of the subwoofer and set to the SUBWOOFER DIRECT position This will eliminate the internal crossover from the signal path When installing your n...

Page 12: ...t at the inputs and turn off the unit after several minutes when there is no longer any signal at the inputs Your new subwoofer is equipped with circuitry to provide maximum performance with greatest...

Page 13: ...levels one of the protection circuits may be engaged Has the amplifier overheated 6 Make sure binding posts are tightened If the protection circuitry is active the unit may cycle on and off until ope...

Page 14: ...ice Coil 2 5 Dual Layer 3 Dual Layer inner outer wind inner outer wind Inputs Gold plated line level and speaker level Gold plated line level and speaker level Outputs Line level 80 Hz up Line level 8...

Page 15: ...es Manual w w w c h r y s a l i s a c o u s t i c s c o m 12 CH RY S A L I S PR O D U C T S BassMatrix Series BassMatrix 10 BassMatrix 12 Photon Series Photon 8 Photon 10 Starfire Series Starfire 10 S...

Page 16: ...ot responsible for damage caused by accidents abuse misuse natural or personal disaster or unauthorized modification The CHRYSALIS products are not intended for professional or commercial use and CHRY...

Page 17: ...ill CA 95037 408 465 2888 voice 408 779 9227 fax 408 779 9208 service fax w w w c h r y s a l i s a c o u s t i c s c o m Service E mail service chrysalisacoustics com Product E mail help chrysalisaco...

Reviews: