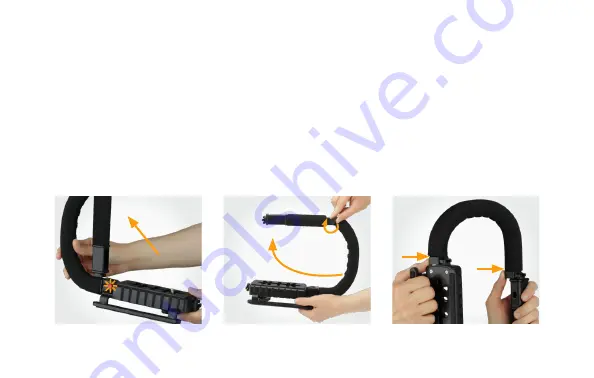
background image

1.

 Lift the padded locking arm until it 

locks into place.

To Add the Second Arm

Slide the padded second arm into the 
mounting slots until the locking tabs 
click shut.

SETTING UP THE ACTIONPAN PRO

2.

 Swivel out the padded extension 

arm, and secure it by tightening the 
locking knob.

5

Summary of Contents for ACTIONPAN PRO

Page 1: ...ACTIONPAN PRO STABILIZING ACTION GRIP HANDLE USER MANUAL VB 2000...

Page 2: ...he stability that digital and video cameras need to achieve dramatic low angle shots and follow fast paced action like skiing skateboarding or motocross The grip easily converts to a one arm configura...

Page 3: ...ll images are for illustrative purposes only PRECAUTIONS SPECIFICATIONS Compatibility Compact cameras and camcorders with 1 4 20 mount Attachment Method 1 4 20 mount Material ABS polymers Shoe Mounts...

Page 4: ...unting platform 3 Locking button 4 Padded locking arm 5 Locking knob 6 Padded arm extension 7 Mounting screw 8 Second arm slots and locking tabs 9 Padded second arm 10 Single shoe mount 11 Triple shoe...

Page 5: ...locks into place To Add the Second Arm Slide the padded second arm into the mounting slots until the locking tabs click shut SETTING UP THE ACTIONPAN PRO 2 Swivel out the padded extension arm and secu...

Page 6: ...secure Attaching Accessories Use the single or triple shoe mounts to attach accessories like a microphone LED light or flash with a hot or cold shoe type connection 1 Attach the single shoe or triple...

Page 7: ...second arm locking tabs and remove the padded second arm FOLDING THE ACTIONPAN PRO GRIP 2 Loosen the locking knob and fold down the padded arm extension 3 Press the locking button and fold down the pa...

Page 8: ...e or defect caused by misuse neglect accident alteration abuse improper installation or maintenance EXCEPT AS PROVIDED HEREIN THE WARRANTY PROVIDER MAKES NEITHER ANY EXPRESS WARRANTIES NOR ANY IMPLIED...

Reviews: