background image

15 


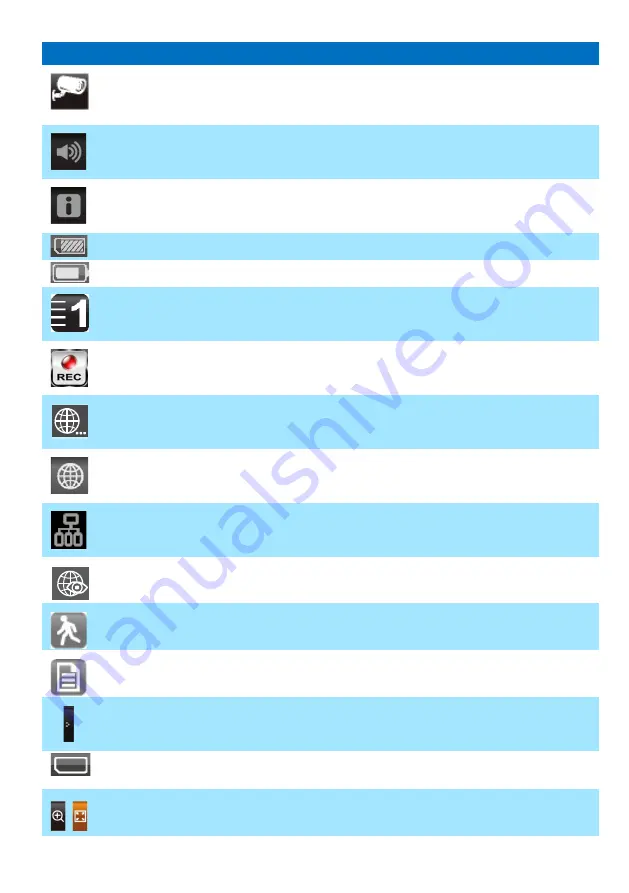
ICON 


WHAT THE ICON MEANS 


Camera Mode 

Select how you want the Live screen to display camera input: 
Scan between cameras (5 seconds) 
Quad view (all paired cameras display) 
Full view (1 camera displays on full screen) 


Volume 

Adjust the volume level. 


System Settings 

Access the system software operation and setting page or view recorded 
events. 


SD Capacity 

Indicates memory capacity remaining. 


Battery Capacity 

Displays battery capacity. This graphic shows battery at nearly full. 


Camera Number 

Displays the camera number and signal strength through the status lines 
to the left of the number. 


Record Status 

Tap to start or stop recording for that camera 
• Steady on - Not recording • Flashing - Recording 


Connecting to the 
Internet 

Connecting your system to the internet. 


Internet Connected 

Connects your system to the internet. 


Intranet Connected 

Connects your system to the intranet. 


Remote View 

Indicates remote viewing is in process. 


Motion 

System indicates motion detection recording in progress. 


Scheduled 

System indicates scheduled recording in progress. 


Pop Up Menu Tab 

Opens and closes the pop up menu display. 


No SD Card 
Indicator 

Displays red when the SD card is not present or is damaged. 


Zoom


Zoom in / out of a particular section of the live video


Summary of Contents for DWH Series

Page 1: ...DWH SERIES VIDEO SECURITY SYSTEM Installation and Operation Instruction Manual Model AWS22R Version 1 0 This manual should be retained for future reference 4 3 LCD Real Time Digital W ireless Monitor...

Page 2: ...ra to Receiver optional 10 QUICK START GUIDE 11 Set Up the Camera 11 Set Up the Wireless Touch Screen Monitor 11 System Operation 12 Remote Access 12 GETTING TO KNOW THE MONITOR AND CAMERA 13 SYSTEM I...

Page 3: ...r Saving 28 Screen Auto Lock 29 Time 30 Clock Alarm 30 Time Setting 30 Timer 31 Format Storage 32 System Upgrade 32 Language 33 Quick Tips 33 REMOTE ACCESS 34 Overview 34 Downloading Android APP 34 Do...

Page 4: ...ot assume any liability for damages to items or persons caused by improper handling or non compliance with the safety notices Any warranty claim will be null and void in such cases 1 Do not drop punct...

Page 5: ...is encouraged to try to correct the interference by one or more of the following measures Reorient or relocate the receiving antenna Move the equipment away from the receiver Plug the equipment into...

Page 6: ...the Device ID and Password information Please keep the device ID and password information in a safe place for future reference REQUIREMENTS FOR REMOTE VIEW Supported Device iPhone iPad iPod Touch w i...

Page 7: ...ouch Screen LCD Monitor w Cradle x 1 C Camera Antenna x 1 D 5V 1A Power Adapter for Camera x2 E Internet Cable x 1 F Screw Bag x 1 G Instruction Manual x 1 Tools Required Electric drill 5mm masonry dr...

Page 8: ...s Do not expose any wiring connections to weathering If terminating any wiring connections outdoors then use a suitable weathering box to insulate the connections There are no user serviceable parts i...

Page 9: ...8 NOTE The camera has an open field RF operating range of up to 150m...

Page 10: ...9 Camera Installation Secure camera stand on the stable surface Loosen up the Thumb screw Adjust proper view angle then secure the joint with T bolt...

Page 11: ...eps in Camera Setup section to setup or change the channel of the camera If you are adding another camera to link with the supplied monitor in this kit then ensure its channel is set to a different ch...

Page 12: ...extend the antenna connect AC DC adapter to the input on the side of the monitor 2 Press and hold the POWER button on the top of the monitor for 3 4 seconds to power it up 3 The receiver displays Welc...

Page 13: ...r to the System Operation section for Camera System and Recording Settings Remote Access Can be done via iPhone iPad iPod Touch w iOS 5 0 1 or above Android smartphone tablet v2 3X or above connected...

Page 14: ...ERA WHAT THE LIGHTS MEAN Light State What it means Power status On Red The camera is on Off The camera is off Link status Flashing The camera is in pairing mode On Green The camera is connected to the...

Page 15: ...n set how you want the main viewing screen the Live screen to display images from the paired cameras You can scan between cameras show all cameras on a single screen Quad view or only display specific...

Page 16: ...gnal strength through the status lines to the left of the number Record Status Tap to start or stop recording for that camera Steady on Not recording Flashing Recording Connecting to the Internet Conn...

Page 17: ...ain to return to Quad View Zoom Feature To zoom into a particular area 1 Go to full view then tap to activate zoom mode 2 Select the zone by tapping the zone area to view zoom in screen Recording Live...

Page 18: ...t highlighted a folder displays with no recordings listed 2 Tap on the recording you want to view It displays on the screen 3 Tap on any area of the screen that does not have control icons to bring up...

Page 19: ...of internet connection to be used Security Code Set a security code for remote access Network Information Displays information about your network and the receiver s unique DID number Alarm Setup Perio...

Page 20: ...ou have to pair it to the different channel s 1 Tap the camera image you want to pair A processing icon displays for a 60 second countdown 2 Press and release the Pairing button on that camera s power...

Page 21: ...m the system will turn on the camera automatically An X indicates a camera is OFF a check indicates ON Tap on the camera to turn it ON or OFF Brightness Tap the camera to change brightness level The d...

Page 22: ...om any camera by sending you an email alert The email alert contains information such as the time that motion was detected and by which camera In order to enable the Email Alert function you must ente...

Page 23: ...s Free apps are available through the iTunes App store or the Android Market 1 Tap Enable to activate Email Alert or Disable to deactivate it 2 Tap on the SMTP Server field A keyboard screen displays...

Page 24: ...password for this gmail account Email to XXXX gmail com Enter the email address where you want the alerts sent Schedule Record Up to 5 scheduled recording sessions available in a single day You are li...

Page 25: ...Recording 1 Access the Schedule Record screen 2 Tap on the scheduled recording you want to clear 1 5 The screen displays the settings for that schedule 3 Tap CLEAR The screen resets to the default va...

Page 26: ...our selection and fill in the fields requested Tap OK 3 Tap OK at the system reboot prompt The Network Setup screen displays Security Code Set up your security code to limit who can have access to the...

Page 27: ...cess To protect your privacy please be sure to change the default password 123456 into your personal security code Network Information 1 Tap the Network Information icon to display the Network Informa...

Page 28: ...ction allows you to select the alarm siren duration for Clock Alarm and Timer 1 Tap Period The Set Siren Duration screen displays 2 Select the alarm duration time required 3 Tap the BACK arrow to retu...

Page 29: ...reen Power Saving In Power Saving mode the monitor will shut off LCD after idle for 2 minutes Press Power button once to reactive the monitor If a motion detection event or scheduled recording begins...

Page 30: ...n lock mode after it has been idle for 2 minutes Auto Lock disables the touch screen and removed the icons from the display 1 Tap Screen Auto Lock 2 Tap your selection a check mark displays 3 Tap the...

Page 31: ...affect the operation of live video or recording video 1 Tap to display the Clock Alarm screen 2 Tap on an alarm button total of 5 to select from 3 Tap on the hour minutes block then UP DOWN arrows to...

Page 32: ...switch between the two 4 Tap SAVE when you are finished Timer This feature operates as an independent alarm clock It does not affect the operation of live video of recoding video 1 Tap to display the...

Page 33: ...rd deletes all files on that card 1 Tap on START a warning statement displays 2 Tap OK to proceed to format storage or tap CANCEL to discontinue 3 The system will indicate success or failure System Up...

Page 34: ...about 5 seconds 3 When the system restarts it will ask you to perform the touch screen calibration Follow the instructions on the screen 4 Select the frequency setting by tapping the frequency icon 50...

Page 35: ...and search for OMGuard Connecting to the Internet The docking cradle charges your monitor as well as provides an internet connection When you are connected to the internet live video will continue to...

Page 36: ...y is set the system will memorize the setting and the next time you place the monitor back into the cradle the system will automatically connect to the internet Connecting to the Intranet Home Network...

Page 37: ...f you need to upgrade your system firmware download the latest firmware version to your SD card and then upgrade that firmware version to the monitor 1 Eject the SD card from the monitor 2 Place the S...

Page 38: ...ing object to trigger the motion sensor Unable to pair the camera to the receiver Make sure the camera is power on Press and release the pairing button quickly Do not press and hold Power off the rece...

Page 39: ...0 Minutes 2 080 Minutes 32GB 6 400 Minutes 4 160 Minutes Note Single camera file recorded with video audio multiple camera file recorded with video only Battery Used In the LCD Monitor The LCD monitor...

Page 40: ...terference will not occur in a particular installation If this equipment does cause harmful interference to radio or television reception which can be determined by turning the equipment off and on th...

Reviews: