CS990XD
VELLEMAN
4
4. Batteries
The CS990XD is powered by eight AA batteries (not supplied). It is
advisable to use standard alkaline batteries to start with. You can then
evaluate the sort of use you give the detector and decide whether the
investment in rechargeable batteries is justified.
The batteries should be fitted in the holder which is located in the
battery compartment. To fit new batteries first check if the power switch
on the unit is switched off. Then loosen the two captive screws located
in the battery cover (do not fully remove these from the cover) and
remove the cover. Inside is the battery holder. Lift out the battery holder
and detach the plug on the connector. Load the holder with eight
batteries ensuring that each battery is inserted the correct way round
(direction of the batteries alternating as shown on the holder). Roll each
individual battery to ensure it is located correctly and making proper
contact. Replace the connector making sure that it is well-seated, and
put the loaded holder in the housing. Fit the cover and tighten the two
captive screws finger tight.
Note: Zinc-carbon batteries should not be left in the detector for long periods
where they could leak. Remember to remove them at the end of the day’s
searching.
5. How It Works
Inside the CS990XD are two separate detectors operating simultaneously. An “inland” detector which is factory set to ignore
mineralised inland ground and gives a positive response to all metals, and a “beach/disc” detector operating at the
(adjustable) wet salt sand exclude level, which gives a negative response to iron. By using the switches on the front of the
CS990XD to combine the signals from the above two detectors, it is possible for the operator to detect all targets whilst
eliminating the effects of the ground, and at the same time distinguishing between the good and the reject targets.
Detection is indicated by the loudspeaker sounding off (the loudspeaker is located in the rear of the battery compartment),
and by the moving meter needle (in the facia panel).
6. The Controls and What They Do
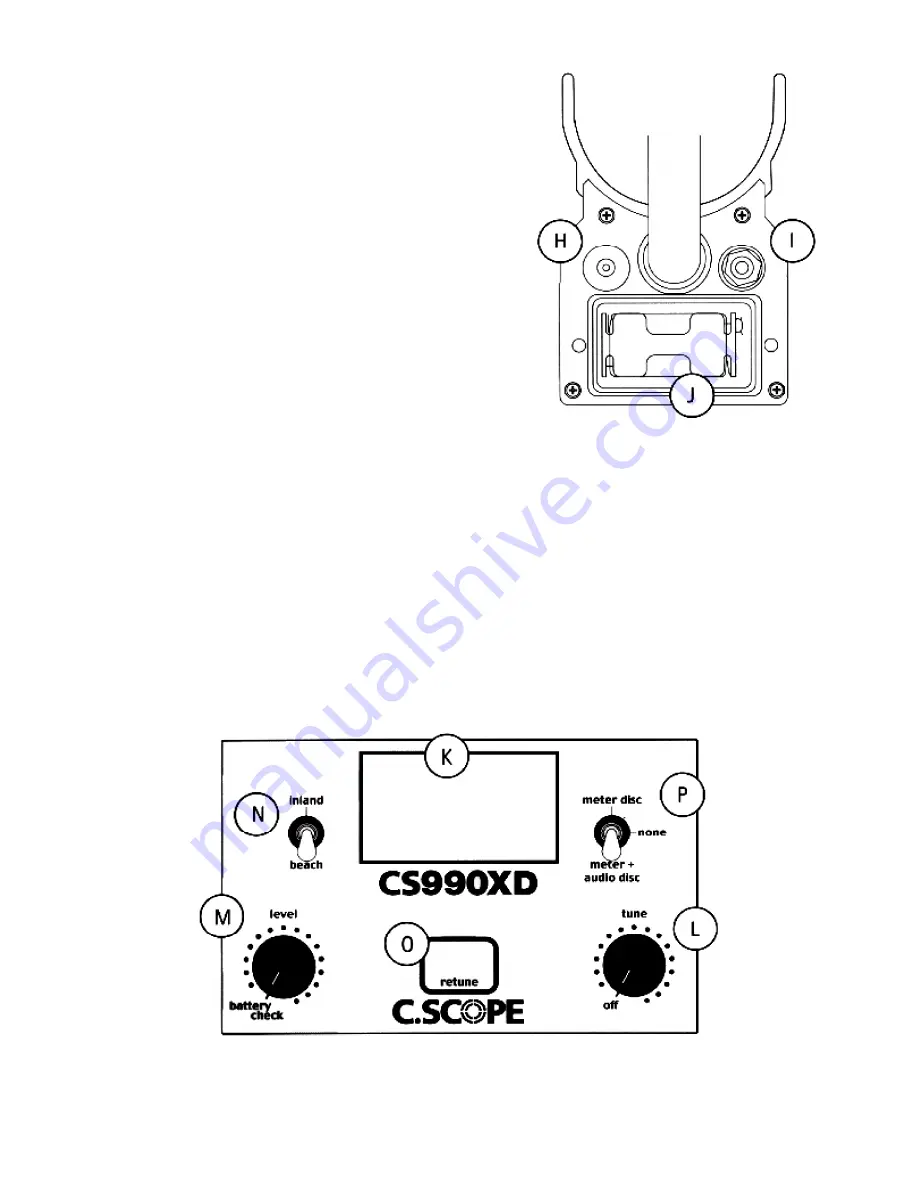
K. signal meter
N. ground exclusion switch
L. on/off switch and tune control
O. retune push button
M.level control and battery check
P. disc mode switch
H. charger socket
I. headphones socket
J. battery compartment


