background image


CAMTVI5 

V. 01 – 22/06/2015 

©Velleman nv 

MIRROR 

OFF / ON 

rotate image 

FLIP 

OFF / ON 

flip image 

SYSTEM 

CAMERA ID 

0 ~ 255 

camera ID 

ID DISP 

OFF / ON 

camera ID display 

NAME DISP 

OFF / ON 

camera name display 

LANGUAGE 

ENG / CHI 

English / Chinese 

FACTORY 
INIT 

OFF / ON 

restore factory settings 


Remark: 


This camera will only work with TVI-compatible DVRs (Velleman 

DVRxTx

 series). Velleman nv does not guarantee this camera will work 

with other types of DVRs and can therefore not be held responsible in 
this event. 

8.


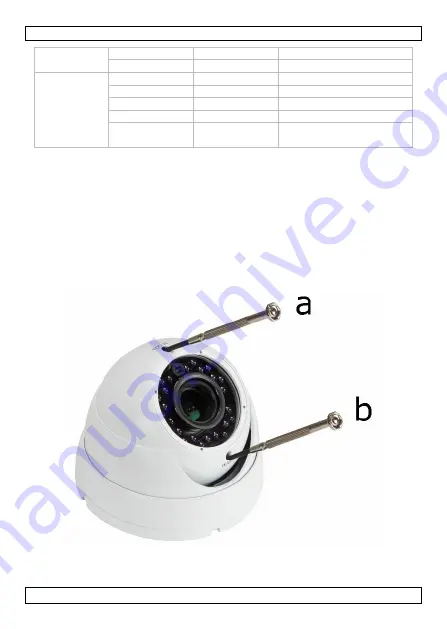
Varifocal Lens 

The lens of this camera can be adjusted to capture the best images at a 

specific distance. Adjusting the lens is simple: just slightly turn the FOCUS 
(a) and/or ZOOM (b) screw with the appropriate screwdriver until you are 
satisfied with the image. 


Summary of Contents for CAMTVI5

Page 1: ...CAMERA VARIFOCALE LENS CAM RA D ME HD CCTV TVI LENTILLE VARIFOCALE C MARA HD CCTV TVI DOMO IR LENTE VARIFOCAL HD CCTV KAMERA TVI DOME IR VARIFOKAL OBJEKTIV USER MANUAL 2 GEBRUIKERSHANDLEIDING 10 MODE...

Page 2: ...our dealer 2 Safety Instructions Keep this device away from children and unauthorized users This appliance is not intended for use by persons including children with reduced physical sensory or mental...

Page 3: ...t images are for illustrative purposes only Do not use this product to violate privacy laws or perform other illegal activities Do not switch the device on immediately after it has been exposed to cha...

Page 4: ...ot Take the base as a template and drill the necessary mounting holes If necessary drill a hole for routing the cables Insert a nylon plug in each hole 3 Pass the camera cable through the base and fix...

Page 5: ...t the power terminal of the camera to a 12 VDC regulated power supply 2 Connect the video output of the camera to the video input of your DVR using a 75 coaxial cable Remarks Only use a regulated 12 V...

Page 6: ...ol panel by clicking the camera and the panel icons 3 The control panel appears 7 2 Method 2 1 On the DVR live view right click in the screen to display the DVR menu 2 Select ADVANCED CONFIG and then...

Page 7: ...255 red green ratio B G GAIN 1 255 blue green ratio AE MODE ESC HOLD exposure mode BRIGHT 0 255 brightness level SHUTTER AUTO shutter speed FLICKER OFF 50HZ 60HZ flicker mode BLC 0 16 backlight compen...

Page 8: ...ark This camera will only work with TVI compatible DVRs Velleman DVRxTx series Velleman nv does not guarantee this camera will work with other types of DVRs and can therefore not be held responsible i...

Page 9: ...4200K 3200K video output BNC connection TVI signal audio no power supply 12 VDC current consumption max 300 mA operating temperature 20 C to 40 C RH max 95 dimensions 138 x 100 mm weight 570 g Use thi...

Page 10: ...het dan niet en raadpleeg uw dealer 2 Veiligheidsinstructies Houd dit toestel buiten het bereik van kinderen en onbevoegden Dit toestel is niet geschikt voor gebruik door personen kinderen inbegrepen...

Page 11: ...de afbeeldingen De afbeeldingen van het product zijn enkel ter illustratie Installeer en gebruik dit toestel NIET voor illegale praktijken en respecteer ieders privacy Schakel het toestel niet onmidd...

Page 12: ...Kies een montageplaats Gebruik de voet als sjabloon en boor de nodige montagegaten Indien nodig boor een gat om de kabels te leiden Plaats een nylon plug in elk gat 3 Voer de camerakabel door de voet...

Page 13: ...camera aan op de video ingang van uw DVR met een 75 coaxiale kabel Opmerkingen Gebruik enkel een gereguleerde voedingsadapter van 12 VDC Het gebruik van een ander type kan de camera beschadigen Besche...

Page 14: ...ERA CH1 CH2 CH3 CH4 DETECTION MENU SETUP ALERT NETWORK DISPLAY RECORD DEVICES DCCS DEVICE XXXXX NOTIFY CONNECTION OK EXIT 3 Selecteer het camerakanaal en klik op SETUP om het menu weer te geven DAY NI...

Page 15: ...CY ZONE AREA SEL MASK PAT SX EX SY EY maskeringszone MOTION MATION SENSITI ALARM HOLD TIME zone voor bewegingsdetectie HLC HLC MASK VALUE TRESHOLD onderdrukking sterk tegenlicht EFFECT COLOR GAIN 0 25...

Page 16: ...ld in dit geval 8 Varifocale lens De lens van de camera is instelbaar voor het vastleggen van de beste beelden vanaf een bepaalde afstand De lens instellen is eenvoudig draai lichtjes aan de FOCUS a e...

Page 17: ...ratuur 20 C tot 40 C RH max 95 afmetingen 138 x 100 mm gewicht 570 g Gebruik dit toestel enkel met originele accessoires Velleman nv is niet aansprakelijk voor schade of kwetsuren bij verkeerd gebruik...

Page 18: ...e de l appareil Si l appareil a t endommag pendant le transport ne pas l installer et consulter votre revendeur 2 Consignes de s curit Garder l appareil hors de la port e des enfants et des personnes...

Page 19: ...nte de nos produits l apparence du produit peut diff rer l g rement des images affich es Les images des produits sont titre indicatif seulement Installer et utiliser la cam ra en respectant la l gisla...

Page 20: ...rer 2 Choisir l emplacement de montage Utiliser la base comme gabarit et percer les trous de montage n cessaires Si n cessaire percer un trou pour le passage des c bles Ins rer une cheville en nylon d...

Page 21: ...de vue 6 Connexion 1 Connecter la borne d alimentation de la cam ra une alimentation r gul e de 12 VCC 2 Connecter la sortie vid o de la cam ra l entr e vid o de votre DVR avec un c ble coaxial de 75...

Page 22: ...outon droit de la souris pour afficher le menu DVR 2 S lectionner ADVANCED CONFIG et ensuite DCCS ADVANCED CONFIG CAMERA CH1 CH2 CH3 CH4 DETECTION MENU SETUP ALERT NETWORK DISPLAY RECORD DEVICES DCCS...

Page 23: ...tr le automatique de gain LSC ON OFF correction de vignettage SPECIAL PRIVACY ZONE AREA SEL MASK PAT SX EX SY EY zone de masquage MOTION MATION SENSITI ALARM HOLD TIME zone de d tection de mouvements...

Page 24: ...fonctionnera avec un autre type de DVR et ne peut pas tre tenu responsable dans ce cas 8 Objectif varifocal L objectif de la cam ra est r glable pour capturer les meilleures images une certaine dista...

Page 25: ...mensions 138 x 100 mm poids 570 g N employer cet appareil qu avec des accessoires d origine La SA Velleman ne peut dans la mesure conforme au droit applicable tre tenue responsable des dommages ou l s...

Page 26: ...su distribuidor 2 Instrucciones de seguridad Mantenga el aparato lejos del alcance de personas no capacitadas y ni os Este aparato no es apto para personas ni os incl con capacidades f sicas sensorial...

Page 27: ...ducto podr a diferir del de las im genes Las im genes son meramente ilustrativas Instale y utilice la c mara al respetar la legislaci n et la vida privada de terceros No conecte el aparato si ha estad...

Page 28: ...ilice la base como plantilla y taladre los agujeros de montaje necesarios Si fuera necesario taladre un agujero de paso para los cables Introduzca un taco de nylon en cada agujero 3 Pase el cable de l...

Page 29: ...a necesario ajuste la posici n y el ngulo de visi n 6 Conexi n 1 Conecte el terminal de alimentaci n de la c mara a una fuente de alimentaci n regulada de 12 VCC 2 Conecte la salida de v deo de la c m...

Page 30: ...que aparezca en pantalla completa 2 Haga clic en la c mara y en los iconos del panel para abrir el panel de control 3 El panel de control se visualizar 7 2 M todo 2 1 En la imagen en directo del DVR h...

Page 31: ...para la transici n d a noche AWB MODE AUTO USER PUSH 8000K 6000K 4200K 3200K balance de blancos R G GAIN 1 255 relaci n rojo verde B G GAIN 1 255 relaci n azul verde AE MODE ESC HOLD modo de exposici...

Page 32: ...mara NAME DISP OFF ON visualizaci n del nombre de la c mara LANGUAGE ENG CHI ingl s chino FACTORY INIT OFF ON Restaurar los ajustes de f brica Restore Factory Settings Observaci n Esta c mara s lo fu...

Page 33: ...pecificaciones grado de protecci n IP IP66 elemento de imagen sensor de im genes CMOS de 1 2 7 n mero de p xeles 1930 H x 1088 V resoluci n 1080P DSP Techpoint chip iluminaci n m nima 0 1 lux F1 8 anc...

Page 34: ...esponsable de da os ni lesiones causados por un uso indebido de este aparato Para m s informaci n sobre este producto y la versi n m s reciente de este manual del usuario visite nuestra p gina www vel...

Page 35: ...n Sie ob Transportsch den vorliegen Sollte dies der Fall sein verwenden Sie das Ger t nicht und wenden Sie sich an Ihren H ndler 2 Sicherheitshinweise Halten Sie Kinder und Unbefugte vom Ger t fern Di...

Page 36: ...t der Hersteller keine Haftung Durch st ndige Verbesserungen kann das Produkt von den Abbildungen abweichen Die Abbildungen dienen nur zur Illustration Installieren und verwenden Sie das Ger t nicht f...

Page 37: ...en Au enring fest und drehen Sie gegen den Uhrzeigersinn um loszuschrauben 2 W hlen Sie Ihren Montageort Nehmen Sie die Basis als Schablone und bohren Sie die erforderlichen Montagel cher Bohren Sie b...

Page 38: ...7 Ihre Kamera anschlie en und einschalten siehe unten berpr fen Sie den Betrachtungswinkel auf Ihrem PC 8 Betrachtungswinkel 6 Anschluss 1 Schlie en Sie den Netzanschluss der Kamera an ein 12 V DC ger...

Page 39: ...akanal f r die Anzeige im Vollbild 2 Klicken Sie auf die Kamera und Feldsymbolen um das Bedienfeld zu ffnen 3 Das Bedienfeld erscheint 7 2 Methode 2 1 Klicken Sie w hrend der Live Anzeige mit der rech...

Page 40: ...Nacht bergang AWB MODE AUTO USER PUSH 8000K 6000K 4200K 3200K Wei abgleich R G GAIN 1 255 Verh ltnis rot gr n B G GAIN 1 255 Verh ltnis blau gr n AE MODE ESC HOLD Belichtungsmodus BRIGHT 0 255 Helligk...

Page 41: ...rung NAME DISP OFF ON Anzeige des Kameranamens LANGUAGE ENG CHI Englisch Chinesisch FACTORY INIT OFF ON Auf Werkseinstellungen zur cksetzen Restore Factory Settings Bemerkung Diese Kamera ist nur komp...

Page 42: ...Technische Daten IP Schutzart IP66 Aufnahme Element 1 2 7 CMOS Bildsensor Anzahl der Pixel 1930 H x 1088 V Aufl sung 1080P digitaler Signalprozessor Techpoint Chip minimale Lichtst rke 0 1 lux F1 8 br...

Page 43: ...lleman NV bernimmt keine Haftung f r Schaden oder Verletzungen bei falscher Anwendung dieses Ger tes Mehr Informationen zu diesem Produkt und die neueste Version dieser Bedienungsanleitung finden Sie...

Page 44: ...efective article can also involve handling costs Repairs occurring after warranty expiration are subject to shipping costs The above conditions are without prejudice to all commercial warranties The a...

Page 45: ...tilisation ou un entretien incorrect ou une utilisation de l appareil contraire aux prescriptions du fabricant tout dommage cause d une utilisation commerciale professionnelle ou collective de l appar...

Page 46: ...he Garantiebedingungen Allgemeine Garantiebedingungen in Bezug auf Konsumg ter f r die Europ ische Union Alle Produkte haben f r Material oder Herstellungsfehler eine Garantieperiode von 24 Monaten ab...

Reviews: