background image

least 20 cm above the water level.


3.


On the wall using the enclosed mounting plate


The mounting plate should be fastened near the feeding place.


The feed container should stay at least 20 cm above the water level.


4.


Above the pond using a cord or cable


The feed container should be placed at least 20 cm above the water level by 
fastening a cord or cable on the handle on the lid.


The control display should be installed in a dry place, protected against sun light. 
The Fish Feeder is provided with 5 m of safety cable for outdoor use.


Optional 10 m of extra cable is available.
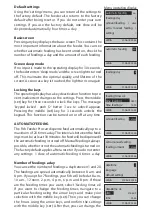
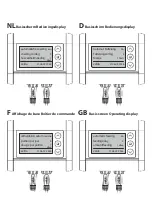


BASIC SETTINGS


You can navigate through the menu items using the arrow keys, and select them 
using the middle key (set). You can change the setting when the black cursor blinks. 
Use the arrow keys to select the right setting. Confirm it using the middle key (set).


First-time use


When  you  use  the  feeder  for  the  first  time,  you  must  set  the  date,  time  and 
language using the display. You can change the settings by navigating to 'date/time' 
using the arrow keys and selecting them using the middle key (set). Then you can 
change the days, months and years using the arrow keys, and confirm the settings 
with the middle key (set). You can change the time in the same way. You can also 
choose your preferred language. Once you have done this, you return to the menu.


Summary of Contents for FISH FEEDER PRO

Page 1: ...USER INSTRUCTIONS FOR FISH FEEDER PRO brings life to your pond ...

Page 2: ...sophisticated feeding of these fish is important for obtaininganoptimalrangeofcolouringandaconstantgrowth The feeding device has a capacity of approx 3 litres It includes a sight glass to keep track of the level of feed in the container The sophisticated design of the feeder and the feeding mechanism stops moisture getting into the feed The device also includes four removable feed screws for dispe...

Page 3: ... is available BASIC SETTINGS You can navigate through the menu items using the arrow keys and select them using the middle key set You can change the setting when the black cursor blinks Use the arrow keys to select the right setting Confirm it using the middle key set First time use When you use the feeder for the first time you must set the date time and language using the display You can change...

Page 4: ...locked push O button 3 sec to unlock appears Pressing the middle set key for 3 seconds unlocks the keypad This function can be turned on or off at any time time feeding 2 12 00 velda 21 06 09 23 56 AUTOMATIC FEEDING The Fish Feeder Pro can dispense feed automatically up to a amount feeding 1 dose maximum of 20 times a day The intervals between the feed ings must be at least 30 minutes No feed will...

Page 5: ...changing the worm screw the Fish Feeder Pro should be empty and clean AUTUMN AND WINTER When temperatures drop in autumn fish require less food due to their low energy use Limit the amount of feed during this period When the water temperature is 8 C or less the feeding device can be removed from the pond At these low tempera tures it is enough to hand feed the fish once or twice a week with winter...

Page 6: ...A 1 B C D 2 3 4 ...

Page 7: ...lda 21 06 09 23 56 Automat Fütterung An Fütterungen Tag 4 Menge 1 Dosis velda 21 06 09 23 56 F Affichage de base Boîtier de commande GB Basis screen Operating display alimentation autom marche portion par jour 4 dosage par portion 1 dose velda 21 06 09 23 56 automatic feeding on feedings day 4 amount feeding 1 dose velda 21 06 09 23 56 ...

Page 8: ...EN ALGEN LES ALGUES ALGAE FILTRATIE FILTRATION LA FILTRATION FILTRATION BELUCHTING BELÜFTUNG L AÉRATION AERATION VISSEN FISCHE LES POISSONS FISH DIVERSEN DIVERSES PRODUITS DIVERS MISCELLANEOUS brings life to your pond GEB124817040 Design Research Development Velda The Netherlands www velda com info velda com ...

Reviews: