⇒
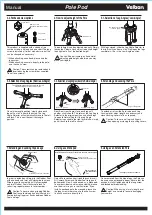
9. Using as an Extension Pole
Thick stages should be downward.
Once removed from the tripod legs, the Pole can
be used as an extendable boom. Ensure that the
panhead is fully tightened onto the long screw
and locked before extending.
Caution: When using at arm's length or at
height, use carefully to avoid damaging
your camera.
Detach Pole section from tripod legs and invert.
Fit Camera Screw and Rubber Foot to top and
bottom ends. Now it can be used as a Monopod.
To avoid accidents and increase stability, please
use the wrist strap as in the illustration. If you
install a panhead onto the monpod, please use
the long screw, otherwise, use the short screw
to attach a camera directly to it.
Install Camera screw onto the Pedestal. Use the Screw driver supplied.
Remove panhead
and install Rubber
Foot.
8. Using as a Monopod
To extend or retract the Pole, raise each Leg
Locking lever, adjust length as necessary and
close Locking Levers to fix as required.
Caution: Take care not to pinch fingers
when opening or closing the Locking Levers.
In order to extend each leg, grip the Rubber Foot
with one hand and twist anti-clockwise to unlock.
Slide leg section smoothly until fully extended
and twist Rubber Foot clockwise to lock. To
retract leg, repeat process in reverse order.
Caution: Take care when gripping Rubber
Foot to avoid staining hands with mud etc.
Avoid pinching fingers or hands between Rubber
Foot and legs.
7. Extending and Locking Tripod Legs
Rubber shoe
Leg Locking Lever
6. Extending and Locking the Pole
From Semi-Low-Angle, close each leg until
another click is heard. This returns the Leg Angle
Selector to the original position and allows legs
to open to Normal Angle. If the Leg Angle
Selector is pushed to the right by mistake, simply
push it back to the left to cancel.
Close
Close
5-2. Selection of Leg Angles ('Semi-Low-Angle')
5-3. Selection of Leg Angles (back to 'Normal Angle')
5-1. Selection of Leg Angles ('Low-Angle')
Once in low-angle position, slowly close each
leg until a click is heard, then stop. The Leg
Angle Selector will automatically move to the left
and lock. This is now the semi-low-angle
position.
Semi-low position
selector
Standard Leg angle
Then Adjustment knob slides towards the left
automatically until click sound occurs.
With legs closed, slide the Leg Angle Selector to
the right until you hear a click. Now open the legs
completely - this is the 'Low-Angle' position.
The pole height can be adjusted manually. Simply
loosen the Column Lock, adjust to desired height
then tighten to fix at the desired height.
Caution: Support camera by hand whilst
adjusting pole height, otherwise you may
pinch your fingers.
4. How to adjust height of the Pole
This product is supplied with a choice of two
camera screws: one long and one short.The long
screw is installed at time of manufacture, but this
can be changed as necessary.
*
When attaching a panhead, please use the
long screw.
*
When attaching a camera directly to the pole,
use the short screw.
Caution: The screws can be removed and
inserted using the screw-driver supplied.
Do not lose screws.
Screw driver
3-2. Panhead screw options
Screw driver
Pole Pod
Column Lock
※
You may feel 'click' sensation
Manual
Camera screw
(Panhead installment screw)
Camera screw
(Panhead installment screw)
For camera
For panhead
Leg angle selector
(slide to right)
Click !
Click !
Line up r
idges
, then e
xtend
To tighten
To loosen


