


For resistance measurements above one megohm the display
might take a few seconds to stabilize. This is normal for high
resistance readings.
To measure resistance, follow these steps:
1. Set the rotary switch to the resistance function.
2. Turn off power to the circuit under test and ensure there is no
residual voltage present from any source.
3. Touch the probes to the test points and read the display. The meter
beeps as it seeks the correct range to measure the circuit’s
resistance. Be sure you have good contact between the test leads
and the circuit. Dirt, oil, solder-flux or other foreign matter alters the
reading value.
Measuring Continuity
Use the continuity mode to make quick checks for connection of
electrical circuits, such as electrical wiring, switch contacts, relays and
audio cables. In the continuity mode, an audible tone sounds when the
value measured is approximately 50
Ω
or less.
To test for continuity, follow these steps:
1. Set the rotary switch to the continuity function.
2. Place one probe to each side of the circuit to be tested. If the
circuit measures approximately 50
Ω
or less, the meter will sound
a continuos tone.
M a i n t e n a n c e
Periodic service
WARNING!
Repair and service of this instrument is to be performed by qualified
personnel only. Improper repair or service could result in physical
degradation of the meter. This could alter the protection from
electrical shock and personal injury this meter provides to the
operator. Perform only those maintenance tasks that you are
qualified to do.
These guidelines will help you attain long and reliable service from
your meter:
1. Calibrate your meter annually to ensure it meets original
performance specifications.
2. Keep your meter dry. If it gets wet, wipe it dry immediately. Liquids
damage electronic circuits.
3. Whenever pra c t i cal, keep the meter away from dust and dirt, which
can cause premature wear.
4. Although your meter is built to withstand the rigors of daily use, it
can be damaged by severe impacts. Use reasonable caution when
using and storing the meter.
NOTE:
When servicing the meter, use only the replacement parts specified.
Battery: 9V, NEDA 1604 or IEC 6LR 61
Test lead set: ATL55
Cleaning and Decontamination
Periodically clean your meter’s case using a damp cloth.
DO NOT
use
abrasives, cleaning solvents or strong detergents, as they may damage
the finish or affect the reliability of the structural components.
Battery Replacement
Always use a fresh replacement battery of the specified size and type.
Immediately remove the old or weak battery from the meter and dis-
pose of it in accordance with your local disposal regulations. Old or
defective batteries can leak chemicals that corrode electronic circuits.
WARNING!
To avoid electric shock, be sure to turn off the meter’s power and
disconnect both test leads from any equipment before you remove
or install batteries.
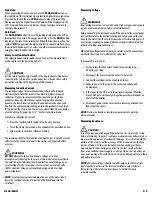
To install a new battery, follow these procedures:
1. Remove the screw from the battery compartment cover on the
back (lower half) of the meter and lift the cover (Fig 1).
2. Remove and discard the old battery. Always dispose of old batteries
promptly in a manner consistent with local disposal regulations.
WARNING!
Under
NO
circumstance should you expose batteries to extreme heat or
fire as they may explode and cause injury.
3. Place a fresh 9V battery in the compartment.
NOTE:
If you do not plan to use the meter for a month or more,
remove the battery and store it in an area that won’t be damaged by a
leaking battery.
4. Reattach the battery compartment cover to the meter and
reinstall the screw.
Remove cover
DL49-MAN
P. 4
(Fig 1)


