79
78
中文
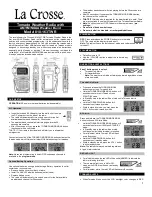
电源开/关
按电源按钮打开收音机。按住电源按钮
约 2 秒钟关闭电源。
待机模式
当收音机处于“开启”状态时,按“
开/关”按钮进入待机模式。当收音机
处于“待机”状态时,按“开/关”按
钮退出待机模式。
时间/日期设置
收音机将根据您当地的 DAB 信号自动
设置日期和时间。
要手动更改时间和日期设置,请按
住“时钟”按钮约 2 秒钟。使用跳
过曲目控件设置时间和日期,然后
按“ENTER”按钮进行确认。
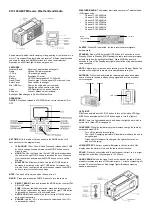
DAB模式
按住“ENTER”按钮大约 2 秒钟来搜索
电台。使用跳过曲目控件跳到下一个广
播电台,按“ENTER”按钮确认。
调频模式
按下模式按钮直到显示“FM”,进
入 FM 模式。使用跳过曲目控件搜索
广播电台,然后按“ENTER”按钮进行
确认。
辅助模式
将设备上的 3.5 毫米音频线连接到
MD-2。按下模式按钮,直到到达“辅助
输入”。
蓝牙模式
按下模式按钮,直到到达“蓝牙”,
3
职能
这将激活配对模式。 在您的蓝牙兼容
设备上,打开蓝牙设置并选择“Veho
MD-2”。
USB模式
插入 U 盘或连接 USB 音频输入线。按
下模式按钮,直到到达“USB”。
标清模式
将 Micro SD 卡插入扬声器。按下模式
按钮,直到到达“SD”。MD-2 与最大
32GB 的卡兼容。
调节音量
顺时针旋转音量轮可增大音量,或逆时
针旋转可减小音量。按下滚轮可静音/
取消静音。
警报
要设置闹钟,请按“时钟”按钮。 使
用跳转按钮选择闹钟设置槽,然后
按“ENTER”。再次使用跳过曲目按钮
选择您的闹钟时间,然后按“ENTER”
确认设置。MD-2 必须处于待机模式才
能发出警报。使用“SNOOZE”按钮暂时
使闹钟静音。
设置预设电台
要设置预设电台,请使用跳过曲目控件
选择您选择的电台,然后按“ENTER”
。按住“PRESET”按钮,找到所需
的插槽,然后按“ENTER”确认。通
过按“PRESET”按钮并使用跳过曲
目控件浏览选择来查看预设电台,
按“ENTER”确认。
Summary of Contents for Mode MD-2
Page 1: ...1 VSS 240 MD2 C Bluetooth wireless DAB speaker...
Page 38: ...75 74 MD 2 Micro USB USB LED 1...
Page 42: ...82 MD 2 Veho Veho MD 2 DAB veho world com...
Page 43: ...85 84 MD 2 USB USB LED 1...
Page 49: ...96...