Veho DISCOVERY DX-2 User Manual Download Page 8

14

15

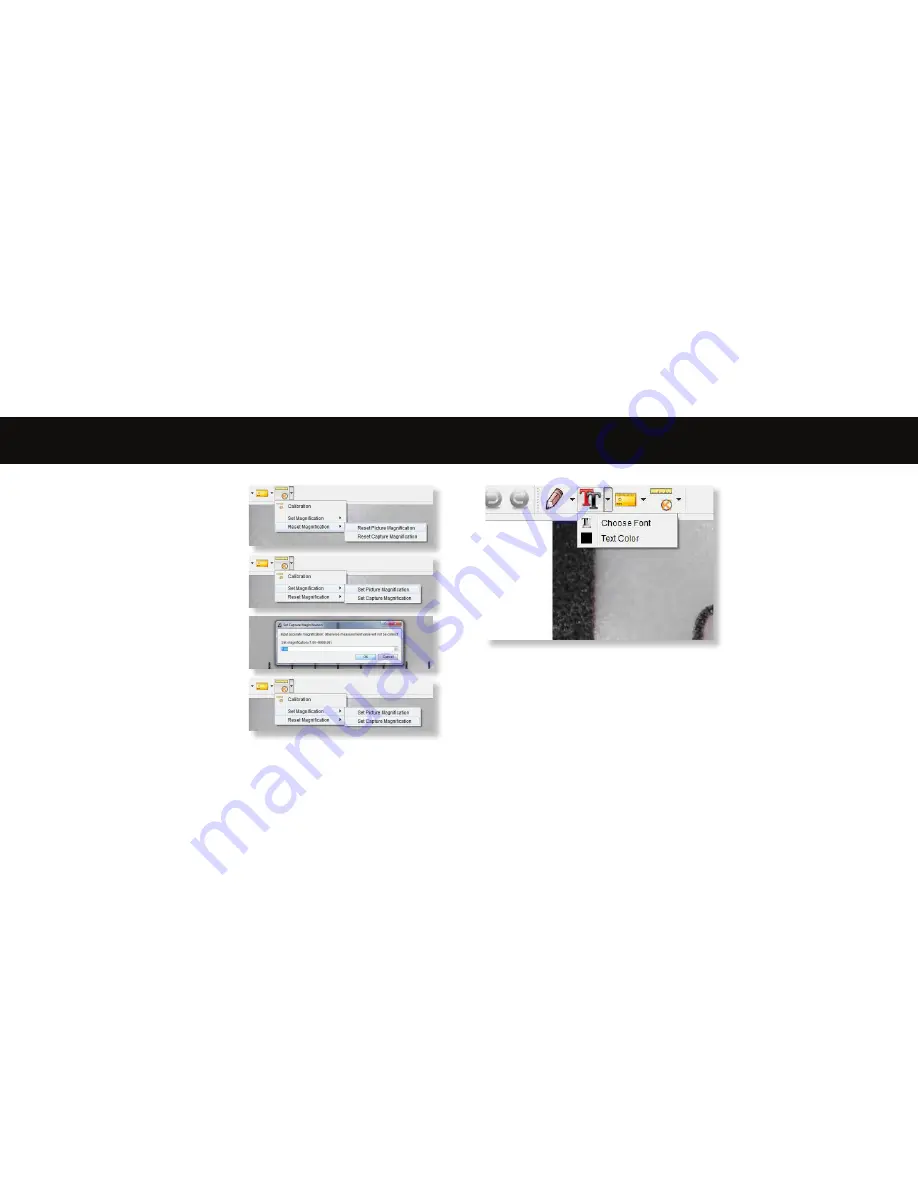
Changing Calibration 

Use the following steps to change calibration settings.

1.   Double-click to open the image, click the 

‘Calibration’ icon, and select ‘Reset Magnification’ 
and then ‘Reset Picture Magnification’. Then start 
calibration again.

2.   Change the magnification rate and capture several 

images, click on the image to enter measurement 
interface. Select ‘Set Magnification’ then ‘Set 
Picture Magnification’, a dialogue box will appear; 
enter your chosen magnification rate and click ‘OK’.

3.   If you want to use the same magnification rate to 

capture pictures, click ‘Set Magnification’ then ‘Set 
Capture Magnification’ to save settings. All pictures 
will use the same magnification rate.

You can annotate captured images using 
the draw or add text features; this is 
useful when using for later analysis.

1.   Click the pencil icon to bring up the 

drawing dropdown list. Select your 
preferred tool, and start drawing on 
the image.

2.    Click the text icon to add writing 

to your captured image. From the 
dropdown select your preferred font, 
size and text colour.

Adding drawing and text

Summary of Contents for DISCOVERY DX-2

Page 1: ...VMS 007 DX2 User manual...

Page 2: ...ectly n The DX 2 microscope is not waterproof n Use and store within a cool dry environment 5 C 50 C avoid using in damp conditions n Do not point the lens towards the sun or a strong light source thi...

Page 3: ...the mount carriage to the metal pole Clamp Screw Secures microscope in mount Brightness Wheel Adjust the brightness of the 8 LED s Stand Screw Secures the pole and mount to the stand Place the metal...

Page 4: ...the installation will begin Installing microscope software Important Connect the DX 2 to your computer before opening the Micro Capture Plus software Once connected open Micro Capture Plus to start us...

Page 5: ...Unlock Wheel 2 to secure the mounts position Using the software Capture a still photo or video footage at any point when using the microscope use the icons or dropdown menu within the Micro Capture Pl...

Page 6: ...urement interface Step 3 Once the image is open click on the calibration icon Using the mouse click on the beginning and ending points you must know the distance between the points using the ruler A d...

Page 7: ...ou to measure any continuous length Click hold and drag from one point to other points then release Radius Circle Measurement Click hold and extend out to the chosen radius The radius circumference an...

Page 8: ...ar enter your chosen magnification rate and click OK 3 If you want to use the same magnification rate to capture pictures click Set Magnification then Set Capture Magnification to save settings All pi...

Page 9: ...ese Bundle software MicroCapture Plus with measurement for Win Mac Dimensions Microscope 110mm x 33mm Stand 165mm x 118mm x 12mm Problem Solution Photo capture or video is blurred or shaky The image i...

Page 10: ...In the event you need to contact Veho for support or troubleshooting for your Veho DX 2 Microscope please contact us via our Live Chat on our website at veho world com Support...

Reviews: