background image

17

5 Set up the sensor with the display and adjustment module

VEGAPULS SR 68 • Modbus and Levelmaster protocol

47164-EN-140129

The following circumstances cause interfering reflections and can 

influence the measurement:

• 

High sockets

• 

Vessel installations such as struts

• 

Agitators

• 

Buildup or welded joints on vessel walls

Note:

A false signal suppression detects, marks and saves these false sig

-

nals so that they are no longer taken into account for level measure-

ment.
This should be done with the low level so that all potential interfering 

reflections can be detected.

Proceed as follows:
1.  Select the menu item "

Additional settins

" with 

[->]

 and confirm 

with 

[OK]

. With 

[->]

 you have to select the menu item "

False 

signal suppression

" and confirm with 

[OK]

.

2.  Confirm again with 

[OK]

.

3.  Confirm again with 

[OK]

.

4.  Confirm again with 

[OK]

 and enter the actual distance from the 

sensor to the product surface.

5.  All interfering signals in this section are detected by the sensor 

and stored after confirming with 

[OK]

.

Note:

Check the distance to the product surface, because if an incorrect 

(too large) value is entered, the existing level will be saved as a false 

echo. The filling level would then no longer be detectable in this area.
If a false signal suppression has already been created in the sensor, 

the following menu window appears when selecting "

False signal 

suppression

":

Additional adjustments - 

False signal suppression

Summary of Contents for PULS SR 68

Page 1: ...Quick setup guide Radar sensor for continuous level measurement of bulk solids VEGAPULS SR 68 Modbus and Levelmaster protocol Document ID 47164...

Page 2: ...ns Horn antenna 9 3 3 Mounting instructions 9 4 Connecting to power supply and bus system 4 1 Connection 11 4 2 Wiring plan 12 5 Set up the sensor with the display and adjustment module 5 1 Insert dis...

Page 3: ...f the art instrument complying with all prevailing regulations and guidelines The instrument must only be operated in a technically flawless and reliable condition The operator is responsible for the...

Page 4: ...epted as the standard in field instrumentation The device fulfills the requirements of the following NAMUR recom mendations NE 21 Electromagnetic compatibility of equipment NE 43 Signal level for malf...

Page 5: ...ties That is why we have introduced an environment management system with the goal of continuously improving company environmental pro tection The environment management system is certified according...

Page 6: ...ument 12 Data Matrix Code for Smartphone App 13 Symbol of the device protection class 14 ID numbers instrument documentation 15 Reminder to observe the instrument documentation 16 Notified authority f...

Page 7: ...bus and Levelmaster protocol 47164 EN 140129 Download the smartphone app VEGA Tools from the Apple App Store or the Google Play Store Scan the Data Matrix code on the type label of the instrument or E...

Page 8: ...41 mm in the direction of the antenna 5 Remove the parabolic antenna 4 axially 6 Mount sensor flange on the adapter flange and fasten it tightly 7 Check if the O ring seal is present on the connection...

Page 9: ...Insert the antenna from below into the vessel socket and secure it against falling off 4 Retighten the antenna with hexagon screws to the antenna socket torque max 2 5 Nm 1 8 lbf ft Note The radar se...

Page 10: ...r protocol 47164 EN 140129 ca 10 mm 200 mm 7 87 Fig 4 Distance of the antenna to the vessel wall vessel ceiling 2 Note min socket diameter depending on the socket length 3 Note the instructions for se...

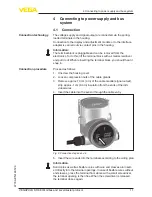
Page 11: ...lock you should hear it snap in Proceed as follows 1 Unscrew the housing cover 2 Loosen compression nuts of the cable glands 3 Remove approx 10 cm 4 in of the cable mantle signal output strip approx 1...

Page 12: ...able glands The seal ring must completely encircle the cables 10 Screw the housing cover back on The electrical connection is finished Information The terminal blocks are pluggable and can be removed...

Page 13: ...ith this double chamber housing power supply MODBUS D0 D1 IS GND USB 1 2 4 3 1 3 4 5 2 off on Fig 8 Terminal compartment 1 USB interface 2 Slide switch for integrated termination resistor 120 3 Voltag...

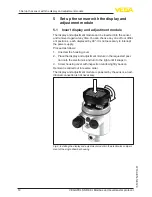
Page 14: ...ions each displaced by 90 It is not necessary to interrupt the power supply Proceed as follows 1 Unscrew the housing cover 2 Place the display and adjustment module in the requested posi tion onto the...

Page 15: ...nd to retrofit the instrument with a display and adjustment module for continuous measured value indication a higher cover with an inspection glass is required 5 2 Parameter adjustment 1 Go via the di...

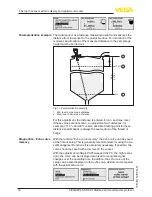
Page 16: ...nown an adjustment with distances for example of 10 and 90 is also possible Starting point for these distance specifications is always the seal surface of the thread or flange With the function Echo c...

Page 17: ...the menu item Additional settins with and confirm with OK With you have to select the menu item False signal suppression and confirm with OK 2 Confirm again with OK 3 Confirm again with OK 4 Confirm...
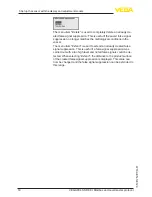
Page 18: ...o longer matches the metrological conditions in the vessel The menu item Extend is used to extend an already created false signal suppression This is useful if a false signal suppression was carried o...
Page 19: ...mm Cable entry NPT Blind plug M20 x 1 5 NPT Closing cap M20 x 1 5 NPT Plug options Supply and signal circuit only with low voltage M12 x 1 plug Indication circuit M12 x 1 plug Wire cross section sprin...

Page 20: ...of delivery application practical use and operat ing conditions of the sensors and processing systems correspond to the information available at the time of printing Subject to change without prior n...

Reviews: