background image


Vega BS/User Manual 


Revision 15 – 20 November 2018 


3 OPERATION 

The gateway terminal board has control and indication instruments, input and output 

interfaces. Detailed information see below. 


Fig. 3.1. Control and indication instruments, input and output interfaces. 

1 – mini USB-port for connection to a computer   
2 – USB-host for connection of external devices   

– /Spare/ 

4 – gateway reset button  
5 – service DIP-switches 
6 – performance indicators of various systems 
7 – micro SD-card connector 
8 – Ethernet-cable connector 
9 – additional power connector (optional)  
 

Summary of Contents for BS Series

Page 1: ...ru GATEWAY VEGA BS User Manual Vega BS gateway designed to deploy LoRaWAN network within 863 870 MHz frequency band Vega BS operates with Linux operating system and supplied with pre installed Packet...

Page 2: ...ision Date Name Comments 01 27 04 2017 KEV Document creation date 02 15 05 2017 PKP Minor edits 03 18 05 2017 KEV 1 2 04 13 06 2017 KEV Edits in the content of the package 05 14 06 2017 KEV Part Confi...

Page 3: ...cription is added content of the package is changed working temperatures are changed 12 23 08 2018 KEV Minor changes 13 18 09 2018 KEV Minor changes 14 24 10 2018 KEV Ethernet type added in specificat...

Page 4: ...and switches 13 Indication 14 4 GATEWAY CONFIGURATION 15 Connection to the computer start of work 15 Packet forwarder updating to 4 0 1 version 22 Configuration of a static IP adress for the gateway 2...

Page 5: ...ctured by Vega Absolute LLC and provides information on powering and activation procedure control commands and functions of the gateway This manual is targeted at specialists familiar with installatio...

Page 6: ...upplied with pre installed Packet forwarder software The gateway is powered and communicates with the server via the Ethernet channel The device is configured through Ethernet via SSH protocol with an...

Page 7: ...atures 40 70 LoRaWAN Number of LoRa channels 8 Frequency band 863 870 MHz Power output up to 500 mW Antenna connector SMA N Type female SMA N Type female Radio coverage in restrained urban conditions...

Page 8: ...ormation see below Fig 3 1 Control and indication instruments input and output interfaces 1 mini USB port for connection to a computer 2 USB host for connection of external devices 3 Spare 4 gateway r...

Page 9: ...onnector on the terminal board fig 3 1 8 Cable shall be crimped in compliance with 568 and 568B standards Contacts shall be numerated 1 8 right to left Colors are shown for cable T568B Contact no Colo...

Page 10: ...ay has a mini USB port for connecting to a computer and working via the SSH protocol Fig 3 1 1 and a USB host for connecting of external devices via a USB cable Fig 3 1 2 There is a slot on the board...

Page 11: ...Vega BS User Manual 11 Revision 15 20 November 2018 SIM CARD INSTALLATION AT THE BS 2 AND BS 2 2 Vega BS 2 and Vega BS 2 2 gateways include a GSM module installing on the main board BS 2 BS 2 2...

Page 12: ...M slot is located on the back of the module To install the SIM card you must disconnect the GSM module from the main board and turn it over You need to insert the SIM card of the micro SIM format into...

Page 13: ...ther button Fig 3 1 4 for the gateway instantaneous rebooting In addition there are DIP switches Fig 3 1 5 on the board used to select the download option of the firmware image from internal memory fr...

Page 14: ...lor Indication Rx Green Flashes data exchange via USB_DBG port Tx Red Link Green Flashes activity via Ethernet GPS1 Blue Doesn t light no data from GPS receiver Flashes there data exist but are not va...

Page 15: ...ram There are two ways of connection to the gateway via a serial port or SSH 1 Connection via a serial port In case of a serial port connect the gateway to a personal computer with a mini USB connecto...

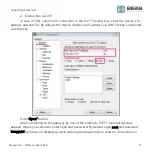
Page 16: ...Vega BS User Manual 16 Revision 15 20 November 2018 Open PuTTY select Serial enter number of the gateway virtual COM port and speed 115200 in the corresponding fields Push Open button...

Page 17: ...s and port 22 By default the device obtains an IP address via DHCP when connected via Ethernet Push Open button After connecting to the gateway by one of the methods PuTTY terminal window appears wher...

Page 18: ...connection it is recommend to change the password for individual access Now the configuration can be carrying out Packet forwarder starts automatically when the system starts Before the gateway config...

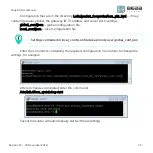
Page 19: ...gs global_conf json global configuration file local_conf json local configuration file Settings contained in local_conf json file take priority over global_conf json Enter the command containing the r...

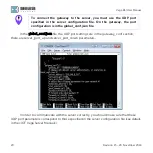
Page 20: ...guration is in the global_conf json file In the global_conf json file the UDP port settings are in the gateway_conf section there are server_port_up and server_port_down parameters In order to communi...

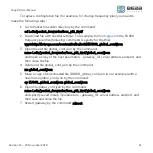
Page 21: ...global_conf json by the command nano LoRa packet_forwarder lora_pkt_fwd global_conf json and make a copy of the next parameters gateway_ID server address and port and then close the file 4 Delete old...

Page 22: ...gs after the update 4 Delete files of the previous version of Packet forwarder by sequential introduction of commands rm r LoRa rm LoRa tar gz 5 Download files of the new version of the Packet forward...

Page 23: ...Vega BS User Manual 23 Revision 15 20 November 2018 10 Restart the Packet forwarder process with the command etc init d lora_watchdog start Update complete...

Page 24: ...different for first generation gateways and second For the first generation BS 1 and BS 2 configuration carrying out with the terminal program in the following way 1 After connecting to the gateway e...

Page 25: ...ample shown setting of the static IP address 192 168 240 252 and gateway 192 168 240 1 You need to change those values to others which are necessary to your own case 4 Open file nano link_detect sh th...

Page 26: ...e strings are absent enter them changes are highlighted in red if LINK_STATE UP then if n cat etc network interfaces grep iface INTERFACE inet dhcp then killall 15 udhcpc udhcpc R t 5 n p var run udhc...

Page 27: ...eration BS 1 2 and BS 2 2 configuration carrying out with the terminal program in the following way 1 After connecting to the gateway enter login and password in the PuTTY terminal window 2 Open file...

Page 28: ...at are strings exactly 4 For static IP mode you should to remove symbol from the 3rd to 6th strings and specify your parameters are address netmask and gateway 5 Comment the 2nd string there is result...

Page 29: ...example shown setting of the static IP address 192 168 10 2 and gateway 192 168 10 1 You need to change those values to others which are necessary to your own case 6 Type reboot in command line for g...

Page 30: ...g to the gateway enter login and password in the PuTTY terminal window 2 Check that in file nano etc ppp peers wvdial entered strings highlighted in red noauth name wvdial usepeerdns defaultroute repl...

Page 31: ...igure above you do not need to change anything If these strings are not present then you should to add them At that strings Init1 AT CPIN Init2 AT CGDCONT 1 IP internet beeline ru are entering instead...

Page 32: ...e gateway with new settings To stop using the 3G modem for communicate with server type at the command line update rc d f gsm_init remove and restart the gateway to apply new settings To start using t...

Page 33: ...N REQUIREMENTS Vega BS gateways shall be stored in the original packaging in heated room at temperatures 5 to 40 and relative humidity less than 85 The gateway transportation is permissible in covered...

Page 34: ...Vega BS User Manual 34 Revision 15 20 November 2018 6 CONTENT OF THE PACKAGE The gateway delivered complete with Vega BS gateway 1 pc POE adapter 1 pc Factory certificate 1 pc...

Page 35: ...ation storage and operation specified in this manual Warranty does not apply to the device with mechanical electrical and or other damages and defects caused by violation of the transportation storage...

Page 36: ...antenna can be brought back closer to the cellular antennas if the quality of the communication is satisfactory 3 The antenna shall not stand in the close proximity to obstacles about 2 meters from r...

Page 37: ...his should be taken into account while port forwarding The steps sequence for changing BS dropbear and telnetd ports is described below To change ssh port 1 Enter at the command line of the terminal p...

Page 38: ...etd stop 2 Enter at the command line killall 15 telnetd 3 Open file nano etc init d telnetd and find strings 4 Enter strings highlighted in red instead of 2224 enter the desired port number telnetd us...

Page 39: ...Vega BS User Manual 39 Revision 15 20 November 2018 vega absolute ru User Manual Vega Absolute LLC 2017...

Reviews: