


Sp r i n g I n s t a l l a t i o n I n s t r u c t i o n s
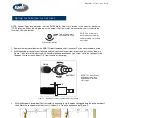
NOTE: Veeder-Root recommends that the EM R3 Meter Register is driven in the counter-clockwise
(CCW) rotation. When looking down at the end of the flow meter vertical drive shaft it should b e
turning CCW (see below).
1. Remove the four cover bolts of the EMR³ Display Head and lift off the cover. Put the cover and bolts aside.
2. With the encoder spring in your left hand and the input shaft in your right, orient the input shaft as shown in
Figure 1, then rotate the input shaft in a counter-clockwise direction as you ‘screw’ it into the spring until the
flange on the input shaft is about 1/8” from the end of the spring.
Figure 1. Screwing Input Shaft CCW Into Encoder Spring
3.
With the Encoder Spring/Input Shaft assembly in one hand, push the open spring end onto the pulse encoder’s
shaft. Work the spring onto the shaft until it is about 1/8” from the pulse encoder (Figure 2).
Top of flow meter’s
vertical drive shaft
Preferred Rotation
Input Shaft
Spring
1/8”
04 KP4
05 KP5
06 KP6
07 KP7
08 KP8
09 AS-
10 AS+
11 + 5V
12 GND
04 KP4
05 KP5
06 KP6
07 KP7
08 KP8
09 AS-
10 AS+
11 + 5V
12 GND
Manual No. 5 7 7 0 1 3 -9 9 1 Rev B
NOTE: The flow meter’s
drive shaft end view may
vary depending on the flow
meter type.
NOTE: The Input Shaft’s
appearance may vary
depending on the flow
meter type.
Summary of Contents for EMR3 XStream-PKG
Page 3: ......


