into a 3-terminal grounded socket. Do not modify plug or use an ungrounded
power socket. If an extension cord is necessary, use only a 3-wire extension
cord that provides grounding.
Don‟t use the unit for applications other than soldering.
Don‟t rap the soldering iron against the workbench to shake off residual
solder, or otherwise subject the iron to severe shocks.
Don‟t modify the unit.
Use only original replacement parts.
Don‟t wet the unit or use and disconnect the unit when your hands are wet
and without to force the supply cord.
The soldering process will produce smoke, so make sure the area is well
ventilated.
While using the unit, don‟t do anything, which may cause bodily harm or
physical damage.
Children cannot recognize the risks of electrical appliances. Therefore use or
keep the appliance only under supervision of adults and out of the reach from
children.
2. Character
Large power, Digital display and PID control temperature. Rapid heating and
recovery of temperature.
With long life ceramics heater element.
Many kinds of long service life and general tips can be matched and easy to
use.
Digital type calibration and it is easy to operate.
The portable soldering iron uses comfortably.
Original appearance and firm structure.
ESD design.
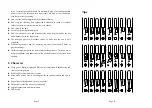
Tips
(0.
1 2)
(0.
09)
(0.
06)
(0.
047
)
(0.
031
)
0.8
?
-1
0
~
C/
-1
8
~
F
0
~
C
0
~
C
0
~
C
0
~
C
0
~
C
0
~
C
0
~
C
0
~
C
0
~
C
0
~
C
0
~
C
0
~
C
0
~
C
0
~
C
-1
0
~
C/
-1
8
~
F
-1
0
~
C/
-1
8
~
F
0
~
C
-1
0
~
C/
-1
8
~
F
-1
0
~
C/
-1
8
~
F
-2
0
~
C/
-3
6
~
F
T-
0.
8
C
T-
0.
5
C
T-
S4
T-
1.
8
H
T-
H
T-
I
T-
RT
T-
R
+3
0
~
C/
+5
4
~
F
2(
0.
08
)
T-
K
(0.
2)
?5
15
(0
.6
)
45
~
13
(0
.5
1)
T-
SI
R0
.2
(0
.0
08
)
R0
.2
(0
.0
08
)
T-
SB
?2
14
(0
.5
5)
(0.
08)
60
~
15
(0
.6
)
?1.5
(0.
06)
T-
1.
5
C
T-
1.
5
CF
*
45
~
T-
4
CF
*
(0.
1 6)
17
(0
.6
6)
?4
T-
4
C
T-
3
C
?3
17
(0
.6
6)
(0.
1 )
T-
3
CF
*
45
~
45
~
T-
2
CF
*
(0.
08)
17
(0
.6
6)
?2
T-
2
C
T-
1
CF
*
T-
1
C
(0.
04)
?1
15
(0
.6
)
60
~
T-
LB
T-
B
T-
1.
2
L
D
T-
3.2
D
T-
2.4
D
T-
1.6
D
T-
1.2
D
T-
0.8
D
(0.
031
)
?0.
8
45
~
17
(0
.6
6)
45
~
15
(0
.6
)
?0.
5
(0.
02)
(0.
08)
?2
15
(0
.6
)
R0
.2
5(
0.
01
)
14
(0
.5
)
7.
5
(0
.2
9)
1.8
(0
.0
7)
1
(0
.0
4)
25
~
25
~
1.2
(0
.0
4)
3.
5(
0.
13
)
(0
.2
9)
7.
5
R0
.2
(0
.0
08
)
17
(0
.6
6)
19
(0
.7
4)
(0.
08)
2
?4.
2
(0.
1 7)
3.2
(0.
1 )
(0.
2)
17
(0
.6
6)
2
(0
.0
8)
(0
.0
8)
2
?5.
1
17
(0
.6
6)
R0
.2
(0
.0
08
)
25
(0
.9
8)
R0
.5
(0
.0
2)
17
(0
.6
6)
?1.2
(0.
047
)
0.
7(
0.
02
8)
25
(0
.9
8)
(0
.2
5)
6
17
(0
.6
6)
?3.
2
0.
5(
0.
02
)
0.
5(
0.
02
)
?2.
4
17
(0
.6
6)
5
(0
.2
)
(0
.1) 3
17
(0
.6
6)
?1.6
0.
5(
0.
02
)
0.
7(
0.
02
8)
?1.2
17
(0
.6
6)
17
(0
.6
6)
0.
6(
0.
02
4)
Page 2
Page 15


