


"RA10/4LV" - RECESSED AXIAL FANS
INSTALLATION and OPERATING INSTRUCTIONS
PLEASE READ THE FOLLOWING INSTRUCTIONS VERY CAREFULLY BEFORE USING
THE PRODUCT. THE MANUFACTURER WILL NOT BE HELD RESPONSIBLE AND
DECLINES ANY AND ALL LIABILITY FOR DAMAGE CAUSED TO PERSONS OR PROP-
ERTY DUE TO IMPROPER USE WITH REFERENCE TO THE PRECAUTIONS OUTLINED
IN THIS MANUAL.
THIS MANUAL MUST ALWAYS BE READILY AVAILABLE.
RA10/4LV with DRHLV
4"/10cm axial fan for installation into walls, ceilings or single pane or double glazed windows up to
28mm thick using optional Window Kit.
This is a
LOW VOLTAGE
model and
MUST
be installed using the transformer provided.
This fan works in conjunction with a Dynamic Remote Humidistat, which is also a SELV (Safety Extra
Low Voltage) product.
The adjustable, humidistat is pre-set so that the fan will operate automatically when the moisture con-
tent in the room reaches 70% R.H. The fan will continue to operate until the Relative Humidity falls
below the pre-set level and the timer has completed the over-run period. There is a trimmer inside the
humidistat which allows it to operate at a higher or lower level of humidity. The Humidistat can be
adjusted so that it starts to operate from a minimum of 40% to a maximum of 100%. All versions with
Humidistat incorporate a controlled temperature set-back allowing the humidistat to take into account
variations in the ambient temperature and to avoid the fan switching on unnecessarily. This reduces fan
operation at night.
IMPORTANT - SITING INFORMATION
1.
For optimum use your fan should be installed at a minimum height of 2.3 m.
2.
The fan must not be used in an ambient temperature higher than 40°C.
3.
Your fan should not be exhausted into a duct which is already used for any other purpose.
4.
An adequate supply of fresh air must be provided if the fan is to be fitted in a room containing a
fuel burning appliance which is not of the balanced flue type.
5.
Installation must be carried out by qualified personnel. Incorrect installation can cause damage to
people, animals or properly for which the manufacturer cannot be held liable.
6.
If you have any doubts concerning this product, please contact your supplier.
IMPORTANT - ELECTRICAL INFORMATION
1.
All electrical connections must comply with current BS7671 wiring regulations.
2.
The fan is a fixed appliance, and the electrical supply must therefore be by a fixed wired and fused
(3 amp) spur incorporating a double pole switch with contact openings of at least 3 mm. Use twin con-
ductor cable of at least 1mm in section.
3.
Your fan is double insulated and does not require earthing.
4.
The fan complies with BSEN60335; with the Low Voltage Directive; with EC Directive EMC 89/336
for the Suppression of Radio Interference.
5.
It is recommended that the installation be carried out by a qualified electrician.
INSTALLATION INSTRUCTIONS
Preparation
1.
Remove all packing material and check that your fan has not been damaged in transit.
2.
Check that your electrical voltage and frequency correspond with those marked on the transformer
rating label.
3.
Check the location of existing wiring for ease of connection.
4.
Cut a 4"/10 cm hole (plus thickness of ducting to be used, when necessary) on the wall, ceiling or
window.
5.
Make the electrical connections as in the following instructions.
Fixing Instructions
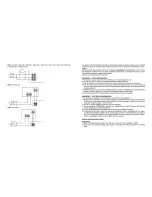
1.
Remove the front cover (A) by pressing the catch (1) with the tip of a screw-driver until it is free.
Pull the front cover forward and off main casing (B). Note that the fixing clip is at the 6 o'clock position.
2.
How to install in a window – using optional Window Kit.
i.
Separate the sections of the window kit - these will consist of:
a - external grille
b - circular fixing ring
c - external clamp section
d - tapered internal clamp section