background image

66

©Vecow IVH-9204MX ICY User Manual  

SYSTEM SETUP

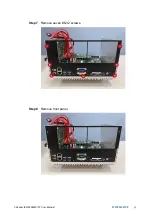
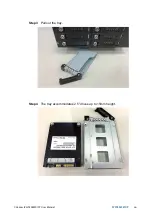
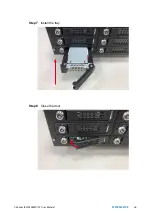
Step 3

  Pull out the tray.

Step 4

  The tray accommodates 2.5” drives up to 15mm height.

Summary of Contents for IVH-9204MX ICY

Page 1: ...USER Manual USER Manual 1 0 0 Edition 20200205 Intel Xeon Core i7 i5 i3FanlessIn VehicleComputingSystem EN50155 EN45545 2Certified X codedM12PoE 16Vto160VDC in IVH 9204MXICY...

Page 2: ...ii Vecow IVH 9204MX ICY User Manual Version Date Page Description Remark 0 10 2020 01 30 All Preliminary Release 1 00 2020 02 05 Official Release Record of Revision...

Page 3: ...adio frequency energy and if it is not installed and used in accordance with the instruction manual it may cause harmful interference to radio communications Operation of this equipment in a residenti...

Page 4: ...68L v5 6th Gen Intel Xeon E3 1268L v5 Processor 8M Cache up to 3 40GHz 35W i7 7700 7th Gen Intel Core i7 7700 Processor 8M Cache up to 4 20GHz 65W i7 7700T 7th Gen Intel Core i7 7700T Processor 8M Cac...

Page 5: ...l Block Wide Temperature 30 C to 70 C PWA 160W WT 160W 24V 85V AC to 264V AC Power Adaptor with 3 pin Terminal Block Wide Temperature 30 C to 70 C TMK2 20P 100 Terminal Block 20 pin to Terminal Block...

Page 6: ...204MX ICYU 12 1 5 2 Dimensions of IVH 9204MX ICY 12 1 5 3 Dimensions of IVH 9204MX ICY4U 13 1 5 4 Dimensions of IVH 9204MX ICY4 13 CHAPTER 2 GETTINGTOKNOWYOURIVH 9204MXICY 14 2 1 Packing List 14 2 2 F...

Page 7: ...r IVH 9204MX ICY 74 CHAPTER 4 BIOS SETUP 75 4 1 Entering BIOS Setup 75 4 2 Main 76 4 3 Advanced 76 4 4 Chipset 87 4 5 Security 92 4 6 Boot 94 4 7 Save Exit 95 APPENDIX A Isolated Guide 96 APPENDIX B S...

Page 8: ...rating temperature 6 GigE LAN ports with 4 IEEE 802 3at 25 5W 48V PoE and up to 4 X coded M12 connections without additional power connections 6 front access 2 5 SSD HDD trays flexible support 7mm to...

Page 9: ...00 2133 MHz Memory up to 64GB ECC Non ECC 6 Independent GigE LAN with 4 X coded M12 IEEE 802 3at PoE iAMT 11 0 supported 6 Front access 7mm to 15mm in height 2 5 SSD HDD Tray up to 24TB capacity RAID...

Page 10: ...PoE SIM Card 2 External SIM Card Socket SIM 1 unavailable Expansion Mini PCIe 2 Full size for PCIe USB External SIM Card mSATA Graphics Graphics Processor Intel HD Graphics 630 530 Interface DVI I Up...

Page 11: ...atchdog Timer Reset 1 to 255 sec min per step Smart Management Wake on LAN PXE supported HW Monitor Monitoring temperature voltages Auto throttling control when CPU overheats Software Support OS Windo...

Page 12: ...M Card 2 External SIM Card Socket SIM 1 unavailable Expansion Mini PCIe 2 Full size for PCIe USB External SIM Card mSATA Graphics Graphics Processor Intel HD Graphics 630 530 Interface DVI I Up to 192...

Page 13: ...Wake on LAN PXE supported HW Monitor Monitoring temperature voltages Auto throttling control when CPU overheats Software Support OS Windows 10 Windows 8 1 Windows 7 Linux Mechanical Dimension 260 0mm...

Page 14: ...SIM Card 3 External SIM Card Socket Expansion Mini PCIe 3 Full size for PCIe USB External SIM Card mSATA Graphics Graphics Processor Intel HD Graphics 630 530 Interface DVI I Up to 1920 x 1200 60Hz D...

Page 15: ...atchdog Timer Reset 1 to 255 sec min per step Smart Management Wake on LAN PXE supported HW Monitor Monitoring temperature voltages Auto throttling control when CPU overheats Software Support OS Windo...

Page 16: ...ss PoE SIM Card 3 External SIM Card Socket Expansion Mini PCIe 3 Full size for PCIe USB External SIM Card mSATA Graphics Graphics Processor Intel HD Graphics 630 530 Interface DVI I Up to 1920 x 1200...

Page 17: ...Wake on LAN PXE supported HW Monitor Monitoring temperature voltages Auto throttling control when CPU overheats Software Support OS Windows 10 Windows 8 1 Windows 7 Linux Mechanical Dimension 260 0mm...

Page 18: ...l Core i7 7700 4 65W 12M Up to 4 2GHz N Intel Core i7 7700T 4 35W 12M Up to 3 8GHz N Intel Core i7 6700 4 65W 12M Up to 4 0GHz N Intel Core i7 6700TE 4 35W 12M Up to 3 4GHz N Intel Core i5 7500 4 65W...

Page 19: ...IVH 9204MX ICYU 155 1 6 10 A Detail 2 1 5 0 0 20 25 0 0 98 9 0 0 35 260 0 10 24 282 0 11 10 297 0 11 69 155 0 6 10 215 0 8 46 A 1 5 2 Dimensions of IVH 9204MX ICY 155 1 6 10 A Detail 2 1 5 0 0 20 25...

Page 20: ...IVH 9204MX ICY4U 155 1 6 10 A Detail 2 1 5 0 0 20 25 0 0 98 9 0 0 35 260 0 10 24 282 0 11 10 297 0 11 69 155 0 6 10 215 0 8 46 A 1 5 4 Dimensions of IVH 9204MX ICY4 155 1 6 10 A Detail 2 1 5 0 0 20 25...

Page 21: ...et KHS 6 32x6 screw for wall mounting bracket M2 5x6 screw for Mini PCIe Slot Din Rail PH M4x16 5 S Ni 3 pin pluggable terminal block 20 pin pluggable terminal block Foot Pad F M3x4 for SSD HDD screws...

Page 22: ...follows LED Color Power Status System Status Solid Blue S0 System working Solid Orange S3 S5 Suspend to RAM System off with standby power To power on the system press the power button and then the bl...

Page 23: ...Port from C236 PCH Be sure to disconnect the power source and unscrew the CFast socket cover before installing a CFast card The IVH 9200 does not support the CFast hot swap and PnP Plug and Play funct...

Page 24: ...ystem Status Yellow HDD CFast On Off Storage status function or not Twinkling Data transferring Green Power System power status on off RST DP LAN 1 LAN 2 DVI D DVI I CFast SIM 2 SIM 3 SIM 1 1 2 3 WLAN...

Page 25: ...1920x1200 resolution If using VGA function you will need a DVI I to VGA module connected to DVI I device Below is the DVI I to VGA dongle image RST DP LAN 1 LAN 2 DVI D DVI I CFast SIM 2 SIM 3 SIM 1 1...

Page 26: ...connections in the front side LAN 1 is powered by Intel i219 Ethernet Phy and LAN 2 is powered by Intel I210 Ethernet engine When both LAN 1 and LAN 2 work at normal status iAMT 11 0 function is enabl...

Page 27: ...Solid Orange Left Bottom LED Flash Yellow Flash Yellow Flash Yellow 1 8 2 2 10 Audio Jack There are 2 audio connectors Mic in and Line out in the front side of IVH 9200 Onboard Realtek ALC892 audio c...

Page 28: ...M card sockets do not support hot plug Please make sure to unplug the system power before inserting the SIM cards 2 2 12 SSD HDD Tray There are 4 front access 2 5 SSD HDD trays in the front side of IV...

Page 29: ...It supports up to 80V surge protection Pin No Definition 1 V 2 V 3 Chassis Ground 2 3 2 Remote Power On Off Switch Ignition COM 1 COM 2 COM 3 COM 4 On Off IGN DC IN 16 160V LAN6 PoE LAN5 PoE LAN4 PoE...

Page 30: ...e default definition of COM 1 and COM 2 is RS 232 but if you want to change to RS 422 or RS 485 you can find the setting in BIOS BIOS Setting Function COM 1 COM 2 COM 3 COM 4 RS 232 RS 422 5 wire RS 4...

Page 31: ...O 1 D I PIN 1 8 DO PIN 11 18 20 11 10 1 V V There are 4 USB 3 0 connections available supporting up to 5GB per second data rate in the rear side of IVH 9200 It is also compliant with the requirements...

Page 32: ...will be lightened PS Suggest to use PoE function when power input is over 12V The pin outs of LAN 3 to LAN 6 are listed as follows Pin No 10 100 Mbps 1000Mbps PoE Signal 1 E_TX MDI0_P PoE 2 E_TX MDI0...

Page 33: ...each DIO connector DO Safety Related Certifications 4242 VPK Basic Isolation per DIN V VDE V 0884 10 and DIN EN 61010 1 3 KVRMS Isolation for 1 minute per UL 1577 CSA Component Acceptance Notice 5A I...

Page 34: ...4 14 OUTPUT 3 SIO_GPO65 15 OUTPUT 4 SIO_GPO41 16 OUTPUT 5 SIO_GPO40 17 OUTPUT 6 SIO_GPO52 18 OUTPUT 7 SIO_GPO27 19 DIO2_GND 20 DIO2_VDC 6 to 48V Input DO reference circuit Sink Mode NPN Default Device...

Page 35: ...rd Expansion Connectors 2 4 1 Inside View of IVH 9200 Main Board with Connector Location Mini PCIe 1 Mini PCIe 2 Mini PCIe 3 Battery BIOS CN3 JP9 J1 M2_CN1 CN6 FAN2 CN15 SW2 J6 J7 J8 J9 CN9 CN10 JP6 J...

Page 36: ...A 1 3 2 4 2 4 3 Miscellaneous Pin Header 2 0mm 2x4p header This pin header can be used as a backup for following functions such as hard drive LED indicator reset button power LED indicator and power o...

Page 37: ...S module optional 4 2mm 2x2p power connector This system has a UPS power input connector for optional part UPS module Slot Description SODIMM_1 DDR4 Channel A SODIMM_2 DDR4 Channel B SODIMM2 SODIMM1 2...

Page 38: ...ess cabling effort and smaller required space SATA4 SATA3 SATA2 SATA1 Pin No Description Pin No Description 1 Ground 2 TX DP 3 TX DN 4 Ground 5 RX DN 6 RX DP 7 Ground 1 7 2 4 7 SATA Power Header Stand...

Page 39: ...n USB port using plug and play for Dongle Key or LCD touch Panel The USB interface supports 480Mbps transfer rate complied with high speed USB specification Rev 2 0 The USB interface is accessed throu...

Page 40: ...ATA III and PCIe The SSD supports hot plug function and can be removed or plugged in during operating User has to avoid hot plugging the SSD which is configured as boot device and installed operation...

Page 41: ...46 Reserved 43 GND 44 Reserved 41 3 3Vaux 42 Reserved 39 3 3Vaux 40 GND 37 GND 38 USB_D 35 GND 36 USB_D 33 PETp0 34 GND 31 PETn0 32 SMB_DATA 29 GND 30 SMB_CLK 27 GND 28 1 5V 25 PERn0 26 GND 23 PERp0...

Page 42: ...t is recommended that you not replace the lithium battery on your own If the battery needs to be changed please contact the Vecow RMA service team Battery 2 4 12 FAN Header Fan power connector support...

Page 43: ...4 RESET 5 LAD1 6 LAD2 7 LFRAME 8 LAD0 9 N C 10 Ground 11 CLOCK 12 Ground 2 1 12 11 2 4 14 LAN IEEE1588 Header J9 J8 J7 J6 IVH 9200 provides a LAN header for IEEE1588 LAN Number MAC Controller IEEE1588...

Page 44: ...S COM 3 6 TXD COM 3 7 RTS COM 3 8 RXD COM 3 9 DSR COM 3 10 DCD COM 3 1 10 CN9 Pin No Description Port 1 Ground_Frame COM 4 2 Ground COM 4 3 RI COM 4 4 DTR COM 4 5 CTS COM 4 6 TXD COM 4 7 RTS COM 4 8 R...

Page 45: ...P12V 3 P12V 4 GND 5 GND 6 GND CN1 Input power ATX connector Pin No Description 1 DCIN 2 DCIN 3 DCIN 4 GND 5 GND 6 GND J3 Battery connection Pin No Description 1 VBAT 2 VBAT 3 GND 4 GND 5 VBAT_TYPE 6 V...

Page 46: ...application by DIP switch As below show the deep switch on and off 1 OFF 2 OFF ON 1 2 1 ON 2 OFF ON 1 2 1 ON 2 ON ON 1 2 Open Closed Closed 2 3 1 2 3 You may configure your card to match the needs of...

Page 47: ...n Wake Up support 1 3 Pin Header Pin No Description COM 1 JP3 1 2 5V 1A max 3 4 12V 0 5A max 5 6 RI Default 1 2 5 6 Pin Header Pin No Description COM 2 JP4 1 2 5V 1A max 3 4 12V 0 5A max 5 6 RI Defaul...

Page 48: ...Power ON Select Setting Function 1 2 PoE power on at standby power ready 2 3 PoE power on after system power on Default JP10 2 5 5 Clear CMOS ME Switch JP2 JP1 JP1 Setting Function 1 2 Normal Default...

Page 49: ...e for in vehicle applications The built in MCU monitors the ignition signal and turns on off the system according to pre defined on off delay period 2 6 1 Adjust Ignition Control Modes IVH 9200 series...

Page 50: ...elay 20 seconds 5 5 seconds 30 seconds 6 5 seconds 60 seconds 7 5 seconds 90 seconds 8 5 seconds 30 minutes 9 5 seconds 1 hour A 10 seconds 2 hours B 10 seconds 4 hours C 10 seconds 6 hours D 10 secon...

Page 51: ...blow to simulate ignition signal input controlled by a latching switch Note 1 DC power source and IGN share the same ground 2 IVH 9200 supports 6V to 36V wide range DC power input in ATX AT mode In I...

Page 52: ...form Smart Battery Protection namely Low Battery Detection When the system is running on a battery and its voltage drops below the threshold the system will automatically shut down The Low Battery Det...

Page 53: ...46 Vecow IVH 9204MX ICY User Manual SYSTEM SETUP SYSTEM SETUP 3 1 How to Open Your IVH 9204MX ICY 3 Step 1 Remove three 6 32 screws Step 2 Finish...

Page 54: ...47 Vecow IVH 9204MX ICY User Manual SYSTEM SETUP Step 4 Finish Step 3 Remove eight flat head 6 32 screws...

Page 55: ...48 Vecow IVH 9204MX ICY User Manual SYSTEM SETUP Step 5 Remove SATA SATA power cable Step 7 Finish Step 6 Remove SSD tray module...

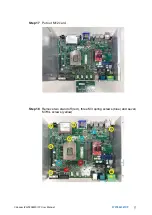
Page 56: ...49 Vecow IVH 9204MX ICY User Manual SYSTEM SETUP 3 2 Installing CPU Step 1 Remove five 6 32 screws Step 2 Finish...

Page 57: ...50 Vecow IVH 9204MX ICY User Manual SYSTEM SETUP Step 3 Remove ATX red and COM blue cable Step 4 Remove COM cable...

Page 58: ...51 Vecow IVH 9204MX ICY User Manual SYSTEM SETUP Step 5 Remove rear panel Step 6 Finish Step1 5...

Page 59: ...52 Vecow IVH 9204MX ICY User Manual SYSTEM SETUP Step 7 Remove seven 6 32 screws Step 8 Remove front panel...

Page 60: ...53 Vecow IVH 9204MX ICY User Manual SYSTEM SETUP Step 9 Remove extender Step 10 Remove 6 32 screw...

Page 61: ...54 Vecow IVH 9204MX ICY User Manual SYSTEM SETUP Step 11 Remove 6 32 screw Step 12 Put out extender...

Page 62: ...55 Vecow IVH 9204MX ICY User Manual SYSTEM SETUP Step 13 Remove SATA SATA power cable Step 14 Finish Step9 13...

Page 63: ...56 Vecow IVH 9204MX ICY User Manual SYSTEM SETUP Step 16 Remove two M3 6L Ni Ny screws on the M12 card Step 15 Remove one flat head 6 32 and put out chock bracket...

Page 64: ...57 Vecow IVH 9204MX ICY User Manual SYSTEM SETUP Step 18 Remove two stand off red three M3 spring screws blue and seven M3 6L screws yellow Step 17 Put out M12 card...

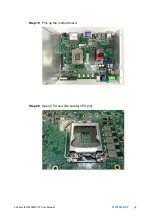
Page 65: ...58 Vecow IVH 9204MX ICY User Manual SYSTEM SETUP Step 19 Pick up the mother board Step 20 Open CPU slot Be careful CPU pin...

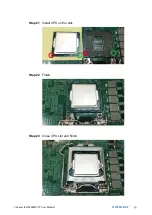
Page 66: ...59 Vecow IVH 9204MX ICY User Manual SYSTEM SETUP Step 22 Finish Step 21 Install CPU on the slot Step 23 Close CPU slot and finish...

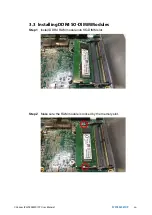
Page 67: ...60 Vecow IVH 9204MX ICY User Manual SYSTEM SETUP 3 3 Installing DDR4 SO DIMM Modules Step 1 Install DDR4 RAM module into SO DIMM slot Step 2 Make sure the RAM module is locked by the memory slot...

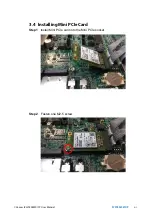
Page 68: ...61 Vecow IVH 9204MX ICY User Manual SYSTEM SETUP 3 4 Installing Mini PCIe Card Step 1 Install Mini PCIe card into the Mini PCIe socket Step 2 Fasten one M2 5 screw...

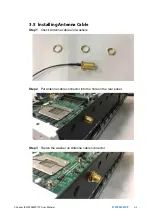
Page 69: ...X ICY User Manual SYSTEM SETUP 3 5 Installing Antenna Cable Step 1 Check Antenna cable and washers Step 2 Put Antenna cable connector into the hole on the rear panel Step 3 Fasten the washer on Antenn...

Page 70: ...ser Manual SYSTEM SETUP 3 6 Installing CFast Card Step 1 Remove 2 pcs F M3x4 screws on CFast SIM cover Step 2 Before inserting CFast SIM Cards make sure IVH 9200 power is not plugged Step 3 Insert CFa...

Page 71: ...ICY User Manual SYSTEM SETUP 3 7 Installing SIM Card Step 1 Remove two F M3x4 screws on CFast SIM cover Step 3 Insert SIM card and push to lock Step 2 Before inserting SIM Card make sure the system p...

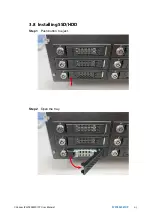
Page 72: ...65 Vecow IVH 9204MX ICY User Manual SYSTEM SETUP 3 8 Installing SSD HDD Step 1 Push button to eject Step 2 Open the tray...

Page 73: ...66 Vecow IVH 9204MX ICY User Manual SYSTEM SETUP Step 3 Pull out the tray Step 4 The tray accommodates 2 5 drives up to 15mm height...

Page 74: ...cow IVH 9204MX ICY User Manual SYSTEM SETUP Step 5 Use the included M3 4 flat head screws to install the drive onto the tray Step 6 Use the included M3 4 flat head screws to install the drive onto the...

Page 75: ...68 Vecow IVH 9204MX ICY User Manual SYSTEM SETUP Step 7 Install the tray Step 8 Close the door...

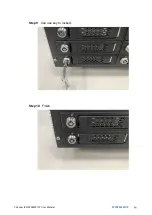
Page 76: ...69 Vecow IVH 9204MX ICY User Manual SYSTEM SETUP Step 9 Can use key to locked Step 10 Finish...

Page 77: ...70 Vecow IVH 9204MX ICY User Manual SYSTEM SETUP 3 9 Installing UPM Step 1 UPM module Step 2 UPM Bracket Step 3 Use M3 4 flat head screws to install the UPM bracket...

Page 78: ...71 Vecow IVH 9204MX ICY User Manual SYSTEM SETUP Step 4 Install cable to UPM V IN Step 5 Remove three pcs PH M3 6L Ni Ny screws Step 6 Install three M3 15L stand off...

Page 79: ...72 Vecow IVH 9204MX ICY User Manual SYSTEM SETUP Step 7 Put on UPM module with bracket Step 8 Fasten three M3 6L Ni Ny screws...

Page 80: ...73 Vecow IVH 9204MX ICY User Manual SYSTEM SETUP Step 10 UPM V in cable red WPM 110 V out blue Step 11 Finish Step 9 Remove ATX cable red then into UPM V out blue...

Page 81: ...9204MX ICY User Manual SYSTEM SETUP 3 10 Mounting Your IVH 9204MX ICY Step 1 Ensure the screw holes on the right and left sides of upper case match the ones on IVH 9200 wall mount bracket Fasten ten...

Page 82: ...UP 4 BIOS SETUP 4 1 Entering BIOS Setup BIOS provides an interface for users to check and change system configuration The BIOS setup program is accessed by pressing the Del key when POST display outpu...

Page 83: ...on Main menu System Date Set the date Use Tab to switch between date elements System Time Set the time Use Tab to switch between time elements Figure 4 2 BIOS Main Menu Figure 4 3 BIOS Advanced Menu...

Page 84: ...derpool Technology Active Processor Cores Number of cores to enable in each processor package Hyper threading Enabled for Windows XP and Linux OS optimized for Hyper Threading Technology and disabled...

Page 85: ...R Speed shift Technology Enable Disable Intel Speed Shift Technology support Enabling will expose the CPPCv2 interface to allow for hardware controlled P states Turbo Mode Turbo Mode C states Enable o...

Page 86: ...4 3 2 2 GT Power Management Control Figure 4 3 2 2 GT Power Management Control ME State Set ME to Soft temporarily disabled AMT BIOS Features When disabled AMT BIOS Features are no longer supported a...

Page 87: ...OS S4 sleep state This option may not be effective with some OS ACPI Sleep State Selects the highest ACPI sleep state the system will enter when the SUSPEND button is pressed S3 Video Repost Enables o...

Page 88: ...6 SIO features an enhanced hardware monitor providing thermal fan speed and system voltages status monitoring Smart Fan Support Smart Fan Support Work with Full Speed if Smart Fan Support is Disabled...

Page 89: ...gs specify how the host computer and the remote computer which the user is using will exchange data Both computers should have the same or compatible settings 4 3 9 Serial Port Console Redirection Fig...

Page 90: ...acoustic management 4 3 11 Acoustic Management Configuration Figure 4 3 11 Acoustic Management Settings Above 4G Decoding Globally Enables or Disables 64bit capable Devices to be Decoded in Above 4G A...

Page 91: ...TP boot support Ipv6 PXE Support Enable Disable IPv6 PXE boot support Ipv6 HTTP Support Enable Disable IPv6 HTTP boot support IP6 Configuration Policy Set IP6 Configuration Policy PXE boot wait time W...

Page 92: ...OS reaction on INT19 trapping by Option ROM IMMEDIATE execute the trap right away POSTPONED execute the trap during legacy boot Boot option filter This option controls Legacy UEFI ROM s priority Netwo...

Page 93: ...USB Mass Storage Driver Support Enable disable USB mass storage driver support Port 60 64 Emulation Enables I O port 60h 64h emulation support This should be enabled for the complete USB keyboard leg...

Page 94: ...e 4 4 BIOS Chipset Menu 4 4 1 System Agent SA Configuration VT d VT d capability GMM Device B0 D8 F0 Enable disable SA GMM device Above 4GB MMIO BIOS assignment Enable disable above 4GB MemoryMappedIO...

Page 95: ...ernal graphics Keep IGFX enabled based on the setup options GTT Size Select the GTT Size Aperture Size Select the Aperture Size Note Above 4GB MMIO BIOS assignment is automatically enabled when select...

Page 96: ...C Wake on LAN Enable or disable integrated LAN to wake the system The wake On LAN cannot be disabled if ME is on at Sx state Serial IRQ Mode Configure serial IRQ mode State After G3 Specify what state...

Page 97: ...f PCH IO DMI Link ASPM Control Enable Disable the control of Active State Power Management on SA side of the DMI Link Native PCIE Enable PCIE Express Native Support Enable Disable PCI Express device s...

Page 98: ...ggressively enter link power state SATA Controller Speed Indicates the maximum speed the SATA controller can support Options for each SATA port Port n Enable or disable SATA Port Hot Plug Designated t...

Page 99: ...ion Figure 4 4 2 3 Security Settings BIOS Lock Enable disable the PCH BIOS Lock Enable BLE bit feature Administrator Password Set administrator password User Password Set user password Secure Boot Cus...

Page 100: ...oved If the Set HDD User Password option is gray do power cycle to enable the option again 4 5 2 Security Boot Figure 4 5 2 Security Boot Settings Attempt Secure Boot Secure Boot activated when Platfo...

Page 101: ...te waiting Bootup NumLock State Select the keyboard NumLock state Quiet Boot Enables or disables Quiet Boot option Boot Option Sets the system boot order New Boot Option Policy Controls the placement...

Page 102: ...Reset Reset system setup without saving any changes Save Changes Save Changes done so far to any of the setup options Discard Changes Discard Changes done so far to any of the setup options Default Op...

Page 103: ...e in out direction in runtime process DIO definition is shown below Pin No Isolated DIO Definition Non Isolated DIO Definition Pin No Isolated DIO Definition Non Isolated DIO Definition 1 DI 0 DIO 0 1...

Page 104: ...IO Connector DI_COM Pin 9 DI Pin 1 8 Source Mode PNP Power Supply 6 48V DC V V DIO Connector DI_COM Pin 9 DI Pin 1 8 DO reference circuit Sink Mode NPN Default Device 6 48V DC V V DIO Connector DIO_VD...

Page 105: ...for driver and guideline to Framework 3 5 distribution for sample Win10_32 bat and Win10_64 bat Installation for driver and installation to Framework 3 5 distribution for sample Uninstall_32 bat and...

Page 106: ...99 Vecow IVH 9204MX ICY User Manual Appendix A A 4 Sample Sample folder include x32 and x64 versions as shown below Sample IVH9K2 exe as shown below...

Page 107: ...adecimal bitmask yes no Use for Read DIO Write button activate DI DIO input text read only DI DIO input state by hexadecimal bitmask on off Use for Read button activate DO DIO text read only DO DIO ou...

Page 108: ...Write button Set POE configuration to set POE state POE output text User setting POE output state by hexadecimal bitmask on off Use for Write button activate POE writable text User setting POE writab...

Page 109: ...ng POE output port state Use for Write button activate POE port writable check button port 4 port 1 User setting POE port writable of POE configuration Use for Write button activate POE port mode chec...

Page 110: ...Success FALSE 0 Fail Driver not exists or initial error version is too old or machine not match BOOL GetDIO1Config BYTE Isolate_Type BYTE DI_NPN BYTE DO_ NPN WORD Mask BOOL GetDIO2Config BYTE Isolate...

Page 111: ...an rule 0 NPN Sink mode for Japanese rule Mask 15 0 In Out pin setting by hexadecimal bitmask 1 Output 0 Input Return TRUE 1 Success FALSE 0 Fail Initial error or hardware problem BOOL GetDI1 BYTE DI...

Page 112: ...are problem BOOL SetDIO1 WORD DO BOOL SetDIO2 WORD DO Set non isolated DIO output DIO output DO 15 0 output state pin setting by hexadecimal bitmask 1 High 0 Low Return TRUE 1 Success FALSE 0 Fail Ini...

Page 113: ...tPOEConfig BYTE Auto BYTE Mask Set POE configuration Auto 3 0 Auto mode pin setting by hexadecimal bitmask 1 Auto 0 Manual Mask 3 0 DC Enable Disable pin setting by hexadecimal bitmask 1 Enable 0 Disa...

Page 114: ...9200 is featured with six SATA include two internal SATA three mSATA and one CFast You can select one of SATA ports for OS installation We used CFast card for Windows 10 OS installation as an example...

Page 115: ..._US support highlights chpsts imsm The RAID environment has been done if you completed the steps above C 5 To Insert SATA HDD for RAID 1 Please notice you can use six SATA ports for SATA HDD except fo...

Page 116: ...he figure of SATA device allocation You will find Volume_0000 in SATA device at BIOS menu To start Disk Management tool select initialize disk Then add Logical Device for Windows access C 8 If One SAT...

Page 117: ...ix C C 10 New HDD Recovery There is a warning will pop up to ask you if the disk is not a member of original RAID volume If you press Rebuild it will replace the broken SATA HDD to the last one SATA H...

Page 118: ...B 3 USB Flash Transcend 3 0 8GB USB 4 USB Flash Transcend 3 0 8GB CFAST Innodisk CFast 3ME3 64GB SATA 0 Transcend SSD370 64GB SATA 1 TOSHIBA SSD THNS064GE4BBDC 64GB LAN 1 i219 1 0 Gbps LAN 2 i210 1 0...

Page 119: ...22 12W Core i7 6700 12V 0 448A 05 38W 1 887A 22 64W Core i7 6700 24V 0 307A 07 37W 1 006A 24 14W Core i7 6700 36V 0 272A 09 79W 0 722A 25 99W CPU Power Input Power on and boot to Win10 64 bit Run 100...

Page 120: ...57W Core i5 6500TE 12V 0 443A 05 32W 1 774A 21 29W Core i5 6500TE 24V 0 298A 07 15W 0 962A 23 09W Core i5 6500TE 36V 0 260A 09 36W 0 688A 24 77W CPU Power Input Power on and boot to Win10 64 bit Run 1...

Page 121: ...0 64W Core i3 6100 12V 0 443A 05 32W 1 792A 21 50W Core i3 6100 24V 0 302A 07 25W 0 997A 23 93W Core i3 6100 36V 0 269A 09 69W 0 702A 25 27W CPU Power Input Power on and boot to Win10 64 bit Run 100 C...

Page 122: ...pported Memory Storage List E 1 Supported Memory List Testing Board IVH 9200 Memory Test version 5 1 Burn in Test V8 1 E 2 Tset Item Channel Memtest Bunin Flash BIOS Remove Battery 2 PASS PASS PASS PA...

Page 123: ...R4 2400 17 Wild Temp D4SAGHLPGFI 01611150030001 85 C 01611150030002 85 C Memxpro 16GB DDR4 2400 17 D4SAGHLPGFC 01611150030003 25 C 01611150030004 25 C Memxpro 8GB DDR4 2400 17 D4S8GHLPGEC 016111700300...

Page 124: ...A1251208WN 512GB innodisk 3MR3 P DRS25 64GD70BCAQC 64GB Silicon Power SP128GISSD301RW0 128GB SP32GISSD301SV0 32GB SATA HDD TOSHIBA MK5055GSX 500GB M 2 SATA SSD Memxpro M3B MD3MB1164GS1WN 64GB M3B MD3M...

Page 125: ...fications are subject to change without prior notice No part of this publication may be reproduced in any form or by any means electric photocopying or recording without prior authorization from the p...

Reviews: