VDO X1 Instruction Manual Download Page 7

X1 

VDO CYCLECOMPUTING

12

GB

SLO

PL

JP

JP

PL

SLO

GB

www.vdocyclecomputing.com  

 X1

13

5.2.2  Setting using wheel circumference 

>>> P05

To enter the wheel size manually, you must first 
measure the wheel roll circumference on your bike.

Measuring wheel roll circumferences:

step 1


Precisely align valve on the front wheel 

vertically to the ground.

step 2 

Mark this spot on the ground with a line 

(e.g. chalk).

step 3


Push the bike forwards one turn of the 

wheel until the valve is vertical to the ground 
again.

step 4

 Also mark this spot on the ground.

step 5

 Measure the distance between the two 

marks.That is your wheel circumference 
(=roll circumference).

step 6

 Enter the wheel circumference measured 

in this way into your VDO computer.

ATTENTION: If you have selected KMH display, 
you must enter the wheel circumference in mm 
(If MPH display is selected, enter the wheel 
circumference in inches).

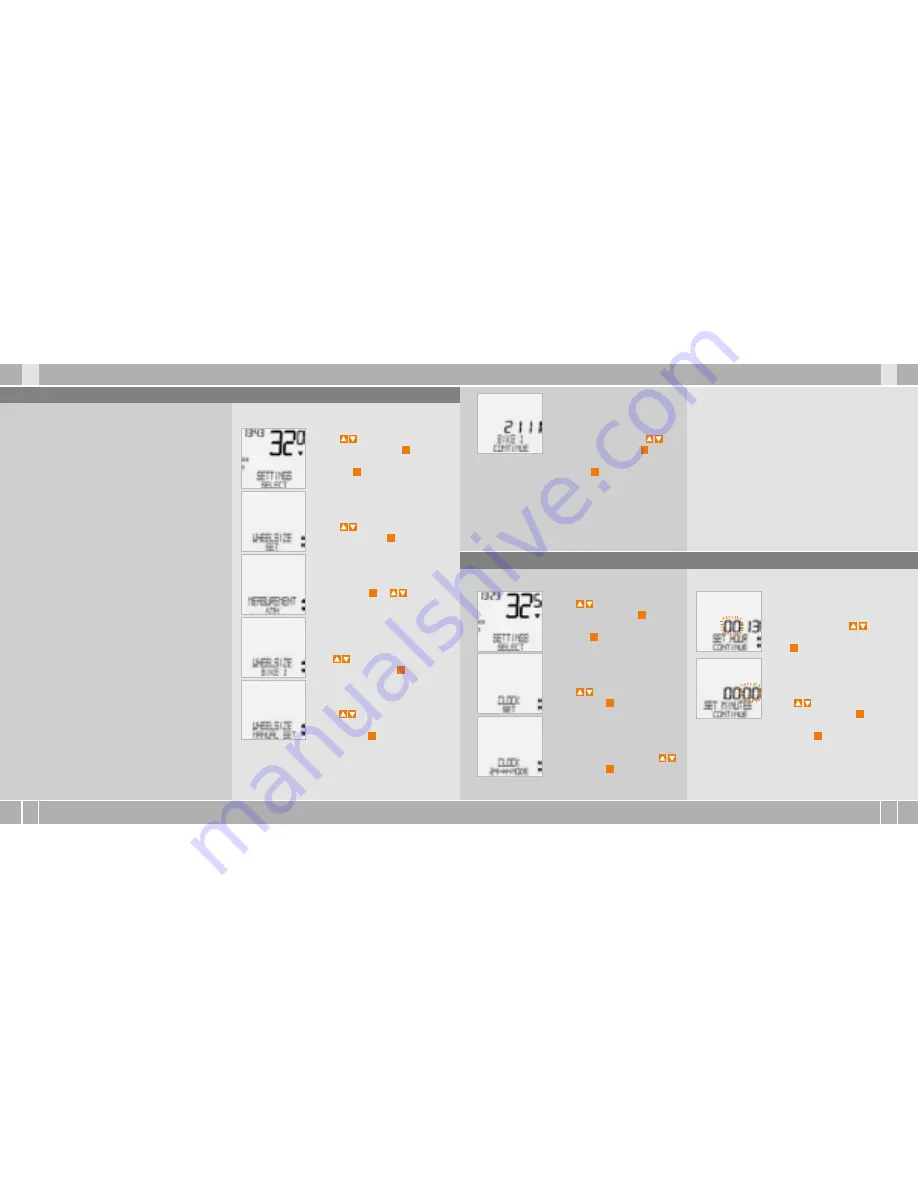
How to set the wheel size manually:

Using 

 go to SETTINGS/

SELECT. Confirm with 

M

You are now in setting mode 
(pressing 

C

 for 3 seconds gets 

you back to function mode)

Using 

 go to WHEELSIZE/ 

SET. Confirm with 

M

 .

MEASUREMENT/KMH.
Confirm with 

M

 or 

 to 

change to MPH.

WHEELSIZE/BIKE 1.
(use 

 to go to setting for 

bike 2) Confirm with 

M

.

Using 

 go to 

WHEEL-SIZE/MANUAL SET.
Confirm with 

M

ATTENTION: The factory settings for bike 1 = 2155 mm 
and for bike 2 = 2000 mm. If you do not enter any 
wheel sizes, the computer works with these fac-
tory settings. The values measured in this way 
for speed, distance etc. can differ widely from 
the actual values.

BIKE 1 ...SET SIZE/CONTINUE
Now set the wheel roll circum-
ference measured using 

Confirm the entry with 

M

.

BIKE 1/SET OK? Confirm with 

M

.

The display confirms: WHEELSIZE/SET DONE.
Automatic return to SETTINGS/SELECT.

How to set the clock:

Using     go to SETTINGS/ 
SELECT. Confirm with 

M

.

You are now in setting mode 
(pressing 

C

 for 3 seconds gets 

you back to function mode)

Using     go to CLOCK/SET. 
Confirm with 

M

.

CLOCK/24-H-MODE (you can 
switch to 12-H mode using    . 
Confirm with 

M

.

CLOCK...SET HOUR/CONTINUE
Set the hours using    .
Confirm the hour setting 
with 

M

.

CLOCK...SET MINUTES/ 
CONTINUE. Set the minutes 
using    . Confirm the  
minutes setting with 

M

.

CLOCK/SET OK? Confirm with 

M

.

The display confirms: CLOCK/SET DONE.
Automatic return to SETTINGS/SELECT.

5.3  Setting the clock 

Summary of Contents for X1

Page 1: ...X1 GB Instruction Manual SLO Navodila Za Uporabo PL Instrukcja obslugi licznika JP Series X JP PL SLO GB...

Page 2: ...r magnet and handlebar holder 8 4 2 Installing the battery in the computer 8 4 3 Placing the computer into the handlebar holder 9 5 Basic settings 10 5 1 Setting the language 10 5 2 Setting and measur...

Page 3: ...the current speed with the average speed The indicator shows B whether the current speed is higher than the average 1 KMH B below the average 1 KMH B or matches the average tolerance 1 KMH Menu prompt...

Page 4: ...unction mode TRIPDISTANCE Shows the distance of the current trip since the last reset Maximum value 999 99 km If the maximum value is exceeded the counter starts again at zero At the same time the val...

Page 5: ...in the handlebar holder place around the handlebars or the stem and pull do not pull tight just yet step 7 If fitting to handlebars Align computer angle to achieve optimum readability Now pull cable...

Page 6: ...nsequently also lead to discrepancies in the distance measured and the speed shown mm value inch value 16 x 1 75 1272 50 1 20 x 1 75 1590 62 6 24 x 1 1948 76 7 24 x 1 75 1907 75 1 26 x 1 1973 77 7 26...

Page 7: ...ack to function mode Using go to WHEELSIZE SET Confirm with M MEASUREMENT KMH Confirm with M or to change to MPH WHEELSIZE BIKE 1 use to go to setting for bike 2 Confirm with M Using go to WHEEL SIZE...

Page 8: ...1 use to switch to bike 2 Confirm with M BIKE 1 SELECT OK Confirm with M The display confirms BIKE SELECT DONE Automatic return to SETTINGS SELECT The selected bike 1 or 2 is shown on the display bot...

Page 9: ...s are processed and no button is pressed Sleep mode is ended when speed impulses are processed again when cycling or a button is pressed Use to go to the data you want to reset B DATA RESET TOUR DATA...

Page 10: ...ay will work normally again 6 Terms of guarantee Please contact the dealer from whom you purchased the device for all complaints and guarantee claims Or send your complaint directly to Cycle Parts Gmb...

Page 11: ...krmilo 26 4 2 Vstavljanje baterije v ra unalnik 27 4 3 Vstavitev ra unalnika v dr alo za krmilo 27 5 Osnovne nastavitve 28 5 1 Stavitev jezika 28 5 2 Nastavitev in merjenje velikosti koles 28 5 2 1 N...

Page 12: ...nik primerja trenutno hitrost s povpre no hitrostjo Indikator prikazuje B ali je trenutna hitrost nad povpre jem 1 KMH B pod povpre jem 1 KMH B ali enaka povpre ju toleranca 1 KMH Indikator krmiljenja...

Page 13: ...o vodenja skozi meni s celotnim besedilom kakr no se uporablja pri 3 Informacijske funkcije TRIPDISTANCE Prikazuje progo trenutne ture od zadnje ponastavitve Maksimalna vrednost 999 99 km Ob prekora i...

Page 14: ...zareze v dr alu za krmilo polo ite okoli krmila ali nosilca in jih zategnite ne e tesno 7 korak Pri monta i na krmilo Nastavite naklonski kot ra unalnika tako da dose ete optimalno od itavanje Vezice...

Page 15: ...atik Zato lahko tudi pride do odstopanja izmerjene proge in prikazane hitrosti Vrednost v mm Vrednost v colah 16 x 1 75 1272 50 1 20 x 1 75 1590 62 6 24 x 1 1948 76 7 24 x 1 75 1907 75 1 26 x 1 1973 7...

Page 16: ...ako izmerjen obseg koles vnesite v va ra unalnik VDO POZOR e ste izbrali prikaz KMH morate obseg koles vnesti v mm e ste izbrali prikaz v MPH obseg koles vnesite v colah Tako ro no nastavite velikost...

Page 17: ...SELECT Izbrano kolo 1 ali 2 se prika e na zaslonu v spodnjem levem delu POZOR pomembno opozorilo Pri menjavi s kolesa 1 na 2 ali obratno se podatki o dnevni turi asu vo nje povpre ni hitrosti in maksi...

Page 18: ...nobena tipka Na in majhne porabe energije se kon a e se spet procesirajo impulzi hitrosti pri vo nji ali e se pritisne na dolo eno tipko 5 6 Prikaz servisnega intervala Prikaz servisnega intervala VDO...

Page 19: ...ovu www vdocyclecomputing com V teku nadaljnjega razvoja si pridr ujemo pravico do tehni nih sprememb VDO Cycle Parts vam za va ra unalnik VDO daje petletno garancijo od datuma nakupa Garancija obsega...

Page 20: ...magnesu i uchwytu na kierownic 44 4 2 Monta baterii w komputerze 45 4 3 Wk adanie komputera w uchwyt na kierownic 45 5 Podstawowe ustawienia 46 5 1 Ustawianie j zyka 46 5 2 Ustawianie i pomiar rozmiar...

Page 21: ...ci aktualnej do pr dko ci redniej Komputer por wnuje pr dko aktualn z pr dko ci redni Wska nik wskazuje B czy pr dko aktualna jest wi ksza od redniej 1 KMH B czy le y poni ej redniej 1 KMH B czy jest...

Page 22: ...ej nawigacji w menu stosowanej obecnie w wi kszo ci 3 Funkcje informacyjne DYST CZESC Wskazuje dystans aktualnej trasy od momentu ostatniego kasowania Warto maksymalna 999 99 km Po przekroczeniu warto...

Page 23: ...wory w uchwycie na kierownic owin wok kierownicy lub sztycy i naci gn jeszcze nie doci ga krok 7 Przy monta u na kierownicy ustawi k t nachylenia komputera aby uzyska optymaln czytelno wy wietlacza Do...

Page 24: ...r dko ci Warto w mm Warto w calach 16 x 1 75 1272 50 1 20 x 1 75 1590 62 6 24 x 1 1948 76 7 24 x 1 75 1907 75 1 26 x 1 1973 77 7 26 x 1 5 2026 79 8 26 x 1 6 2051 80 7 26 x 1 75 2070 81 5 26 x 1 9 2089...

Page 25: ...ustawie dla roweru 2 Potwierdzi przyciskiem M Za pomoc przycisk w przej do opcji ROZMIAR KOLA USTAWIENIA Potwierdzi przyciskiem M ROWER 1 USTAW OBWOD DALEJ Na wy wietlaczu pojawia si potwierdzenie RO...

Page 26: ...m M Na wy wietlaczu pojawia si potwierdzenie DYST CALK 1 USTAWIONO Automatyczny powr t do opcji USTAWIENIA WYBIERZ 5 5 Prze czanie z roweru 1 na rower 2 ROWER 1 WYBIERZ OK Potwierdzi przyciskiem M Na...

Page 27: ...we mo na ustawi w nast puj cy spos b Za pomoc przycisk w przej do opcji USTAWIENIA WYBIERZ Potwierdzi przyciskiem M U ytkownik znajduje si teraz w menu ustawie przyci ni cie przycisku C przez 3 sekund...

Page 28: ...hniczne Zakres pomiaru czasu jazdy do 23 59 59 HH MM SS Zakres pomiaru dystansu cz ciowego do 999 99 km lub mil Zakres pomiaru ca kowitego przebiegu roweru 1 i roweru 2 do 99 999 km lub mil Zakres pom...

Page 29: ...56 GB SLO PL JP JP PL SLO GB www vdocyclecomputing com X1 57 VDO VDO 1 58 2 EMC 60 3 61 4 62 4 1 62 4 2 62 4 3 63 5 63 5 1 63 5 2 63 5 2 1 64 5 2 2 65 5 3 66 5 4 66 5 5 67 5 6 68 5 7 69 5 8 69 6 69 7...

Page 30: ...X1 VDO CYCLECOMPUTING 58 GB SLO PL JP JP PL SLO GB www vdocyclecomputing com X1 59 1 KMH Section 1 4 Section 3 Section 4 MORE SELECT B MORE B SELECT Section 2...

Page 31: ...MENU B B B B B UP B B B EMC 2 EMC EMC EMC 4 3 TRIPDISTANCE 999 99km mile 0 TRIPDISTANCE MORE MORE TRIPDISTANCE M B 1 ODO BIKE 1 99 999 km B 2 2 ODO BIKE 2 99 999 km B ODO TOTAL 199 999km mile C RIDE...

Page 32: ...JP PL SLO GB www vdocyclecomputing com X1 63 4 4 1 P01 a 5mm b P02 5mm 4 5 6 4 2 P03 CR2032 2 3 4 4 3 P04 45 5 5 1 SETTINGS SELECT M C LANGUAGE SELECT M LANGUAGE ENGLISH M ENGLISH SELECT OK M LANGUAG...

Page 33: ...24 87 6 28 x 1 75 2268 89 3 28 x 1 2265 89 2 28 x 1 2205 86 8 30 622 2149 84 6 32 622 2174 85 6 37 622 2205 86 8 40 622 2224 87 6 WHEELSIZE BIKE 1 M BIKE 2 BIKE 2 M WHEELSIZE MANUAL SET M BIKE 1 SET S...

Page 34: ...SELECT 5 3 SETTINGS SELECT M C CLOCK SET M CLOCK 24 H MODE M 12 H mode 12 H MODE M 1 2 SETTINGS SELECT M C 5 4 ODO BIKE 1 SET DISTANCE CONTINUE M M 2 SETTINGS SELECT M C BIKE SELECT M BIKE 1 M BIKE B...

Page 35: ...SET DONE SETTINGS SELECT BIKE SERVICE BIKE 1 ON BIKE SERVICE m SETTINGS SELECT M C BIKE SERVICE SET M 5 6 5 7 5 DATA RESET SELECT M B DATA RESET TOUR DATA B DATA RESET ODO TOTAL M Selected Data RESET...

Page 36: ...owa si z punktem sprzeda y detalicznej w kt rym dokonali zakupu produktu lub z organem w adz lokalnych U ytkownicy w firmach powinni skontaktowa si ze swoim dostawc sprawdzi warunki umowy zakupu Produ...

Page 37: ...Series X www cyclecomputing com CP X1 BDA 4 1...

Reviews: