background image

9

English

Function selection mode OPERATION

SET UP mode operation

Long press 

DISP


button (8)

 more than 2 seconds to activate the set up mode and 

change the desired setting accordingly.

Short press 

DISP button (8)

 on desired mode changes the display information as 

below listed tables.
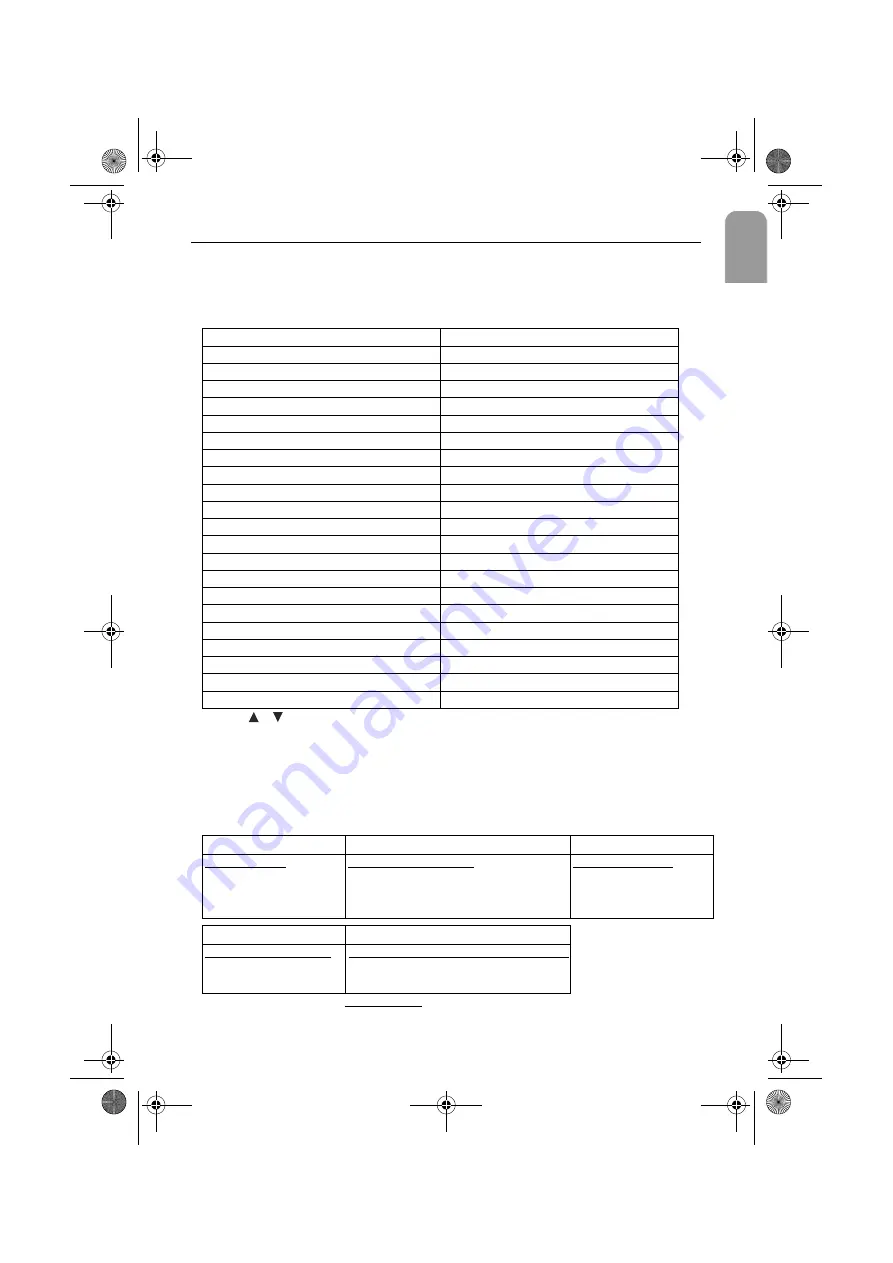
Set-up mode

Subject

Options

Illumination

Color 1 / 2 / 3

Bleep level

BLEEP OFF, 1, 2, 3, 4

Manual Clock

ON / OFF / RDS CLOCK

Clock format (if active)

24 Hr / 12 Hr

Time Adjust Hours (if man.clock)

Hours blinking 00-12 or 23

Time Adjust Min’s (if man.clock)

Minutes blinking 00-59

Tuner configuration

Europe / USA / Asia

RDS

ON / OFF

REGIONAL

ON / OFF

TA - Volume

TAVOL -2, -1, 0, 1, 2

LO / DX

LO / DX

MW

ON / OFF

LW

ON / OFF

Freq SCAN

OFF / SCAN 5, 10, 20 sec

CD level

CD level -3, -2, -1, 0, 1, 2, 3

MP3 level

MP3 level -3, -2, -1, 0, 1, 2, 3

AUX-In

ON / OFF

AUX-IN level

AUXLEV 1, 2, 3, 4

HANDSFREE

HFREE OFF, MUTE, LO, HI

HANDSFREE LEVEL

HFL 1, 2, 3, 4

LED (blinking)

ON / OFF

• Use 

 / 

 to select subject

• Volume knob to select options
• The new selection is immediately memorised

Display key (on head unit)

Sequential information

Tuner Mode

CD Mode

MP3 Mode

Station Name

Frequency
RDS Clock
PTY

Elapsed Track / Time

radio info (freq, station..)
Clock

Title / Track time

radio info (freq, station..)
Clock

VCD Mode

DVD Mode

Elasped Track / Time

radio info (freq, Station..)
Clock

Elasped Track / Time / Title / Chapter

radio info (freq, station..)

After 5 sec, return to the 

main display

Siemens VDO - DV1805 DFU.book  Page 9  Thursday, October 27, 2005  1:26 PM

Summary of Contents for DV 1805 MP3

Page 1: ...DV1805 MP3...

Page 2: ...Siemens VDO DV1805 DFU book Page 4 Friday September 2 2005 5 32 PM...

Page 3: ...ton 14 DOWN button 15 CD eject button 16 Radio preset 6 button PAUSE PLAY 17 Radio preset 5 button STOP 18 Radio preset 4 button 19 Radio preset 3 button SCN 20 Radio preset 2 button RPT 21 Radio pres...

Page 4: ...ry contact your dealer 15A Audio SMART White Red D Video B A F 3 F A B TEL MUTE HIGH PINK TEL MUTE LOW GREY HAND BRAKE CONTROL Orange Multimedia control Yellow C1 C2 External IR ANT Line out Black AUX...

Page 5: ...Up 19 Special Feature Functions 19 Specification 21 Maintenance 22 Trouble shooting 23 HINTS FOR CORRECT AND SAFE OPERATION This unit is designed to be operated only 12 volt DC negative ground system...

Page 6: ...lock Pull the levers toward you makes it possible to remove the unit from the dashboard DIN REAR MOUNT Method B Installation using the screw holes on the sides of the unit Remove the outer rim around...

Page 7: ...7 English REMOTE CONTROL 1 10 2 3 4 5 6 14 11 12 13 15 16 17 20 7 8 18 19 9 Siemens VDO DV1805 DFU book Page 7 Thursday October 27 2005 1 26 PM...

Page 8: ...Display the TITLE menu that is stored in DVD disc 10 DISP Display statistical disc information during playback 11 BAND ILLUM S P In radio mode press it to select desired bands L P Brightness level lo...

Page 9: ...olume TAVOL 2 1 0 1 2 LO DX LO DX MW ON OFF LW ON OFF Freq SCAN OFF SCAN 5 10 20 sec CD level CD level 3 2 1 0 1 2 3 MP3 level MP3 level 3 2 1 0 1 2 3 AUX In ON OFF AUX IN level AUXLEV 1 2 3 4 HANDSFR...

Page 10: ...ode by SOUND button 22 and select desired Bass Boost effect as rotate Volume button 2 There are four kinds of mode as below FLASHING LED If the front panel is removed from the unit the LED 24 will be...

Page 11: ...up down buttons 13 14 shortly to scan all frequency throughout the entire band Note SCAN in SETUP mode has to be turned on before it can function STATION STORE AND RECALL Press any one of the preset b...

Page 12: ...rrent station for retune time which is set by RETUNE SHORT 30sec or RETUNE LONG 90sec the radio start to retune to next same PI station TA ALARM mode When TP information gets lost at the current stati...

Page 13: ...ress second time repeat off SCAN TRACKS During CD operation press SCAN 19 in headunit or SCAN 2 in remote control to play first several seconds of each track of the current disc Press again to stop in...

Page 14: ...e button 12 once again to resume normal playback Fast forward reverse Long Press the button 10 or 6 in remote control or button 11 in headunit or button 6 in remote control button during playback Each...

Page 15: ...wing order Single ELAPSED Single REMAIN Clear message on screen MP3 NO Folder Each time the DISP button is pressed the time display changed in the following order Single ELAPSED Single REMAIN Clear me...

Page 16: ...r button to start a slide show beginning with the selected file All the images in the current directory are displayed in sequence for approx 5 seconds each Press the button in order to pause or resume...

Page 17: ...This is to select the appropriate TV aspect 4 3 or 16 9 according to the connected TV set NORMAL LB For 4 3 Viewing Played back in letterbox style If connected to a wide screen video source black ban...

Page 18: ...lay CAPTIONS Activate the CAPTIONS feature by selecting ON SPEAKER SET UP MENU DOWNMIX This is to select the Dolby AC3 5 1 Downmix mode for the analog output If you select LT RT the Dolby Digital sign...

Page 19: ...t MP3 JPEG MENU This is used to set the display mode for MP3 playback Select NO FOLDERS to play MP3 files without folder file display Select FOLDERS to show the disc contents in folder file style DEFA...

Page 20: ...auxiliary equipment to the headunit via RCA cables connect red socket to right channel connect white socket to left channel Go to SETUP mode turn ON the Aux In Select the SRC button 12 to Aux In SMART...

Page 21: ...with IEC filter DVD Signal to Noise Ratio More than 90 dB Channel Separation More than 75 dB Frequency Response 20 Hz 20 KHz Measure at smart out with IEC filter RADIO EUROPE US ASIA FM FM FM Frequenc...

Page 22: ...igh temperature can shorten the life of electronic devices and distort or melt plastic parts For CD MP3 VCD DVD Player As dust tends to accumulate in the CD slot clean it every once in a while Your CD...

Page 23: ...f for an hour or so then try again No sound Volume is in minimum Adjust volume to a desired level Wiring is not properly connected Check wiring connection Sound skips Th installation angle is more tha...

Page 24: ...DV1805 MP3...

Reviews: