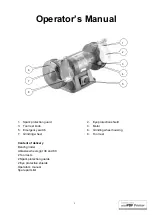
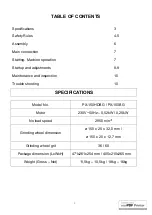
VDH PX-150HDBG Operator'S Manual Download Page 8

8

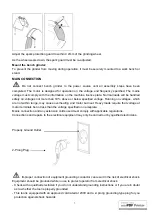
- Grounding plug should be plugged directly into a properly installed and grounded 2- prong grounding-

type receptacle, as shown.

- Do not remove or alter grounding prong in any manner. In the event of a malfunction or breakdown, 

grounding provides a path of least resistance for electrical shock.
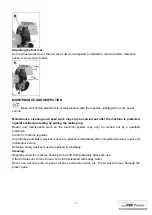
STARTING OPERATION

You can start the machine with the green ON-button.
The red OFF-button on the main switch (5) stops the machine.

Machine operation

The bench grinder is designed for grinding metal materials only without use of water.
The medium grain abrasive wheel is suitable for rough grinding where a considerable amount of metal 
must be removed.
The fine grain abrasive wheel is suitable for sharpening tools and grinding to close size and smooth 
finish.
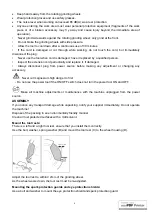
Hold and guide the work piece safely during machining.
Do not perform any operation freehand; always have the work piece supported by the tool rest.
Apply a moderate pressure on the work piece and keep it moving for smooth grinding.
Pressing too hard overheats the motor and prematurely wears down the grinding wheels.
Note the original bevel angle on the item to be sharpened and try to maintain the same shape.
The grinding wheel should rotate into the object being sharpened.
Keep a tray filled with water and dip your work piece regularly to prevent overheating. Overheating can 
weaken metals.
When the  wheel  becomes  loaded of debris,  use an  approved grinding  wheel  dresser  and dress the 
wheel.

Warning:

The condition of the abrasive wheels should be checked before each machining process. Work only 
with flawless abrasive wheels.
Do not allow anyone to stand behind the unit or close to the work piece where debris can be thrown.
Flying sparks will occur when cutting. They can cause injury and ignite flammable materials.

Use safety goggles at all times.
Use ear protection at all times.
Wear a face and dust mask when working in a dusty environment.

Ensure that the wheel guards are in the correct position before you start machining.
Keep the tool rest and spark guard to within 2mm of the grinding wheel. 
Before starting the grinder, turn the wheels by hand making sure they turn freely.
Allow the abrasive wheels to reach full speed before machining.
Do not use the side of the grinding wheel; this puts dangerous stress on the wheel.
Do not stop the wheel by side pressure.
Do not touch the machined work piece until it cools or you may be burned!
Never place your hand near the cutting area while machine is in operation.
Never machine pieces that are too small to hold safely.
Support long work pieces with helping roller stands.

Summary of Contents for PX-150HDBG

Page 1: ...1 PX 150HDBG PX 150BG BENCH GRINDER VDH Machines Gereedschappen BV Texasdreef 8 3565 CL UTRECHT Tel 31 30 296 32 70 Fax 31 30 293 66 00 www vdhbv nl...

Page 2: ...ol rest knob 4 Motor 5 Emergency switch 6 Grinding wheel housing 7 Grinding wheel 8 Tool rest Content of delivery Bench grinder Abrasive wheels grit 36 and 60 2 Tool rests 2 Spark protection guards 2...

Page 3: ...8 9 Maintenance and inspection 10 Trouble shooting 10 SPECIFICATIONS Model No PX 150HDBG PX 150BG Motor 230V 50Hz 0 52kW 0 25kW No load speed 2950 min 1 Grinding wheel dimension 150 x 25 x 32 0 mm 150...

Page 4: ...ep children and visitors away Don t let children contact tool or extension cord All visitors should be kept away from work place 5 Store idle tools When not in use tools should be stored in try high o...

Page 5: ...itches replaced by a qualified service center Do not use the tool if the switch does not turn it on and off 19 Check the voltage Don t plug the electric tool into the mains until you have checked that...

Page 6: ...damaged Always disconnect plug from power source before making any adjustment or changing any accessory Never cut magnesium high danger to fire Do not use the power tool if the ON OFF switch does not...

Page 7: ...re not within range may cause overheating and motor burnout Heavy loads require that voltage at motor terminals be not less than the voltage specified on nameplate Mains connection and any extension c...

Page 8: ...rotate into the object being sharpened Keep a tray filled with water and dip your work piece regularly to prevent overheating Overheating can weaken metals When the wheel becomes loaded of debris use...

Page 9: ...park protection guard away from the wheel Remove the wheel housing cover Remove the nut clamping flange and abrasive wheel D Note Turn the nut on the right hand wheel counter clockwise to loosen Turn...

Page 10: ...ling the mains plug Repair and maintenance work on the electrical system may only be carried out by a qualified electrician Clean the machine regularly All protective and safety devices must be re att...

Page 11: ...waste please take note of the following The crossed out wheelie bin symbol found on the appliance or the packaging indicates that the product must be disposed separately from ordinary household waste...

Page 12: ...ter Wheel flange 2 40 Washer 2 4 Nameplate of wheel 4 41 Knob Nut 2 5 Wheel 2 42 Cable protector 1 6 Inner Wheel flange 2 43 Bolt 3 7 Ash Tube 2 44 Base 1 8 Bolt 6 45 Bolt 2 9 Washer 6 46 Switch 1 10...

Page 13: ...nd cover 1 59 Flat washer 1 23 Screw 6 60 Capacitor clip 1 24 Washer 6 61 Capacitor 1 25 Flat washer 6 62 Washer 2 26 Eye shield 2 63 Flat washer 2 27 Square Neck Screw 2 64 Plug Cord 1 28 Square Neck...

Page 14: ...or 1 11 Nut 4 39 Capacitor clip 1 12 Washer 10 40 Bolt 1 13 Washer 16 41 Cable plug 1 14 Nut 10 42 Nameplate of wheel 4 15 Stator 1 43 Bolt 2 16 Nameplate 1 44 Left Inner guard 1 17 Motor house 1 45 B...

Reviews: