background image

Charging the Battery

Your Vaultek™ safe is powered by a rechargeable lithium-ion battery and comes with a charging kit which 

includes an AC power adapter (suitable for 120 volt power outlets) and a micro-USB cable. Safe and 

micro-USB cable can be used with all international power adapters.

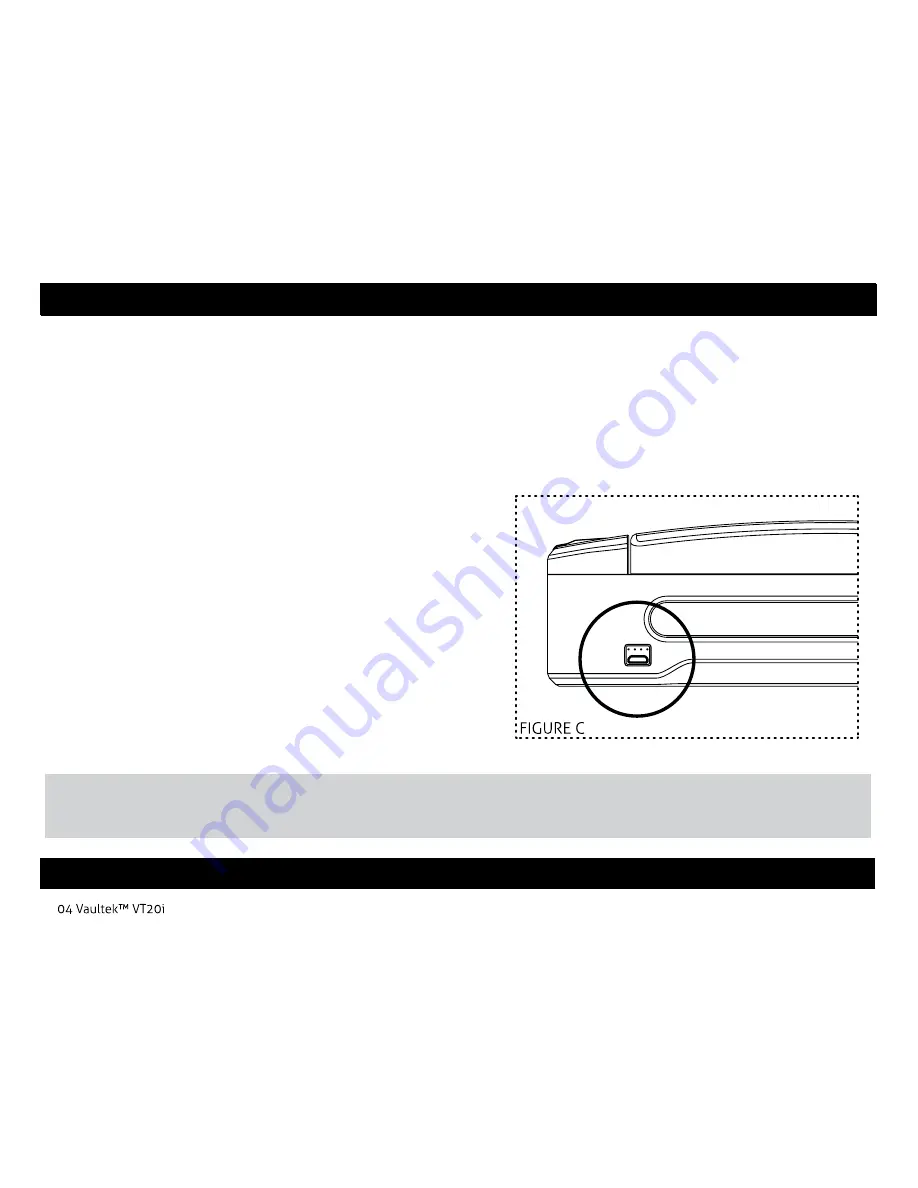
Under normal usage, the battery can last at least 4 months. To recharge the safe, plug the micro-USB cable into 

the micro-USB receiving jack located on the lower right side of the safe (Figure C) and connect to a standard USB 

port or wall outlet using the AC power adapter. Approximate recharge time is 2.5 hours. During recharging, the 

white LEDs above the micro-USB jack (Figure C) indicate the battery capacity as below:

4 lights glow: Fully recharged

3 lights glow, 1 light blinks: 80%~100%

2 lights glow, 1 light blinks: 60%~80%

1 light glows, 1 light blinks: 40%~60%

1 light blinks, less than 20%

The charging kit can also function as an external power

supply, which means you can open your safe even when

the battery is depleted.

IMPORTANT

After installing the battery, use the charging kit provided to charge the unit 100%.

HOW-TO-VIDEOS AVAILABLE 

CLICK HERE FOR ACCESS

Summary of Contents for VT20i

Page 1: ......

Page 2: ...CLICK HERE FOR ACCESS ...

Page 3: ...ics Programming 08 11 Helpful Programming Tips 08 Programming 1st and 2nd Fingerprints 09 Programming Additional Fingerprints 10 Deleting Fingerprints 11 Hot Keys 11 12 Tamper Detection 11 Stealth Mode 11 Travel Mode 11 View Battery Status 12 Delete Fingerprints 12 Toggle Interior Light ON OFF 12 Vaultek App 13 14 Securing Your Safe 15 Customer Support Warranty 16 FAQ 17 18 ...

Page 4: ...gister Your Safe Change Your Master Pin Code How to Program Your Fingerprint Overview of the Bluetooth App How to Anchor Your Safe Hot Keys Available More videos online Vaultek App The Vaultek app is available for Android and iOS devices The app allows you to remotely unlock safe check battery level toggle sound ON OFF adjust the interior light name fingerprint IDs plus much more See pages 13 to 1...

Page 5: ...rmation Vaultek App Open the safe with the Bluetooth app See pages 13 and 14 for more information Key Two keys are provided for manual access to the safe in the event the battery dies Secure Defense How your Vaultek Safes keeps people out Anti Impact Latches Built to withstand forceful impacts and heavy slams Unibody Construction Our unibody design is extremely strong without welds or weak points ...

Page 6: ...ALWAYS check to make sure door has latched when closing lid requires a firm press DO NOT get the fingerprint sensor area wet HOW TO VIDEOS AVAILABLE CLICK HERE FOR ACCESS ...

Page 7: ...river provided open the battery cover by removing the single screw in the top center of the battery cover Insert the 18650 rechargeable lithium ion battery included in box into the battery compartment Note that your Vaultek safe automatically detects the polarity of the battery and can be installed in either direction When the battery is inserted you will hear a short welcome tone and the keypad w...

Page 8: ...fe Figure C and connect to a standard USB port or wall outlet using the AC power adapter Approximate recharge time is 2 5 hours During recharging the white LEDs above the micro USB jack Figure C indicate the battery capacity as below 4 lights glow Fully recharged 3 lights glow 1 light blinks 80 100 2 lights glow 1 light blinks 60 80 1 light glows 1 light blinks 40 60 1 light blinks less than 20 Th...

Page 9: ...f 1 blinks red less than 2 Low Battery If 1 button on the keypad blinks 5 times and you hear a beep when opening the safe your battery level is critically low and your safe needs to be charged immediately IMPORTANT Replace the battery with a 18650 rechargeable lithium ion battery when one or more of the following occurs A all four of the white lights above the micro USB jack are blinking or B it t...

Page 10: ... as soon as possible to prevent unauthorized access to your safe You will also use this master code in the Vaultek app on your smartphone so it should be kept confidential TIP Code Requirements Your code can be a minimum of 4 and a maximum of 8 keypad entries Two keys cannot be pressed simultaneously Programming a new code will overwrite your previous code Enter default code 1 2 3 4 5 on the keypa...

Page 11: ...nside of the battery door and a 4 digit ID number engraved on the keys You will need these numbers to register your safe Locate your product number It is printed on the first page of this user manual and on the back of the battery door Figure E F Find your 4 digit ID number engraved on the keys Figure G Please visit the Vaultek website at VAULTEKSAFE COM and click Support Enter the required inform...

Page 12: ...d on physiological or behavioral characteristics Biometric fingerprint authentication refers to technology that measures and analyzes human physical characteristics for identification and authentication purposes Everyone has their own unique fingerprints and what makes them unique is the pattern of ridges valleys and minutiae points that comprise an individual print Vaultek and their leading engin...

Page 13: ... page 08 place your finger on the fingerprint sensor for the first of 5 scans When the safe beeps and the 1 button flashes GREEN and then solid RED remove your finger If the sensor turns red remove your finger and try again Place finger again over the scanner until the safe beeps and the number 2 lights up GREEN and lift You will repeat this process until all keys 1 5 are solid GREEN Close lid and...

Page 14: ... when the safe beeps and the light above the fingerprint sensor turns GREEN When the 1 button on the keypad starts blinking RED you can program a NEW fingerprint TIP If the administrative print is left on the scanner too long the safe will begin to program that fingerprint into the safe again and not the NEW fingerprint If this happens start over with step one Using the helpful programming tips pr...

Page 15: ... GREEN and safe will beep indicating deletion of all of the fingerprints 1 2 Hot Keys Stealth Mode Press and hold 1 and 3 Tamper Detection Press and hold 2 and 4 To check for tampering press and hold keys 2 and 4 at the same time for 3 seconds The 3 key will glow RED to indicate tampering or GREEN to indicate no tampering You can reset the tamper detection by entering the master code on the keypad...

Page 16: ...or 3 seconds until all keys 1 5 light up RED then enter your master code This will remove all the fingerprints You can delete individual fingerprints in the Vaultek app Delete Fingerprints Press and hold 3 and 5 then enter the master code To toggle the interior light ON OFF press and hold the 1 key for 3 seconds With the light toggled to ON you can press the LIGHT button inside the safe to illumin...

Page 17: ...be within Bluetooth range and connected to your Vaultek safe before any of the features will function Pair with Your Vaultek Safe From your phone tablet make sure Bluetooth is ON and discoverable by other devices Open the app click search and select your Vaultek safe from the device list You will enter your master code you previously programmed for the safe to finalize pairing Your safe is now pai...

Page 18: ...n the internal LED light from 0 100 Name Fingerprint IDs Name each fingerprint that is programmed into the safe and also delete a single fingerprint or all of the fingerprints History Log Track the time and date changes were made to the safe Those changes may include when someone unlocked the safe and how they unlocked the safe any changes to the settings of the safe including brightness sound mas...

Page 19: ...afe on a flat surface where you want to mount it Use a pencil to mark the holes for drilling Drill pilot holes Position safe in place and install screws through safe into pilot holes Tighten screws Securing Your Safe Your Vaultek safe can be secured a few different ways Included is a security cable to attach your safe to larger stationary objects There are also mounting screws included to mount th...

Page 20: ...y caused by the user accidents and or tampering If your safe is determined to be defective we will at our discretion have it repaired at our expense or will send you a new one at no cost to you You will be required to return your existing unit as well as all included parts to Vaultek prior to replacement along with your proof of purchase If it is determined your safe needs to be returned a Vaultek...

Page 21: ...e safe uses a Model 18650 rechargeable lithium ion battery It is a commonly available 3 7V 2800mAh battery If replacing make sure the capacity of the new battery is over 2000mAh HOW TO VIDEOS AVAILABLE CLICK HERE FOR ACCESS ...

Page 22: ...ingerprint access to your safe may be denied until your fingerprint returns to its normal condition The keypad and app will not be affected and will still function normally to open the safe Q Can I travel with my Vaultek safe through US Customs or TSA Security at the airport A Yes there are no restrictions on carrying this type of item Please be aware that you may be asked to open your safe Rather...

Page 23: ... ...

Reviews: