background image


POWDPG7570


EN


Copyright © 2020 VARO 

P a g e

 | 

9


www.varo.com 

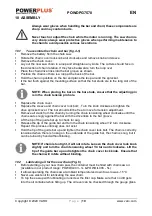
9  KICKBACK SAFETY PRECAUTIONS 


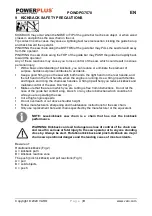
KICKBACK may occur when the NOSE or TIP of the guide bar touches an object, or when wood 
closes in and pinches the saw chain in the cut. 
Tip contact in some cases may cause a lightning-fast reverse reaction, kicking the guide bar up 
and back toward the operator. 
PINCHING the saw chain along the BOTTOM of the guide bar may PULL the saw forward away 
from the operator. 
PINCHING the saw chain along the TOP of the guide bar may PUSH the guide bar rapidly back 
toward the operator. 
Any of these reactions may cause you to lose control of the saw, which could result in serious 
personal injury. 


With a basic understanding of kickback, you can reduce or eliminate the element of 
surprise. Sudden surprise contributes to accidents. 


Keep a good firm grip on the saw with both hands, the right hand on the rear handle, and 
the left hand on the front handle, when the engine is running. Use a firm grip with thumbs 
and fingers encircling the chain saw handles. A firm grip will help you reduce kickback and 
maintain co

ntrol of the saw. Don’t let go. 


Make sure that the area in which you are cutting is free from obstructions. Do not let the 
nose of the guide bar contact a log, branch, or any other obstruction which could be hit 
while you are operating the saw. 


Cut at high engine speeds. 


Do not overreach or cut above shoulder height. 


Follow manufacturer’s sharpening and maintenance instructions for the saw chain. 


Only use replacement bars and chains specified by the manufacturer or the equivalent. 

NOTE:  Low-kickback  saw  chain  is  a  chain  that  has  met  the  kickback 
performance. 

WARNING: Kickback can lead to dangerous loss of control of the chain saw 
and result in serious or fatal injury to the saw operator or to anyone standing 
close by. Always be alert.  Rotational kickback and pinch-kickback are major 
chain saw operational dangers and the leading cause of most accidents. 

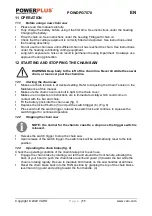
Beware of: 
Rotational kickback (Fig 2) 
A = kickback path 
B = kickback reaction zone 
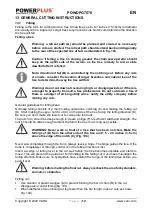
The push (pinch kickback) and pull reactions (Fig 3) 
A = pull 
B = solid objects 
C = push 


Summary of Contents for Power Plus POWDPG7570

Page 1: ...ies 7 7 2 Chargers 7 8 CHARGING AND INSERTION OR REMOVAL OF BATTERY 8 8 1 Charger indications 8 8 2 Removal insertion of battery 8 8 3 Battery capacity indicator Fig 1 8 9 KICKBACK SAFETY PRECAUTIONS...

Page 2: ...4 Bucking using a sawhorse 13 14 CLEANING AND MAINTENANCE 13 14 1 Sprocket tip lubrication 13 14 2 Guide bar maintenance 14 14 3 Chain sharpening 14 14 4 Guide bar 15 14 5 Chain maintenance 15 15 TEC...

Page 3: ...tly reduce kickback or the intensity of kickback due to specially designed depth gauges and guard links CHAIN BRAKE is a safety feature designed to reduce the possibility of injury due to kickback by...

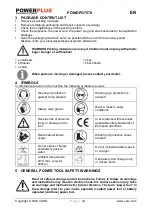
Page 4: ...e machine the following symbols are used Wearing of protection against noise advised Wearing eye protection is advised Always wear gloves Wear a mask In dusty conditions Denotes risk of personal injur...

Page 5: ...hen operating a power tool Do not use a power tool while you are tired or under the influence of drugs alcohol or medication A moment of inattention while operating power tools may result in serious p...

Page 6: ...with the chain saw Keep bystanders and animals out of the work area DO NOT start cutting until you have a clear work area secure footing and a planned retreat path from the falling tree Keep all parts...

Page 7: ...eratures between 4 C and 40 C Store your batteries in a cool dry place 5 C 20 C Never store batteries in discharged state It is better for Li ion batteries to discharge and reload them regularly at le...

Page 8: ...ery pack indoors out of reach of children NOTE If battery is hot after continuous use in the tool allow it to cool down to room temperature before charging This will extend the life of your batteries...

Page 9: ...running Use a firm grip with thumbs and fingers encircling the chain saw handles A firm grip will help you reduce kickback and maintain control of the saw Don t let go Make sure that the area in which...

Page 10: ...ve sprocket cover The bar should still be free to move for tension adjustment Remove all slack from the chain by turning the chain tensioning wheel clockwise until the chain seats snugly against the b...

Page 11: ...ake sure the chain cover lock bolt is tight to the chain cover Make sure no objects or obstructions are in immediate vicinity which could come in contact with the bar and chain Fit the battery pack in...

Page 12: ...trees Normally felling consists of 2 main cutting operations notching C and making the felling cut D Start making the upper notch cut C on the side of the tree facing the felling direction E Be sure...

Page 13: ...stand on the uphill side Log supported along entire length Cut from top overbuck being careful to avoid cutting into the ground Fig 12a Log supported on 1 end First cut from bottom underbuck 1 3 diame...

Page 14: ...r lubrication and operating the saw with chain that is too tight will contribute to rapid bar wear To help minimize bar wear the following guide bar maintenance procedures are recommended Warning alwa...

Page 15: ...n produces well defined chips When your chain starts to produce sawdust it is time to sharpen After every 3 4 times the cutters have been sharpened you need to check the height of the depth gauges and...

Page 16: ...chain This could cause damage to the sprocket Chain lubrication Always make sure the automatic oiler system is working properly Keep the oil tank filled with good quality chain bar and chain oil Adeq...

Page 17: ...rposes for which the device is not suitable incompetent usage e g not following the instructions given in the manual inexpert assembly lightning strike erroneus net voltage This list is not exhaustive...

Page 18: ...ny unauthorized modification of the apparatus voids this declaration European Directives including if applicable their amendments up to the date of signature 2011 65 EU 2006 42 EC 2014 30 EU 2000 14 E...

Reviews: