Vari BDR-620B User Manual Download Page 21

 Lucina MaX 

Speeds are changed by moving the V-belt on the pulleys between the gearbox and the drive axle (see 

Pict.23

 and 

Pict.24

). A sticker

is glued on the top gearbox cover with a picture of the belt positions in the pulleys on the gear box and the drive axle.

The engine must always be off and the gas lever in the STOP position when the speeds are changed!

Procedure:

1)

Loosen the 

plastic nut

51

 (

 3 

 on 

Pict. 10

), tilt out the 

upper gearbox cover 

 1 

 in the direction of the arrow and pull it out

diagonally backwards. Push in the 

foot 

 4 

 of the 

lower gearbox cover 

 2 

, located in the middle of the rear section of the

frame until the cover releases and pops out of the frame 

tab 

 4 

.

2)

Slide the whole V-belt of the pulley on the axle towards the left wheel. Subsequently then slide the V-belt from the pulley on the

gearbox towards the right wheel.

3)

Move the V-belt into the pulley groove on the axle that corresponds to the selected transfer ratio. Check visually and by touch if
the V-belt sits properly in the groove on the selected pulley.

4)

Move the V-belt into the pulley groove on the axle that corresponds to the selected transfer ratio. Check visually if the V-belt sits

in the correct pulleys according to the selected transfer ratio (see 

Pict23

. and 

Pict.24

). The V-belt must not cross!

5)

Reinstall both of the covers. Place the upper plastic cover under the engine plate, close it, and tighten the plastic nut. Bend the
bottom plastic cover upwards and place the opening into the 

foot 

 4 

 of the cover on the frame tab. Loosen the deflection of the

cover, and the cover will sink into place.

2.4.3 Working with the machine

2.4.3.1 Cutting width

Always adjust the cutting width to the stand density!

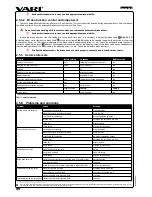
It is not recommended to use the maximum cutting width (

Table  4

)  given by the disc construction. In a terrain, the user cannot

operate the cutter straight, and precisely enough to cut the brushes in complete cutting width. We recommend to use the cutter partially

(approximately 5-10 cm from the edge of the front cover) in the cut stand (as shown in 

Pict.5

 from the user’s point of view).

2.4.3.2 Methods of stand cutting

Remove any solid parts form the stand before cutting (such as stones, wires, loose construction leftovers, etc.),
as these could be thrown away or damage the machine. If these cannot be removed, avoid them.

It is necessary to keep the lower disc sliding across the land without bouncing off when cutting in uneven terrain. Disc bouncing causes

low quality stand cutting and uneven stubble. 

Let the engine and cutting disc spin in their maximum rpm, and start moving against the stand you wish to cut. The cutting disc throws

cut stand onto the right side, where it is windrowed by the side screen.

Always keep the cut brush on the left side form the machine when cutting (

Pict.5

).

When cutting on slopes it is best to move along the slope contour line. 

Keep the safe climbing ability (

Table 4

)!

In case the cut stand is too dense, inter grown, rotten, or flattened, it is necessary to adjust the machine cutting width, so that the

cutting disc rpm would not be too low, and thus causing low cutting quality.

2.4.3.2.1 Cutting problems

Be especially careful when lifting and reversing the machine!

Always turn the engine off when cleaning the space under the top cover!

Always tip the machine backwards on its handlebars only. Always be especially careful when moving in the space
under a lifted machine. Secure the cutter from spontaneous movement!

Always be especially careful when cleaning the space under the top cover. The cutting blades are sharp. Use work
gloves, or other convenient objects, e.g. a piece of branch, for cleaning the machine.

Before continuing any activity on the machine or its surroundings, always wait until the cutting disc stops.

1.

The cutting disc and the engine rpm are both slowing down, but the engine does not stall.

Stop the machine immediately, reverse slightly while lifting the front of the machine a bit (by pressing the handlebars
down). The space under the top cover partially cleans itself from extensive amounts of grass mass. Start moving against
the stand again.

2.

Cutting disk stopped spinning, the engine staled. 

Release both handlebars levers and lift the cutter by pressing the handlebars. Move the cutter slightly backwards. Clean
the space under the top cover, and spread the cut grass across the surface. Start the engine, turn the cutting disc drive

on, and start moving against the stand again.

3.

The cut brushes keeps catching on the side screen 

(because the stand is too thick).

51

Loosen the plastic nut by about 1 to 2 turns. The cover contains a groove that enables removal of the cover without the need of unscrewing the plastic nut.

 21 

R

ev

iz

0

5

/2

0

1

4

Summary of Contents for BDR-620B

Page 1: ...620B N vod k pou v n User guide Bedienungsanleitung Instrukcja obs ugi CZ esky p vodn n vod k pou v n EN English translation of the original instructions DE Deutsch bersetzung der Originalbetriebsanl...

Page 2: ......

Page 3: ..._ _ _ _ _ _ _ _ _ CZ Datum dod n prodeje EN Delivery date date of sale RU PL Numer seryjny rok produkcji CZ Dodavatel raz tko EN Supplier stamp RU PL Dostawca piecz tka CZ M sto pro nalepen identifik...

Page 4: ...tost tak nyn mohou tento univerz ln stroj MaX im ln vyu vat po cel rok Pro t te si pros m d kladn tento n vod k pou v n Pokud se budete dit pokyny zde uveden mi bude V m n v robek slou it spolehliv po...

Page 5: ...nebo SN EN 352 2 z tkov chr ni e sluchu Tyto pom cky dejte u sv ho prodejce pr ci se strojem po maxim ln 20 minut ch p eru ujte p est vkami v d lce minim ln 10 minut Obsluha nesm b t p i t chto p est...

Page 6: ...iky Vynik snadnou ovladatelnost tich m v konn m a sporn m motorem a bezprobl movou dr bou Tato seka ka je ur ena pro se en vysok ch tenkost belnat ch travn ch porost do maxim ln v ky 60 cm na udr ovan...

Page 7: ...ce odstra te kartonovou vlo ku um st nou mezi d tky a motorem 2 Stroj uchopte za chopov m sta vp edu 4 a vzadu 1 a vyndejte ho z krabice 3 d tka 5 dle Obr 1 zvedn te oto te a nasa te dle Obr 3 krok 1...

Page 8: ...Obr 20 a je zasunuta nadoraz do t menu s lanky 3 Zm kn te tla tko areta n pojistky ve sm ru ipky Obr 21 Plynul m pomal m pohybem prav ruky zm kn te ovl dac p ku Tla tko areta n pojistky dr te a do oka...

Page 9: ...i z b ru se en hustot porostu Maxim ln z b r viz Tabulka 4 dan konstrukc disku nedoporu ujeme vyu vat Obsluha nedok e stroj v st v ter nu dostate n rovn a p esn aby do lo k pose en porostu v cel i z...

Page 10: ...jem P ed del m odstaven m stroje tlak dopl te na MAX Udr ujte stejn tlak v lev m i prav m kole stroj l pe dr p mou stopu Nep ekra ujte maxim ln tlak v pneumatik ch hroz exploze pneumatiky MAXim ln dop...

Page 11: ...provozu kdy doch z k z b hu emene B hem z b hu je nutn kontrolovat funkci nap nac ch kladek aby nedo lo vlivem prodlou en emene k jeho po kozen nedostate n m napnut m nap nac kladkou D le je nutn b he...

Page 12: ...utno prov st se zen bowdenu brzdy 2 Obr 11 a 12 Se izovac roub kter m je upevn n bowden brzdy 2 k r mu stroje Obr 11 za roubujte proti sm ru ipky sm rem k r mu tak aby osov v le bowdenu v se izovac m...

Page 13: ...vte servis Jin z vada nav tivte servis Tabulka 8 Probl my a jejich e en 1 5 7 Skladov n P ed del m skladov n m nap po sez n o ist te stroj od ve ker ch ne istot a rostlinn ch zbytk Zamezte nepovolan m...

Page 14: ...en p slu n ho n hradn ho d lu u Va eho prodejce Pro dohled n n hradn ch d l v elektronick m katalogu n hradn ch d l na adrese http katalognd vari cz posta prvn ch 10 znak z Identifika n ho sla Pokud n...

Page 15: ...Lucina MaX 15 Revize 05 2014...

Page 16: ...grass cutting The real estate and area owners can MaX imally use this universal machine all year round Please read this user manual carefully If you follow the given instruction our product will serv...

Page 17: ...r for these safety devices b After every 20 minutes maximum of operating the machine interrupt the work for a 10 minute break During these breaks the machine attendant must not be exposed to other noi...

Page 18: ...ucina MaX drum mower is designed and manufactured according to the most current knowledge in the field of small garden and agricultural machinery It is characterised by its easy handling quiet efficie...

Page 19: ...ssembling the machine It is advised to assemble the machine with a second person s assistance 1 According Pict 1 take the disc cover 3 bag 6 side and rear screens 7 and a screen holder 2 out of the bo...

Page 20: ...the first starts of the cutting disc a new or cold engine might stall This tendency disappears after warming up the engine In case the cutting disc drive cannot be runned up check if there is a defect...

Page 21: ...rown away or damage the machine If these cannot be removed avoid them It is necessary to keep the lower disc sliding across the land without bouncing off when cutting in uneven terrain Disc bouncing c...

Page 22: ...heck and repair possible tyre defect Seek authorised service in case you lack appropriate manual skills 2 5 2 Machine lubrication Follow basic hygienic rules and environmental laws when working with l...

Page 23: ...If the belt slipping occurs on the right side of the cutter tighten it by unscrewing the bolt 3 at the cable55 terminal in the direction of the arrow away from the frame for approximately 1 mm and re...

Page 24: ...exchange if damaged yes Cutting disk tightening check yes yes Bolted connections tightening check yes every 5 hours yes Lubrications condition check Table 6 Table 6 V belts check every 20 hours yes T...

Page 25: ...he cutter 2 5 8 Cover and machine disposal after its service life termination You are required to carry out the package disposal after unwrapping the cutter following national waste laws and regulatio...

Page 26: ...abric eyelet Pict 2 Description of the main parts Position STOP Engine is not running position 1 Used for turning off the running engine Putting the machine out of service Refuelling Machine transport...

Page 27: ...Lucina MaX 27 Revize 05 2014...

Page 28: ...1 32 3 4 2 32 3 4 2 1 32 3 4 2 2 33 3 4 2 3 33 3 4 2 4 33 3 4 3 34 3 4 3 1 34 3 4 3 2 34 3 4 3 2 1 34 3 5 34 3 5 1 35 3 5 1 1 35 3 5 2 35 3 5 2 1 35 3 5 2 2 35 3 5 3 36 3 5 4 36 3 5 4 1 36 3 5 4 1 1 3...

Page 29: ...Lucina MaX 1 3 2 3 2 1 18 64 m s 1 EN 352 1 EN 352 2 20 10 EN 166 EN 1731 10 29 Revize 05 2014...

Page 30: ...WA G 98 dB 98 dB 66 ahvd 7 3 2 9 m s 2 6 3 2 5 m s 2 2 3 2 3 16 1 2 3 4 5 6 17 18 50 19 15 1 2 0 1 2 14 2 2 0 1 3 3 3 3 3 1 Lucina MaX HONDA 60 64 EN 836 A4 EN ISO 11201 2010 65 2000 14 EC NV 9 2002 3...

Page 31: ...20B HONDA GCV190 Briggs Stratton 850 Series 1 3200 100 3200 100 20 15 69 30 30 l 0 9170 1 1 91 95 91 95 l 0 55 0 6 SAE API SAE 10W 30 SAE 30 SJ SH SAE 10W 30 SAE 30 SJ SH NKG BPR6ES CHAMPION QC12YC BR...

Page 32: ...7 2 2 4 1 3 5 1 3 1 3 1 2 4 3 2 A 5 5 C 3 C B C 4 C 5 6 C 6 4 C 7 D D 8 B C 3 4 5 6 7 9 Pirelli 7 10 9 A 11 2 1 3 10 E F 12 11 G G 3 4 2 72 1 2 4 CHOKE 4 3 73 4 30 CHOKE MAX 30 1 2 2 3 4 2 1 1 74 1 7...

Page 33: ...Lucina MaX 2 1 2 20 3 21 4 22 8 3 4 2 2 2 2 3 4 2 3 MIN STOP 3 4 2 4 24 23 23 24 1 1 3 10 75 1 4 2 4 2 3 4 23 24 5 4 75 1 2 33 Revize 05 2014...

Page 34: ...Lucina MaX 3 4 3 3 4 3 1 4 5 10 5 3 4 3 2 5 4 3 4 3 2 1 1 2 3 3 5 34 Revize 05 2014...

Page 35: ...Lucina MaX 3 5 1 3 5 1 1 23 PSI 160 a 1 6 1 57 0 16 M a 76 18 PSI 124 1 a 1 24 1 22 0 124 M a 3 5 2 3 5 2 1 3 5 2 2 25 2x 5 7 10 2 8 10 2 6 5 1 9 9 1 11 6 76 35 Revize 05 2014...

Page 36: ...Lucina MaX 3 5 3 77 1 16 2 30 3 4 78 3 5 4 5 a 10 b 1 3 3 5 4 1 Ad a 11 1 3 79 1 3 2 4 Ad b 12 1 2 11 12 77 78 79 36 Revize 05 2014...

Page 37: ...Lucina MaX 1 80 1 11 1 b b 81 1 b 3 5 4 1 1 82 13 6 3 5 4 2 10 5 2 11 12 2 11 1 2 1 83 84 3 5 5 10 2x 5 6 6 20 7 80 81 82 83 1 84 37 Revize 05 2014...

Page 38: ...Lucina MaX 3 5 6 8 3 5 7 6 MAX 3 5 7 1 38 Revize 05 2014...

Page 39: ...C 4428 9 3 6 VARI a s 420 325 607 111 http www vari cz http katalognd vari cz Opolansk 350 420 325 607 264 Libice nad Cidlinou 289 07 esk republika E mail vari vari cz 3 7 54 1 U 2 3 4 Me 5 6 7 8 1 1...

Page 40: ...Lucina MaX STOP 1 MIN 2 MAX 3 CHOKE 4 4 5 11 6 12 7 13 8 14 9 15 10 16 17 18 19 20 23 21 24 22 40 Revize 05 2014...

Page 41: ...Lucina MaX 41 Revize 05 2014...

Page 42: ...ersaln maszyn ca y rok Prosz zapozna si dok adnie z niniejsz instrukcj obs ugi Je eli dostosujesz si do jej wskaz wek nasz produkt b dzie Ci s u y niezawodnie przez d ugie lata 4 1 1 Podstawowe ostrze...

Page 43: ...EN 352 1 nauszniki przeciwha asowe lub EN 352 2 zatyczki przeciwha asowe O rodki ochrony s uchu pytaj sprzedawc urz dzenia b Prac z urz dzeniem nale y przerywa po maks 20 minutach robi c przynajmniej...

Page 44: ...ni ciami w dziedzinie konstrukcji drobnych maszyn ogrodniczych i rolnych Wyr nia si atwo ci obs ugi cichym wysokowydajnym i oszcz dnym silnikiem HONDA oraz bezproblemow konserwacj Kosiarka b bnowa prz...

Page 45: ...trzymania kosiarki przy wyci ganiu jej z pude ka patrz Rys 1 przy dysku tn cym z przodu 4 i za element ramy z ty u 1 4 4 1 1 Procedura sk adania maszyny Do z o enia zastosowa nast puj c procedur Zalec...

Page 46: ...pr dko silnika je eli silnik jest zimny rozgrzej go w tej pozycji przez ok 1 min 2 Chwy lew r czk na r koje ci lew r k Nast pnie praw r k powoli przesu d wigni 2 na Rys 2 do g rnej pozycji Rys 20 a d...

Page 47: ...zek adni patrz Rys 23 i Rys 24 Pas nie powinien si skrzy owa 1 Zamontuj z powrotem obie pokrywy G rn pokryw p aszcza nasadzi uko nie pod p yt silnika opu ci i dokr ci plastikow nakr tk Doln plastikow...

Page 48: ...ami i regulacjami Zaleca si zapisywanie i przechowywanie godzin pracy kosiarki oraz warunk w w jakich pracowa a dla cel w serwisu Zar wno bie ca konserwacja jak i konserwacja po zako czeniu sezonu pow...

Page 49: ...dowa si na stabilnym pod o u oraz musi by zabezpieczona przed samoistn zmian po o enia umo liwiaj c atwy dost p no y Zachowaj du ostro no wymieniaj c no e Ich kraw dzie tn ce s ostre Chro d onie r kaw...

Page 50: ...ontrol dzia ania hamulca automatycznego 4 5 4 1 1 Wymiana paska klinowego Wymie pasek klinowy na nowy106 zawsze je eli tylko pojawia si na nim p kni cia lub je eli jest ju wyci gni ty e nie mo na zape...

Page 51: ...z pasek inne uszkodzenie odwied punkt serwisowy nie mo na uruchomi silnika brak paliwa w zbiorniku nape ni dop yw paliwa jest zamkni ty otw rz dop yw paliwa inne uszkodzenie odwied punkt serwisowy ham...

Page 52: ...stosowanego do tego celu pojemnika i przeka do punktu utylizacji109 wymontuj wszystkie cz ci z metali kolorowych oraz tworzyw sztucznych pozosta o kosiarki oraz wymontowane cz ci podlegaj usuni ciu zg...

Page 53: ...nkowania transportu kosiarki Pozycja MIN silnik pracuje na biegu ja owym pozycja 2 w kr tka przerwa w pracy Pozycja MAX silnik pracuje na maksymalnych obrotach pozycja 3 zaj c pozycja robocza Pozycja...

Page 54: ...b d tek 1 P ka spojky pohonu disku 2 P ka spojky pojezdu 3 Upev ovac roub d tek 4 P ka akceler toru p ka plynu 5 Upev ovac roub bo n z st rky 6 Bo n z st rka 7 ac disk 8 N 4 ks 9 Kryt mezi koly 10 Kry...

Page 55: ...va stroje 3 MAX Motor b v maxim ln ch ot k ch poloha zaj c Pracovn poloha Obr 4 Polohy p ky akceler toru 2 MIN Motor b ve volnob n ch ot k ch poloha elva Kr tkodob p est vka v pr ci 4 CHOKE Motor b na...

Page 56: ...u Obr 12 Kladka spojky pohonu disku brzda Obr 13 Trasa kl nov ho emene Obr 14 Bezp piktogram Pojezd stroje Obr 15 Bezp piktogram Rozto en disku slo 1 2 3 4 5 6 Um st n na stroji 56 Obr 9 Mazac m sto O...

Page 57: ...Um st n na stroji Obr 18 Bezpe nostn piktogram 1 nebezpe n prostor Obr 19 Bezpe nostn piktogram 2 Garantovan hladina Um st n na stroji 57 Revize 05 2014 1 2 Obr 20 Horn poloha Obr 21 Aretace p ky Obr...

Page 58: ...Lucina MaX 58 Revize 05 2014...

Page 59: ...Lucina MaX 59 Revize 05 2014...

Page 60: ...Text a ilustrace 2014 VARI a s Text and illustrations by 2014 VARI a s 2014 VARI a s Text i ilustracie 2014 VARI a s VL 184 2014...

Reviews: