background image

Installation 

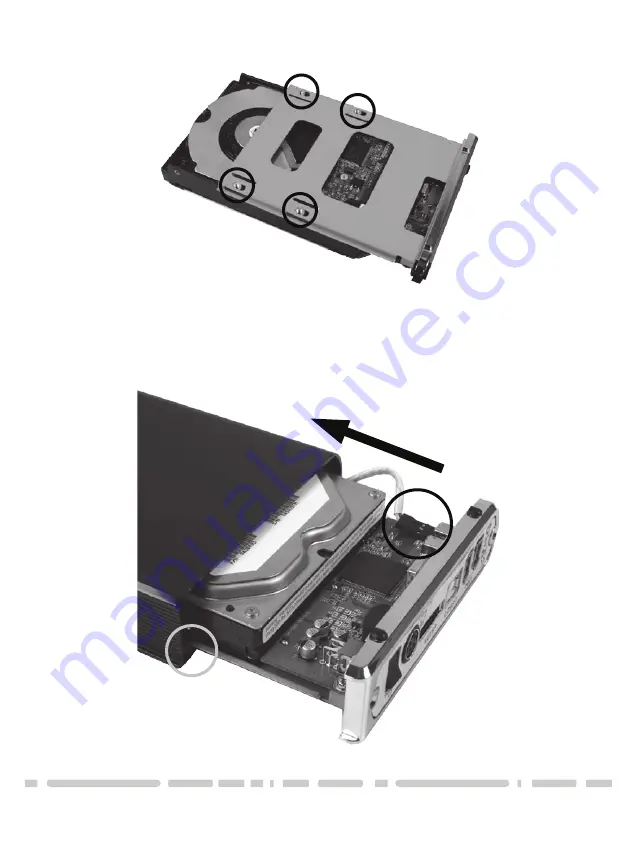
2) Align the hard drive mounting holes with the holes on the back of the drive 

caddy.  See picture below.

3) Secure the hard drive onto the drive caddy with the screws provided. 

4) Insert the drive caddy back into the  aluminum housing.  Be sure to 

reconnect the LED cable before closing the unit.  When reinserting the caddy, 
also be sure to align the top of the caddy with the guides on the housing.

Summary of Contents for NexStar 3

Page 1: ...w w w v a n t e c u s a c o m U S E R M A N U A L...

Page 2: ......

Page 3: ...yout NexStar 3 External 3 5 HDD Enclosure pg 5 5 Installation NexStar 3 External 3 5 HDD Enclosure 5 1 Hardware Installation pg 6 5 2 Driver Installation pg 8 6 Disconnecting the NexStar 3 NexStar 3 E...

Page 4: ...ut from the crowd The sturdy drive cage protects your hard drive while the aluminum case effectively draws away the heat protecting your drive from overheating The NexStar 3 utilizes USB 2 0 offering...

Page 5: ...e Dimension 206mm x 123mm x 33mm Features Aluminum casing cools down your hard drive Transfer Rates Up to 12Mbps With USB 1 1 Transfer Rates Up to 480Mbps With USB 2 0 Transfer Rates Up to 3GBPS With...

Page 6: ......

Page 7: ...Parts Layout 5 4 Parts Layout NexStar 3 External 3 5 HDD Enclosure LED Cable Aluminum Housing Hard Drive Caddy SATA Power Cable...

Page 8: ...mation on how to accomplish this Preparing the NexStar 3 1 Remove the side of the NexStar 3 with the power and USB connection ports If it has previously been screwed in place remove the screws first 2...

Page 9: ...e picture below 3 Secure the hard drive onto the drive caddy with the screws provided 4 Insert the drive caddy back into the aluminum housing Be sure to reconnect the LED cable before closing the unit...

Page 10: ......

Page 11: ......

Page 12: ......

Page 13: ......

Page 14: ...select the drive you want to initialize 5 Click Initialize To format your hard drive with Mac OS Extended format a method of formatting hard drives that allows for more efficient use of hard drive sto...

Page 15: ...d assign a name to the new drive 5 Click on Erase 6 Once complete your new hard drive should be mounted on your desktop Note If the hard drive will not mount on your system format the drive with a FAT...

Page 16: ......

Page 17: ......

Page 18: ...Please check the contents of the unit to make sure you received all parts Also check for any cosmetic flaws If any parts are missing or if there are cosmetic defects please contact the retailer from w...

Reviews: