background image


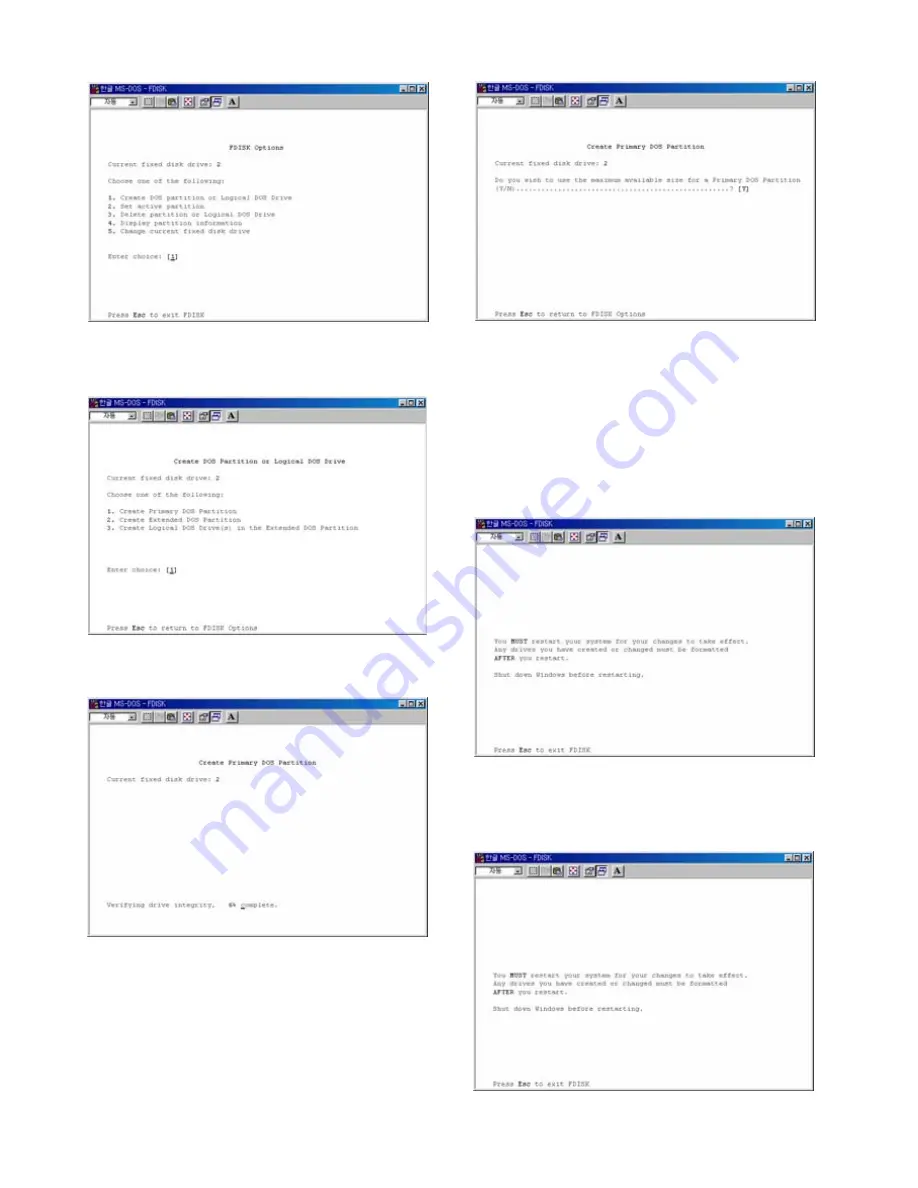
8) Select “ 1. Create Primary DOS Partition ” and 
press [Enter]. 


9) Wait until finishing verifying the drive integrity. 


10)  After finishing drive integrity verification, type “Y” 
at “Do you wish to use the maximum available size for 
a Primary DOS Partition (Y/N)”. 


11) Type the capacity or % which you want to use and 
press [Enter]. 
 
12) Drive integrity verification will start again. After 
finishing that, press [ESC] key when the “Primary DOS 
Partition created, drive letters changed or added” 
message displays. 


13) Press [ESC] key again. “ Shut down Windows 
before restarting” message will be displayed. Press 
[ESC] key finally for exiting FDISK. 


8

Summary of Contents for Jukebox

Page 1: ......

Page 2: ...2 Windows 2000 9 1 2 3 Windows XP 11 1 3 Copy Data via USB 13 1 3 1 Windows 98SE 13 1 3 2 Windows ME 14 1 3 3 Windows 2000 XP 15 1 3 4 Linux 16 1 3 5 Mac 16 2 Use as Multimedia Player 17 2 1 Connect to External AV Device 17 2 1 1 Connect Video Cable 17 2 1 2 Connect Audio Cable 18 2 1 3 Connect External IR Receiver 18 2 2 Basic Setup 19 2 2 1 Video Setup 19 2 2 2 Audio Setup 21 2 2 3 Other Setup 2...

Page 3: ...ion 23 2 3 2 File Selection 23 2 4 Play Video Files 24 2 5 Play DVD Files 27 2 6 Play Music Files 29 2 7 Play Photo Files 31 2 8 Make a Play List 33 2 9 Remote Controls 34 2 10 Others 35 2 10 1 Music Slide Show 35 2 10 2 MP3 Quick Play 35 2 10 3 Change Background Image 35 2 10 4 Change OSD Text Color 35 2 10 5 Firmware Upgrade 35 Technical Support 35 2 ...

Page 4: ...oaxial 5 1ch Sound Video Composite HD Component 480p 720p 1080i DVD Manager Playback of DVD File same as Original DVD Title Easy Firmware Upgrade Specifications Product Name AVOX Jukebox Power DC 5V 2A Weight 160g without HDD approx Dimension 80 x 148 x 24 mm approx Available OS Windows 98SE ME 2000 XP Mac OS 9 0 Higher Linux 2 4 Higher USB Interface 480Mbps USB 2 0 USB 1 1 Compatible Slave HDD Ty...

Page 5: ... or the hard drive Please note that any problems with the hard drive must be dealt with by the hard drive manufacturer We recommend you only use the supplied cables or accessories that are made specifically for use with the AVOX Jukebox Using other cables or accessories may inhibit the ability of the unit to perform properly or cause damage IMPORTANT Store and operate the unit away from water and ...

Page 6: ...rea for remote signals Back View USB 5V IR 5 1 SD HD AV USB Connect USB cable 5V Connect power Cable IR 5 1 Connect coaxial cable for 5 1 ch digital audio output or Connect external remote control IR receiver SD HD Connect component Y Pb Pr cable for video output Back View AV Connect AV cable for composite video and or Stereo audio output 5 ...

Page 7: ... to try to set Single mode You should not need to change the setting under most conditions Pull the PCB out Grip HDD and insert it into the pins of PCB be sure to align the 44 pins Grip the handles on the front panel and pull back to remove then open the top cover Secure HDD onto PCB by using the supplied screws Insert the PCB into the case and then close the top cover and secure the front panel 6...

Page 8: ...ver at Windows 98 CD Windows 98 Driver Directory After finishing installation Connect the AVOX to your PC via USB cable 5 Select 5 Change current fixed disk drive and press Enter 6 Type the last Disk number in 0 usage 7 Select 1 Create DOS partition or Logical DOS Drive and press Enter If not detected plug in the power cable 2 Select Start Program Accessories MS DOS Prompt on Windows 3 Type fdisk ...

Page 9: ...ilable size for a Primary DOS Partition Y N 11 Type the capacity or which you want to use and press Enter 12 Drive integrity verification will start again After finishing that press ESC key when the Primary DOS Partition created drive letters changed or added message displays 13 Press ESC key again Shut down Windows before restarting message will be displayed Press ESC key finally for exiting FDIS...

Page 10: ...the wizard If this wizard not started right click the left area of unallocated drive at no 4 figure and start the wizard WARNING Look for the unallocated drive DO NOT assume it is disk 1 4 After finishing the Disk Signature and Upgrade Disk Wizard Right click the Unallocated Drive And then click Create Partition 1 Connect the AVOX to your PC via USB cable If not detected plug in the power cable 2 ...

Page 11: ... click Next 8 Assign a drive letter and click Next 9 FAT 32 system is available on windows 98SE ME 2000 XP but NTFS system is available on windows 2000 XP only 9 If you choose FAT32 system on Windows 2000 XP one drive letter s maximum size will be limited to 32GB If you want to use one drive letter of 32GB more in FAT32 you have to format on windows 98SE ME 9 If you want to create two or more part...

Page 12: ...Control Panel click switch to classic view in the top left corner of the screen 3 If the Disk Signature and Upgrade Disk Wizard starts click Next to progress for finishing the wizard If this wizard does not start right click the marked left area of unallocated drive at figure no 4 to start the wizard WARNING Look for the unallocated drive DO NOT assume it is disk 1 4 After finishing the Disk Signa...

Page 13: ...E ME 2000 XP but NTFS system is available on windows 2000 XP only 9 If you choose FAT32 system on Windows 2000 XP one drive letter s maximum size will be limited to 32GB If you want to use one drive letter of 32GB more in FAT32 you have to format on windows 98SE ME 9 If you want to create two or more partition with one disk drive it will be recommended Primary Partition 12 ...

Page 14: ... AVOX to your PC via USB cable If it is not detected plug in the AVOX power cable 1 After installing the driver connect the AVOX And then check the driver installation at Windows Start Settings Control Panel System Device Manager Hard diskcontrollers Hi SpeedUSB IDEBridgeController 2 Check My Computer or Explorer there should be a new volume You can copy any data to this volume 3 After copying you...

Page 15: ...rs USB Mass Storage Device 3 After copying data remove the AVOX by using the remove icon at Windows right bottom corner Be sure to do this before removing the AVOX to ensure that it is safe to remove the AVOX 2 Check My Computer or Explorer there should be a new volume You can copy any data to this volume 9 If a new volume does not appear make sure the HDD is formatted as FAT32 Windows ME only det...

Page 16: ...sure to do this before removing the AVOX to ensure that it is safe to remove the AVOX 2 Check My Computer or Explorer there should be a new volume You can copy any data to this volume 9If you only have USB 1 1 you may see High Speed USB Device connected to non High Speed USB Hub The unit will still operate correctly though at a reduced speed You will need a USB 2 0 adaptor or port to operate it at...

Page 17: ...X Check the detection with fdisk make Mount Pointer ex mediatest at Folder Mount mnt Edit etc fstab add the following mount t vfat dev sda mnt mediatest in case of FAT32 HDD mount t ntfs dev sda mnt mediatest in case of FAT32 HDD 9above example sda is assumed that the AVOX will be detected as sda on your system If not you have to write the drive name which is detected as USB Mass Storage not sda H...

Page 18: ...o Video Input Mode Turn on TV and switch to video input mode same as video connection See TV user manual 2 AVOX Switch to Video Output Mode Press VIDEO button repeatedly Whenever press VIDEO video output signal is changed 3 Once you see a normal screen you must save your video configuration on the AVOX See 2 2 1 Video Setup Composite Connect to SD HD jack of AVOX Connect to AV jack of AVOX Supplie...

Page 19: ...Connect the external IR receiver to IR 5 1 jack of the AVOX instead of Coaxial cable External IR Receiver and Coaxial cable are not used at the same time 9If you cannot hear sound after connecting the Coaxial Cable you have to change the audio setup of the AVOX to Encoded Digital See 2 2 2 Audio Setup Stereo Connect to IR 5 1 jack of AVOX Connect to AV jack of AVOX Supplied Supplied Coaxial Cable ...

Page 20: ... save your video configuration on the AVOX See 2 2 1 Video Setup TV Video Input Mode AVOX Video Output Mode Connection Jack of TV AVOX Video Cable Type TV Out NTSC C S Video HD Component OFF Normal Video TV Out PAL C S Video HD Component OFF CVBS or Composite Jack Generally Yellow Jack Supplied AV Cable Not supported S Video Not supported TV Out NTSC C YPbPr HD Component OFF Component 480i TV Out ...

Page 21: ...d press SETUP on MediaType Selection screen Move to Video Setup icon and press ENTER Move to Video Output Mode that you want and press ENTER Finally press SETUP again for saving configurations Example of component video output settings 20 ...

Page 22: ...to TV or Audio set directly 9Encoded Digital Select when you want to listen through 5 1Ch by connecting receiver or amplifier with supplied coaxial cable Setup Procedure Turn on the AVOX and press SETUP in MediaType Selection screen Move to Audio Setup icon and press ENTER Move to Audio Output Mode that you want and press ENTER Finally press SETUP again for saving configurations 21 ...

Page 23: ...or saving configurations 2 2 3 1 TV Type Setup Select one among 4 3 Letter Box 4 3 Pan Scan or 16 9 2 2 3 2 Jpeg File Preview Setup It is possible to enable or disable preview the photo file as a thumbnail image before playing 2 2 3 3 Language Selection Setup Select one language among English German Spanish French Italian Portuguese Danish Swedish or Dutch User interface language will be changed a...

Page 24: ...button Play one file that you select After finishing playback return to file selection screen PLAY PAUSE button After playing the file that you select play next all files continuously button Move to files with pressing arrow buttons button Move to left icon with pressing arrow button Press button in order to return to file selection screen NEXT I PREV I button Move to Nextor Previous page when the...

Page 25: ...al audio for example including a local language and English Subtitle Move Size It is possible to change subtitle size and location button changes size and arrow button changes location After doing press ENTER SUBTITLE Subtitle Select or Hide The subtitle name same as video file is displayed on screen automatically However it is possible to open the other preferable subtitle files or hide Select Vi...

Page 26: ... Cont key for returning to the original screen position when applying Screen position TIME SEARCH Jump to Preferable Playback Time Move to a selected time of a file CANCEL Delete Input Numbers In time search box this button deletes all numbers in 0 Brt CONT Controlluminosity colordepth brightness When pressing this button 3 modes switch After selecting a mode change settings with arrow buttons FIL...

Page 27: ...a current playback file If you used ENTER for playback you can not use this function This is available in playing all files as using PLAY PAUSE button or Play All icon NEXT I Playback Next File Play a next file after a current playback file If you used ENTER for playback you can not use this function This is available in playing all files as using PLAY PAUSE button or Play All icon 0 Number button...

Page 28: ...on will not work Select Video icon in Media Type Selection screen Move to the folder including DVD ripping files and select video_ts ifo file and press ENTER button Function and Button Descriptions Remote Control Function Description AUDIO Select Audio Type Audio type will be changed whenever pressing this button SUBTITLE Select Subtitle Type Subtitle type will be changed whenever pressing this bu...

Page 29: ...g this button 3 modes switch After selecting a mode change settings with arrow buttons PREV I Playback Previous Chapter Play a previous chapter NEXT I Playback Next Chapter Play a next chapter FF Fast Forward Whenever pressing this button play speed is changed with 8x 16x 32x 48x in forward REW Rewind Whenever pressing this button play speed is changed with 8x 16x 32x 48x in backward ENTER Playbac...

Page 30: ...elected time of a file CANCEL Delete Input Numbers In time search box this button deletes all numbers in 0 Brt CONT Controlluminosity colordepth brightness When pressing this button 3 modes switch After selecting a mode change settings with arrow buttons PREV I Playback Previous File Play a previous file before a current playback file If you used ENTER for playback you can not use this function Th...

Page 31: ... up VOLUME Volume Down Volume down MUTE Sound Off Mute the sound In order to hear sound press this button again SUBTITLE Hide Mp3 Subtitle It is possible to show mp3 subtitle which the mp3 file supports subtitle In that case this button will hide the subtitle mp3 subtitle supported file must be made by iriver caption editior program not support LDB program 9How to Play MP3 without TV set MP3 Quick...

Page 32: ...current playback file If you used ENTER for playback you can not use this function This is available in playing all files as using PLAY PAUSE button or Play All icon NEXT I Playback Next File Play a next file after a current playback file If you used ENTER for playback you can not use this function This is available in playing all files as using PLAY PAUSE button or Play All icon ENTER Playback a ...

Page 33: ...pth brightness When pressing this button 3 modes switch After selecting a mode change settings with arrow buttons 9 Photo Slide Show If you play all files with Play All icon or PLAY PAUSE photo slide shows will be started 9 Music Slide Show Make a music folder in small letters not capital letters at root directory of HDD and save MP3 files at the folder If the HDD is divided into two or more parti...

Page 34: ...adding to Play List After adding press for moving to Left Icon Move to Display icon and press ENTER Play List screen appears You can see just added files Play as followings Play All icon play in order from selected file Random Play icon play in random Play Pause button play in order from selected file In order to move up to Left Icon press button Delete All icon means to delete all the added files...

Page 35: ...ESEARCH JumptoSpecificplaytime Brt CONT Set Luminosity ColorDepth Brightness MEDIATYPE GotoMediaTypeSelectionScreen MAINPAGE GotoMediaTypeSelectionScreen PLAY PAUSE Playnextallfiles Pause STOP StopPlay VIDEO ChangeVideoOutputMode REW PlayFasterinBackward AUDIO ChangeAudioTypeofVideo DVDfile FF PlayFasterinForward SUBTITLE SubtitleSettings PREV GotoPreviousPage Scr SIZE ScreenSizeSettings PlayPrevi...

Page 36: ...he last played file will continue playing 2 10 3 Change Background Image It is possible to change a background image on the AVOX Save mybg jpg at root directory of the HDD Background image will be set to whatever the mybg jpg image is Recommend to use 720x480 pixels image 2 10 4 Change OSD Text Color Press number 1 button before playing a file OSD text color will be changed in dark or white When y...

Reviews: