background image


Setting the Add-On Monitor as the Primary Monitor 

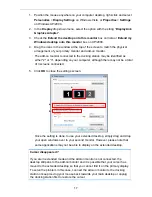
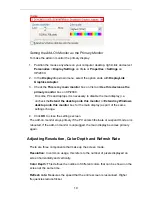
To make the add-on monitor the primary display: 

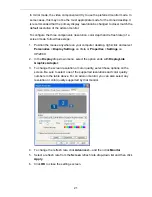
1.  Position the mouse anywhere on your computer desktop, right-click and select 

Personalize

 > 

Display Settings

 on Vista or 

Properties

 > 

Settings

 on 

XP/2000. 

2.  In the 

Display

 drop-down menu, select the option ends with

 DisplayLink 

Graphics Adapter

3. Check 

the

 This is my main monitor

 box on Vista or 

Use this device as the 

primary monitor

 box on XP/2000. 

On some PCs and laptops it is necessary to disable the main display (i.e. 
uncheck the

 Extend the desktop onto this monitor 

or 

Extend my Windows 

desktop onto this monitor

 box for the main display) as part of the same 

settings change. 

4. Click 

OK

 to close the settings


screen. 

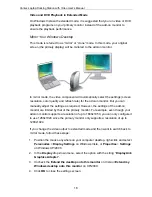
The add-on monitor stays primary if the PC enters hibernate or suspend mode or is 
rebooted. If the add-on monitor is unplugged, the main display becomes primary 
again. 

Adjusting Resolution, Color Depth and Refresh Rate 

There are three components that make up the screen mode:   

Resolution:

 In common usage, this refers to the number of pixels displayed on 

screen horizontally and vertically.   

Color Depth:

 This defines the number of different colors that can be shown on the 

screen at the same time.   

Refresh rate:

 Measures the speed that the entire screen is rescanned. Higher 

frequencies reduce flicker.   

19


Summary of Contents for DSH-200U2

Page 1: ...Vantec Laptop Docking Station with Video User s Manual Model DSH 200U2 www vantecusa com Copyright 2008 Vantec Thermal Technologies All Rights Reserved...

Page 2: ...r s Manual Copyright Statement No part of this publication may be reproduced in any form by any means without prior written permission Other trademarks or brand names mentioned herein are trademarks o...

Page 3: ...g USB Devices 13 Connecting Microphone and Speaker Headphones 13 3 Using the Docking Station with Video 14 USB 2 0 Ports 14 Audio Ports 14 Configuring Windows Audio Device 14 Configuring Instant Messa...

Page 4: ...Vantec Laptop Docking Station with Video User s Manual CE 26 WEEE Information 26 iii...

Page 5: ...d mouse or any other additional USB peripherals This is a convenient solution enabling you to enter and leave your workspace without having to deal with all the wires and connections Connect all your...

Page 6: ...mary Modes Peripherals 4 USB 2 0 Ports for your USB peripherals Audio In Out 1 network port 10 100 Base T Ethernet RJ 45 connector Security slot Package Contents Docking Station with Video x1 Base Pla...

Page 7: ...Input 2 CH ADC Input ADC sampling rate from 8KHz 16KHz 44 1KHz to 48KHz with 16 bit resolution Digital Linear Microphone Gain Control function 6db 33db Emission CE FCC Power Input AC 100 240V 50 60Hz...

Page 8: ...nual 1400x1050 60 75 85 60 75 85 1440x900 60 60 1600x1200 60 60 1680x1050 59 60 59 60 Material ABS Plastic Dimension Main body without base 35 W x 90 D x 153 H mm Main body with base 86 W x 110 D x 16...

Page 9: ...o assemble the docking station slide the body of the docking station firmly as shown below Make sure a click is heard to ensure the body snaps into place To disassemble the docking station hold the ba...

Page 10: ...B Hub LED Glows when any of the four USB downstream ports is connected to a USB device 2 USB 2 0 downstream ports For connection to USB peripherals 3 5 mm stereo audio output port For connection to st...

Page 11: ...se use the provided DVI to VGA adapter for connection USB upstream port For connection to the USB port of the host computer Power jack For connection to the provided power adapter The Docking Station...

Page 12: ...A Installing the Ethernet drivers for Ethernet component B Installing the Video drivers for DVI component C Connect the Docking Station with Video to your computer A Installing the Ethernet Drivers To...

Page 13: ...ur disc drive locate and double click the Setup exe file under x Driver Video where x is your disc drive letter For Windows Vista users Windows Vista users will encounter a User Account Control dialog...

Page 14: ...ent and click Next 3 Prepare to install driver 4 For Vista only When prompted to restart your computer click Yes to restart or to No to manually restart later Note that a reboot is always needed for a...

Page 15: ...red on 3 Plug the square end of the USB cable into the USB upstream connector at the back of the docking station 4 Plug the other end of the USB cable into an available USB 2 0 port on your computer O...

Page 16: ...etwork hub switch or router Connecting DVI Monitor The equipped DVI I DVI Integrated connector transmits both the digital and analog signals This means it supports either of these two connection types...

Page 17: ...e is connected to the port the LED light will not illuminate If your USB device such as a printer or optical drive etc came with its own AC adaptor please make sure that it is plugged into the device...

Page 18: ...o the docking station you have to correctly configure your application to use USB Multimedia Audio Device i e the audio components of the docking station When the docking station is connected to your...

Page 19: ...USB Multimedia Audio Device as the audio in and out devices Ethernet Port The Ethernet port supports Ethernet 10 100 Mbps function To connect your computer to a network through the docking station at...

Page 20: ...monitor can be configured to use either mirror mode extended mode or be the primary display as described in this section Extend Your Windows Desktop to Add on Monitor Default In this so called extend...

Page 21: ...3 depending on your computer although there may not be a total of 3 screens connected 5 Click OK to close the settings screen c a b Once the setting is done to use your extended desktop simply drag a...

Page 22: ...gs as required However the settings of the add on monitor are limited by that of the primary monitor For example even though your add on monitor supports a resolution of up to 1680x1050 you can only c...

Page 23: ...his monitor or Extend my Windows desktop onto this monitor box for the main display as part of the same settings change 4 Click OK to close the settings screen The add on monitor stays primary if the...

Page 24: ...5 1280x960 60 85 60 85 1280x1024 60 75 85 60 75 1360x768 60 60 1366x768 60 60 1368x768 60 60 1400x1050 60 75 85 60 75 85 1440x900 60 60 1600x1200 60 60 1680x1050 59 60 59 60 About the resolutions and...

Page 25: ...ick and select Personalize Display Settings on Vista or Properties Settings on XP 2000 2 In the Display drop down menu select the option ends with DisplayLink Graphics Adapter 3 To change the screen r...

Page 26: ...ate Mode Affects Devices Attached to the Docking Station External Monitors If the computer goes into standby or hibernate mode when the docking station is connected to a computer and an external monit...

Page 27: ...monitor returns to the same mode as it was before shutdown Other Devices If another device is connected to a port on the docking station and the computer goes into standby or hibernate mode that devi...

Page 28: ...n you want to uninstall the Ethernet component driver please follow these steps 1 Open the Control Panel and double click Programs and Features on Vista or Add or Remove Programs on Windows 2000 XP 2...

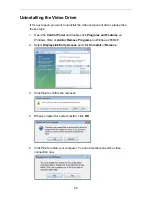
Page 29: ...Panel and double click Programs and Features on Windows Vista or Add or Remove Programs on Windows 2000 XP 2 Select DisplayLink Early Access and click Uninstall or Remove 0 3 Click Yes to confirm the...

Page 30: ...owing regulations EN 55 022 CLASS B WEEE Information For EU European Union member users According to the WEEE Waste electrical and electronic equipment Directive do not dispose of this product as hous...

Reviews: