Installation Guide
Copyright © 2016 Vantec Thermal Technologies. All Right Reserved. All Registered Trademarks Belong To Their Respective Companies.
Model: CB-ISA225-U3
www.vantecusa.com v1.01
Information in this document is subject to change without notice.
Reproduction of these materials in any manner whatsoever without written permission is strictly forbidden.
Printed in China
Printed on Recycled Paper.
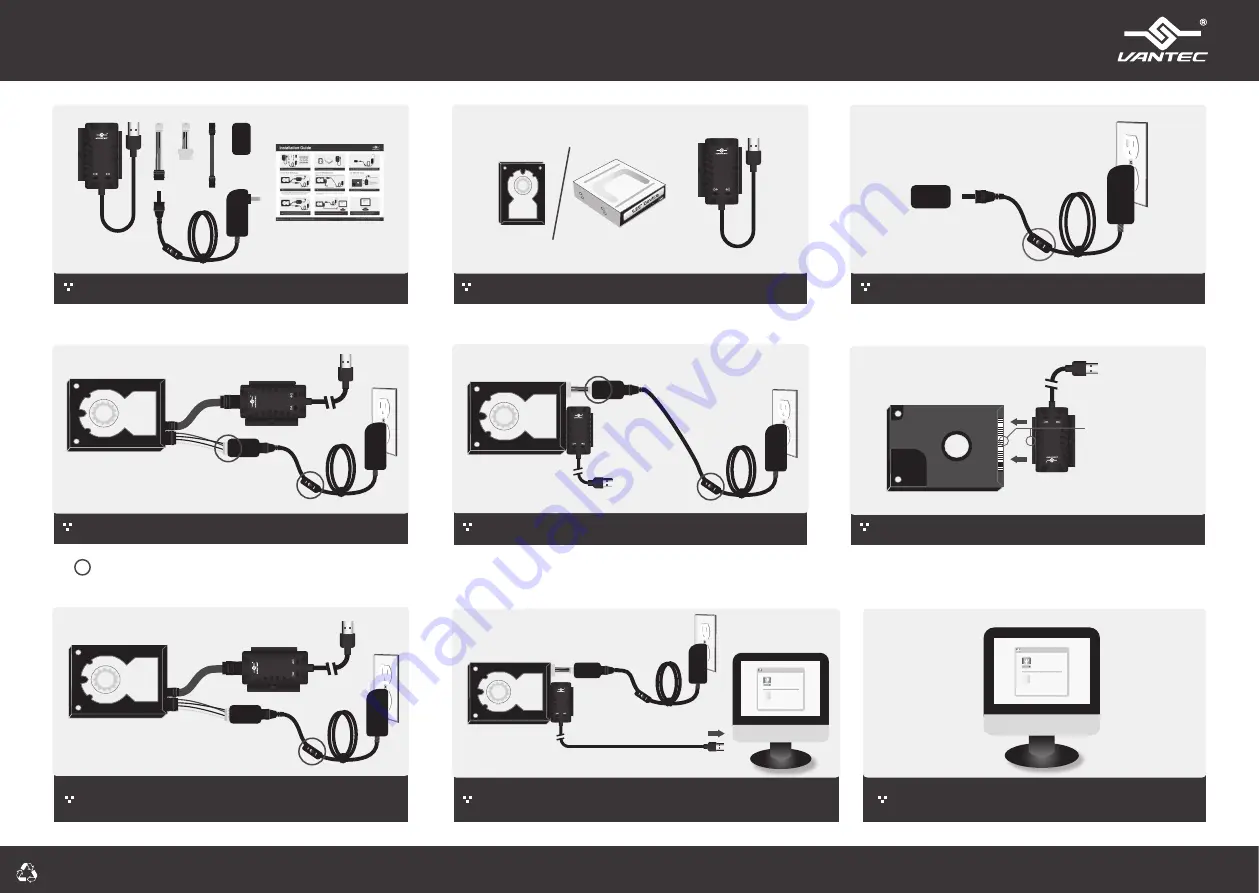
When connected properly, the hard drive should be
automatically detected and begin ‘AutoPlay.’
7.
AutoPlay
Disk(D:)
Open folder to view files
Prepare your device and the Adapter.
2.
Verify the package contents.
1.
Note that there is an On/Off switch located along the AC power
cable. Please make sure it is Off. (For 2.5” IDE, skip to Step 4c)
3.
Carefully connect the desired hard drive to the adapter.
4a.
2.5”/3.5”/5.25” SATA Device
WARNING: Please make sure the power connectors are oriented
correctly before connecting. Incorrect connection may cause
severe damage to your hard drive and/or electrical shock.
To System USB port
Carefully connect the desired hard drive to the adapter.
4b.
3.5”/5.25” PATA(IDE) Device
*For Jumper settings, please refer to your hard drive manufacturer’s
documentation.
Note:
For ALL IDE device, please set the jumper setting on the drive to Master Single drive mode*.
To System USB port
Proceed to connect the Adapter’s USB to a free USB port.
6.
AutoPlay
Disk(D:)
Open folder to view files
Carefully connect the desired hard drive to the adapter.
Proceed to step 6.
4c.
2.5” PATA(IDE) Device
To System USB port
Note:
Missing pin on the drive
Interface
MUST
align with the
plugged hole on the adapter
Interface side.
Once securely connected, you may switch ON the Adapter for device that need to
power using AC Adapter. For 2.5” PATA(IDE) device you can skip this step. After
Powering ON, wait 20 seconds before proceeding to the next step.
To System USB port
5.


