background image

www.fmiproducts.com

125527-01A

27

SMART THERMOSTAT

The Smart Thermostat adjusts flame height 

in  accordance  to  differences  between  set 

temperature and room temperature. As room 

temperature gets closer to set temperature the 

smart function will modulate the flame lower. 

As room temperature cools, it will modulate 

the flame higher.
To activate this function, press THERMOSTAT 

button until the word SMART appears to the 

right of temperature bulb graphic on display. 

Use UP/DOWN arrow button to set desired 

room  temperature. The  control  system  will 

cycle the fireplace on or off to maintain se-

lected temperature.

SMART

MAX

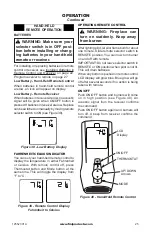
Figure 44 - Smart Thermostat Setting

ON

Figure 45 - Child Safety Lock-Out

CHILD SAFETY LOCK-OUT

This function lets you deactivate the remote 

control buttons. It is active when the lock icon 

is lit on the display.
To activate, press MODE button and UP ar-

row button at the same time. To deactivate, 

press again.

REPLACING HAND-HELD REMOTE 

CONTROL ONLY

If your remote ever needs to be replaced you 

will not need to replace the receiver.

PROGRAM RECEIVER TO REMOTE

To  program  receiver  with  a  new  hand-held 

remote, insert a small pin or paper clip into 

hole on receiver face plate marked PRG. The 

receiver will beep 3 times to indicate it is ready 

to  accept  a  new  remote  transmitter.  Press 

the ON/OFF button on your remote and the 

receiver will beep 4 times to confirm it receives 

commands from the new remote.

ON   REMOTE   OFF

PRG

To 

Program 

Receiver

Figure 46 - Programing Remote Control 

to Receiver

oPeratioN

Continued

Summary of Contents for BG18NV

Page 1: ...pplierfromaneighbor s phone Follow the gas supplier s instructions If you cannot reach your gas supplier call the fire department Installation and service must be performed by a quali fied installer s...

Page 2: ...n unvented gas fired heat er It uses air oxygen from the room in which it is installed Provisions for adequate combustion and ventilation air must be provided Refer to Air for Combustion and Ven tilat...

Page 3: ...l for reference It is your guide to safe and proper operation of this fireplace WARNING Any change to this heater or its controls can be dangerous WARNING Do not use a blower insert heat exchanger ins...

Page 4: ...e no obstructions across openings of fireplace 8 To prevent the creation of soot follow the instructions in Cleaning and Maintenance page 29 9 Before using furniture polish wax carpet cleaner or simil...

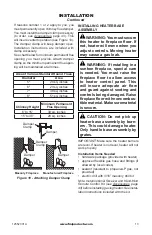
Page 5: ...ty and safety information 1 Remove logs and heater base assembly from cartons Note Do not pick up heater base assem bly by burners This could damage heater Always handle base assembly by grate 2 Remov...

Page 6: ...ld air out and the warm air in During heating months home owners want their homes as airtight as possible While it is good to make your home energy efficient your home needs to breathe Fresh air must...

Page 7: ...enings add the volume of these rooms to the total volume of the space 2 Multiply the space volume by 20 to determine the maximum Btu Hr the space can support _________ volume of space x 20 Maxi mum Bt...

Page 8: ...ure 2 You can also remove door into adjoining room see option 3 Figure 2 Follow the National Fuel Gas Code ANSI Z223 1 NFPA 54 Air for Combustion and Ventilation for required size of ventilation grill...

Page 9: ...al installing heater in rooms without enough ventilation air may cause mildew to form from too much moisture See Air for Combustion and Ventila tion page 6 NOTICE Thisheater isintended for use as supp...

Page 10: ...ensure safe installation into a masonry UL127 listed manufactured fireplace or listed vent free firebox Minimum Clearances For Side Combustible Material Side Wall and Ceiling A Clearances from the si...

Page 11: ...s above the fireplace opening Noncombustible materials such as slate marble tile etc must be at least 1 2 thick With sheet metal you must have noncombustible material be hind it Noncombustible materia...

Page 12: ...tain the minimum distance of 14 to combustibles see Figure 8 B If combustible materials are less than 14 to the fireplace you must install appliance at least 5 above the combustible flooring see Figur...

Page 13: ...pick up heater base assembly by burn ers This could damage heater Only handle base assembly by grates IMPORTANT Make sure the heater burners are level If heater is not level heater will not work prop...

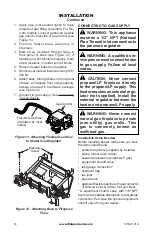
Page 14: ...Masonry Screw CONNECTING TO GAS SUPPLY WARNING This appliance requires a 1 2 NPT National Pipe Thread inlet connection to the pressure regulator WARNING A qualified ser vicepersonmustconnectheater to...

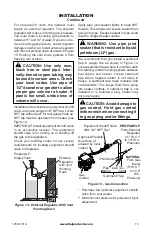
Page 15: ...ropane LP Supply Tank External Regulator with Vent Pointing Down Figure 13 External Regulator With Vent Pointing Down Installation Continued Apply pipe joint sealant lightly to male NPT threads This w...

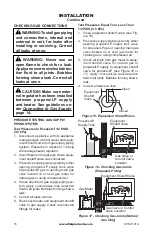
Page 16: ...located on or near gas meter for natural gas or using compressed air 4 Check all joints of gas supply piping sys tem Apply noncorrosive leak detection fluid to all joints Bubbles forming show a leak 5...

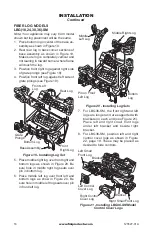
Page 17: ...e diagrams or failure to use only parts specifically approved with this heater may result in property damage or personal injury Log Support Brackets If installing a LBG36 SM attach log support bracket...

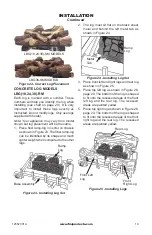
Page 18: ...t Log Figure 20 Installing Log Sets Middle Right Log Middle Left Log Bottom Log Pin on Front Left Log Figure 21 Installing LBG36 SM Model Control Cover Logs Left Control Cover Log Right Control Cover...

Page 19: ...its shape and much lighter weight when compared to the other logs Figure 23 Installing Log Set Base Assembly Ramp Log Figure 24 Installing Log Set Ramp Log Metal Tab 2 The log must sit flat on the bla...

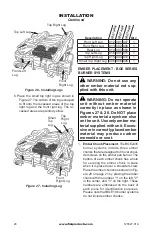
Page 20: ...ly in place as shown in Figures 27 28 Do NOT place ember material anywhere else on the unit Use only ember ma terial supplied with unit Exces sive or incorrectly placed ember material may produce carb...

Page 21: ...replac ing see Parts page 34 Platinum Bright Ember placement Add embers to front flat burner Gently remove embers from bag Separate pieces of ember material and place on surface of flat burner just be...

Page 22: ...batteries are installed the little house icon with current room temperature will be dis played see Figure 32 This icon will always show in the control window as long as the batteries have power Figure...

Page 23: ...b Ignitor Button Operation FOR YOUR SAFETY READ BEFORE LIGHTING WARNING If you do not fol low these instructions exactly a fire or explosion may result causing property damage per sonal injury or loss...

Page 24: ...remote burners will light on high There is no adjustment to the flames without using remote 11 To leave pilot lit and shut off burners only turn control knob clockwise to the PILOT position or use rem...

Page 25: ...trol to display the temperature in either Fahrenheit or Celsius With remote control off press Thermostat button and Mode button at the same time This will toggle the display from F to C Figure 39 Remo...

Page 26: ...occurs press the UP arrow button to relight the unit A beep from receiver confirms the command ON ON MAX Figure 42 Remote Control Display of Flame Height Minimum and Maximum MINIMUM MAXIMUM ON Figure...

Page 27: ...re 45 Child Safety Lock Out Child Safety Lock Out This function lets you deactivate the remote control buttons It is active when the lock icon is lit on the display To activate press MODE button and U...

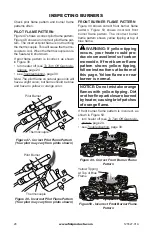
Page 28: ...natural gas units will have a slight curve but flame should be blue and have no yellow or orange color Figure 49 Correct Front Burner Flame Pattern Figure50 Incorrect Front Burner Flame Pattern Yellow...

Page 29: ...thirty minutes 2 Inspect burner pilot and primary air inlet holes on injector holder for dust and dirt see Figure 51 3 Blow air through the ports slots and holes in the burner 4 Check injector holder...

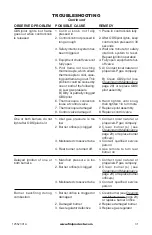
Page 30: ...4 Air in gas lines when in stalled 5 Depleted gas supply pro pane LP only 6 ODS pilot is clogged 7 Gas regulator setting is not correct REMEDY 1 Reconnect ignitor cable 2 Free ignitor cable if pinche...

Page 31: ...30 seconds 3 Wait one minute for safety interlock system to reset Repeat ignition operation 4 Fully open equipment shut off valve 5 A Contact local natural or propane LP gas company B Clean ODS pilot...

Page 32: ...up for a minute 2 Operate burners until air is removed from line Have gas line checked by local natural or propane LP gas company 3 Observe minimum installa tion clearances see pages 10 through 12 4 C...

Page 33: ...ged 1 Gas leak See Warning statement at top of page 2 Control valve or gas control defective 1 Foreign matter between control valve and burner 2 Gas leak See Warning statement at top of page 1 Hand he...

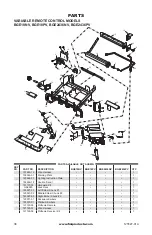
Page 34: ...www fmiproducts com 125527 01A 34 PARTS Variable Remote Control Models BG18NV BG18PV BG2436NV BG2436PV 1 3 20 16 5 10 8 9 19 7 22 18 23 21 17 6 11 2 4 26 24 13 25 14 20 15...

Page 35: ...amp Burner 1 14 113242 01 Rear Ramp Burner 1 113242 02 Rear Ramp Burner 1 15 112713 01 Pilot Bracket 1 112713 03 Pilot Bracket 1 16 112715 01 Heat Shield 1 17 112782 02 Air Deflector Bracket 1 112782...

Page 36: ...scription BGE18NV BGE18PV BGE2436NV BGE2436PV Qty 101480 12 Wire Harness 1 100563 01 Warning Plate 1 123482 01 Lighting Instruction Plate 1 100639 12 Caution Decal 1 101137 02 Hardware Kit 1 GA6060 La...

Page 37: ...t Ramp Burner 1 112465 02 Front Ramp Burner 1 15 113242 01 Rear Ramp Burner 1 113242 02 Rear Ramp Burner 1 16 112713 01 Pilot Bracket 1 17 112715 01 Heat Shield 1 18 120466 01 Flex Tube 1 19 121120 01...

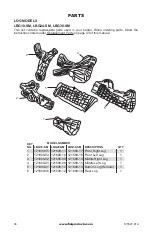
Page 38: ...og 1 3 121699 02 121699 08 121699 14 Middle Right Log 1 4 121699 03 121699 09 121699 15 Middle Left Log 1 5 121699 01 121699 13 121699 13 Bottom Log Remote 1 6 121699 06 121699 12 121699 18 Rear Log 1...

Page 39: ...699 21 Front Right Log 1 6 121699 22 Back Log 1 7 121699 23 Left Small Front Log 1 8 121699 24 Right Small Front Log 1 9 121699 25 Left Control Cover Log 1 10 121699 26 Right Control Cover Log 1 1 2 3...

Page 40: ...055 10 Middle Right Log 1 4 125055 16 125055 05 125055 11 Middle Left Log 1 5 125056 01 125056 02 125056 02 Ramp Log 1 6 125055 14 125055 03 125055 09 Rear Log 1 7 125055 06 125055 06 125055 06 Top Lo...

Page 41: ...ural Ignition Electronic Manifold Pressure 3 4 W C Inlet Gas Pressure in of water Max 10 5 W C Min 5 W C BG2436pV Rating Variable 25 000 36 000 Btu Hr Type Gas Propane LP Ignition Electronic Manifold...

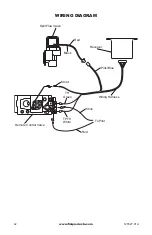
Page 42: ...www fmiproducts com 125527 01A 42 Split Flow Valve Red Black Receiver Wiring Harness To Pilot Remote Control Valve TPTH White Red White TH Green Pink Blue Motor Wiring Diagram...

Page 43: ...nly original replacement parts This will protect your warranty coverage for parts replaced under warranty Contact authorized dealers of this product If they can t supply original replacement part s ca...

Page 44: ...s product and or FMI PRODUCTS LLC who will provide original factory replacement parts Failure to use original factory replacement parts voids this warranty Travel handling transportation diagnostic ma...

Reviews: