background image

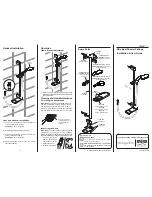
• Before Installation, insure there is sufficient 
  clearance to accommodate the shower panel.  
  A minimum of 23.5” is required between the 
  shower outlet and top of your existing valve.
  Maximum clearance required 42”.

  Ensure that the water line to the overhead
  shower pipe is completely shut off prior to
  performing any work.

• Remove the existing shower head and shower pipe.

• Connect the Brass Extender Joint (Part 15) provided 
  to the shower outlet. Use waterproof plumbing tape 
  on the pipe threading prior to securing the extender 
  to prevent leaks. 
 

 (Note: The Brass Extender Joint (Part 15) in two 

  sizes. Choose the appropriate size and ensure the 
  longer end of threading on the Extender (Part 15) 
  is facing outward.)


INSTALLATION INSTRUCTIONS 

- 7 -

15

15

MAX 1-1/4" 

MIN 23.5 INCH

½" diameter is needed to 
accommodate the shower panel's 
Brass Extender Joint (Part 15)

Summary of Contents for VS-1000C Plus

Page 1: ...ion and User Guide VS 1000C Plus ATTACH YOUR RECEIPT HERE Serial Number Purchase Date If you have questions relating to the use warranty return claims and replacement please call Phone 877 551 0484 Monday to Friday 8 30am 5 30pm PST Français p 18 Español p 35 ...

Page 2: ...ination of any 2 features DIMENSIONS DIMENSIONS CODE COMPLIANCE FEATURES Please read this Installation and User Guide before installing and operating Always take extra care when installing to prevent injury Please wear appropriate safety equipment Do not allow children unsupervised use of the shower panel Do not use the shower panel if you are physically impaired or under the influence of alcohol ...

Page 3: ...coming dirt by pipework Incoming dirt can impair the function and or lead to damages on functional parts of the fixture Manufacturer will not be held liable for resulting damages The O Ring Gasket 9 must be installed to prevent water leakage Manufacturer will not be responsible or liable from any damage which results directly or indirectly from failure to installation of the O Ring Gasket IMPORTAN...

Page 4: ...1 9 3 2 3 4 5 6 8 7 8 7 9 10 9 11 3 12 13 14 3 7 15 8 4 ...

Page 5: ...ASSEMBLY c 5 A b d a 1 2 4 5 6 7 8 7 9 9 4 3 2 3 1 4 ...

Page 6: ...B ASSEMBLY a 6 1 1 10 10 8 7 10 9 7 10 b c ...

Page 7: ...emove the existing shower head and shower pipe Connect the Brass Extender Joint Part 15 provided to the shower outlet Use waterproof plumbing tape on the pipe threading prior to securing the extender to prevent leaks Note The Brass Extender Joint Part 15 in two sizes Choose the appropriate size and ensure the longer end of threading on the Extender Part 15 is facing outward INSTALLATION INSTRUCTIO...

Page 8: ...e final position of the bracket guide Take a pencil marker and lightly mark the vertical position of the Bracket Part 13 6 a b a Peel off the paper backing to the adhesive on the back side of the Bracket Part 13 b Place the adhesive side to the wall and apply pressure to secure the Bracket Part 13 Note Clean all residues from the wall to insure the cover will bond properly c Place the Rubber Washe...

Page 9: ...elect from 10 of clearance between the overhead shower and the top of the tallest user s head is recommended Place the shower panel on the desired bracket position Raise the shower panel and rest it against the bracket until the support strut is resting snugly in the desired bracket position Once a snug and secure fit is achieved and all the parts on the PVC Supply Line are secured to the back of ...

Page 10: ...TRUCTIONS Recommended 10 B Installation position will vary depending on users height It is recommended to have at approximately 10 of clearance above the users head for the best experience with this produce A 1 2 3 10 ...

Page 11: ...er Hose Part 11 to the Handshower Cradle Part 10 turn clock wise to tighten ASSEMBLY INSTALLATION INSTRUCTIONS 11 1 9 11 3 12 9 10 10 Add a Filter Gasket Part 3 into Handshower Hose Part 11 Then attach the Handshower Part 12 to the Handshower Hose Part 11 turn clock wise to tighten ...

Page 12: ...n When the position knob is placed in b Spray Position When the position knob is placed in c When the position knob is placed in a Shower Head Position c When the position knob is placed in between each dot mark this will result in a sharing of water output between 2 operating modes This can be used if combination of 2 modes is desired however the water output will be reduced due to sharing of wat...

Page 13: ... 5 4 3 1 2 Remove the handle to open the set screw access hole 1 Loosen the set screw 1 from the valve stem and pull the knob 2 straight out 2 2 5 mm 3 2 1 1 Loosen and remove the gland nut 4 Remove the Diverter valve 5 by pulling it straight out 4 4 3 5 Diverter valve 4 13 ...

Page 14: ... avoid scratching the trim plate Do not force the nut too tightly 4 4 3 Adjust the knob with right position Shower Head Mode 2 Replace the knob 2 on the valve stem Before securing the knob turn on the water to know which way the handle is to be pointed 5 4 2 5 mm 3 2 1 1 Tighten the handle 3 and finish the install Once the correct position of the knob has been determined place the knob on the valve...

Page 15: ...he check valve and pull straight out 2 3 Check Valve 1 Place the new check valve into the valve body Observe the direction of the valve is correct 2 4 Check Valve 2 2 3 2 Ensure the check valve is flush with the top of the valve body inlet 5 Level Place the filter gasket 3 back in place and secure the PVC hose to the valve body to complete the install 2 6 How to Replace the Check Valve 15 3 ...

Page 16: ...amaged harsh cleaning materials will cause further damage Dirt or sedimentation on valve seat shut off unit damaged Clean or exchange shut off unit Shower drips continuously Modern faucets and shower products utilize a combination of materials to comply with the needs of the market with regard to design and functionality To avoid damage it is necessary to use some caution when cleaning Damage caus...

Page 17: ...r the purchase price The limited warranty does not cover damage due to such things as accident misuse abuse mishandling neglect acts of God fires earthquakes floods high winds government war riot or labor issues defined as strikes lockouts delay of carrier unauthorized repair or any other beyond the control of the Seller whether similar or dissimilar to the foregoing Seller is not responsible for ...

Reviews: