background image

4

5

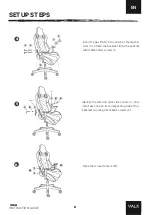
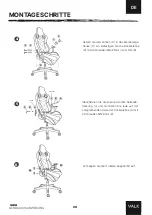
Identificare le coperture laterali destra e sinistra 

(J) e installare ciascuna sul lato corrispondente 
dello  schienale  (A)  utilizzando  2  viti  M5×8mm 
(K).

6

Inserire a scatto i 4 tappi rotondi (M).

Inserire  il  pistone  (D)  nell'alloggiamento  del 
meccanismo  (C).  Fissare  lo  schienale  (A)  al 
sedile (B) con 4 viti M8×25mm (I).

GAIA

PASSI DI MONTAGGIO

IT 

MANUALE D'ISTRUZIONI

M

M

I

D

L

K

J

L

K

J

L

I

L

DESTRO

SiNISTRO

16

Summary of Contents for GAIA

Page 1: ...INSTRUCTION GUIDE EYRA GAIA INSTRUCTION GUIDE...

Page 2: ...WELCOME TO THE RESISTANCE...

Page 3: ...TIONS FRAN AIS COMPOSANTS TAPES D ASSEMBLAGE AVERTISSEMENTS MANUALE D ISTRUZIONI ITALIANO ITALIANO COMPONENTI PASSI DI MONTAGGIO AVVERTENZE GEBRAUCHSANWEISUNG GERMAN ITALIANO KOMPONENTEN MONTAGESCHRIT...

Page 4: ...Asiento C x1 Mecanismo D x1 Pist n de elevaci n a gas E x1 Cubierta del pist n F x1 Base G x5 Ruedas H x10 Tornillos M8 20mm I x4 Tornillos M8 25mm J x2 Tapas laterales I D K x2 Tornillos M5 8mm L x1...

Page 5: ...ala cada uno en su lado correspondiente de la base del asiento B usando 6 tornillos M8X20mm H 1 2 3 Instala el mecanismo C en la base del asiento B con 4 tornillos M8 20mm H con la palanca orientada h...

Page 6: ...en su lado correspondiente del respaldo A usando 2 tornillos M5 8mm K 6 Coloca las 4 tapas redondas M a presi n Inserta el pist n D en el alojamiento del mecanismo C Fija el respaldo A al asiento B co...

Page 7: ...es el siguiente Antes de reclinar el respaldo aseg rate que la funci n de balanceo del asiento est bloqueada Solo el personal cualificado puede reemplazar o sustituir los componentes del mecanismo de...

Page 8: ...1 Mechanism D x1 Gas Lift E x1 Gas Lift Cover F x1 Base G x5 Casters H x10 Screws M8 20mm I x4 Screws M8 25mm J x2 Lateral Covers L R K x2 Screws M5 8mm L x1 Allen Wrench M x4 Round Covers N x2 Armres...

Page 9: ...install each on its corresponding side of the seat base B using 6 M8X20mm screws H 1 2 3 Install the mechanism C on the seat base B with 4 M8 20mm screws H with the lever facing the back of the seat O...

Page 10: ...esponding side of the backrest A using 2 M5 8mm screws K 6 Place the 4 round covers M Insert the gas lift D in the notch of the mecha nism C Attach the backrest A to the seat B with 4 M8 25mm screws I...

Page 11: ...s as follows Before reclining the backrest please make sure the tilt function is blocked Only qualified personnel can replace or substitute the components of the height adjustment mechanism The tilt f...

Page 12: ...nisme D x1 Piston d l vation gaz E x1 Couvercle piston F x1 Base G x5 Roues H x10 Vis M8 20mm I x4 Vis M8 25mm J x2 Couvertures lat rales D G K x2 Vis M5 8mm L x1 Cl Allen N x4 Capuchons ronds N x2 Ac...

Page 13: ...installez chacun d eux sur le c t correspondant de la base du si ge B l aide de 6 vis M8X20mm H 1 2 3 Installez le m canisme C sur la base du si ge B l aide de 4 vis M8 20mm H le levier tant orient v...

Page 14: ...r le c t correspondant du dossier A l aide de 2 vis M5 8mm K 6 Embo tez les 4 capuchons ronds M Ins rez le piston D dans le bo tier du m canis me C Fixez le dossier A au si ge B avec 4 vis M8 25mm I G...

Page 15: ...doucement jusqu au minimum 4 Soulevez l g rement le poids du si ge pour que la hauteur du si ge augmente 5 Quand le si ge est la hauteur d sir e rel chez le levier et la position sera fix e L inclinai...

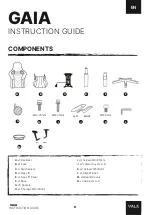
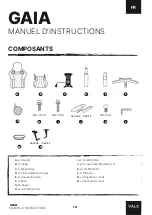
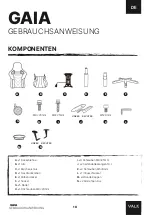
Page 16: ...D x1 Pistone elevatore a gas E x1 Coperchio del pistone F x1 Base G x5 Ruote H x10 Viti M8 20mm I x4 Viti M8 25mm J x2 Coperture laterali S D K x2 Viti M5 8mm L x1 Chiave a brugola N x4 Tappi rotondi...

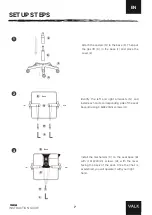
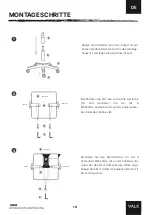
Page 17: ...stallare ciascuno sul lato corrispondente della base del sedile B utilizzando 6 viti M8X20mm H 1 2 3 Installare il meccanismo C sulla base del sedile B con 4 viti M8 20mm H con la leva rivolta verso i...

Page 18: ...dente dello schienale A utilizzando 2 viti M5 8mm K 6 Inserire a scatto i 4 tappi rotondi M Inserire il pistone D nell alloggiamento del meccanismo C Fissare lo schienale A al sedile B con 4 viti M8 2...

Page 19: ...rmente il peso del sedile per aumentarne l altezza 5 Quando il sedile all altezza desiderata rilasciare la leva e la posizione sar fissa La reclinazione dello schienale regolata per mezzo della leva n...

Page 20: ...s D x1 Gasdruckkolben E x1 Kolbendeckel F x1 Sockel G x5 R der H x10 Schrauben M8 20mm I x4 Schrauben M8 25mm J x2 Seitenabdeckungen R L K x2 Schrauben M5 8mm L x1 Inbusschl ssel M x4 Runde Kappen N x...

Page 21: ...nd montieren Sie sie mit 6 M8X20mm Schrauben H auf der entsprechen den Seite der Sitzbasis B 1 2 3 Montieren Sie den Mechanismus C mit 4 Schrauben M8 20mm H an der Sitzbasis B wobei der Hebel zur R ck...

Page 22: ...den Seite der R ckenlehne A mit 2 Schrauben M5 8mm K 6 Schnappen Sie die 4 runden Kappen M auf Setzen Sie den Kolben D in das Mechanikge h use C ein Befestigen Sie die R ckenlehne A mit 4 Schrauben M8...

Page 23: ...Minimum abgesenkt 4 Heben Sie das Gewicht des Sitzes leicht an um die Sitzh he zu erh hen 5 Wenn sich der Sitz in der gew nschten H he befindet lassen Sie den Hebel los und die Position wird fixiert...

Page 24: ...1...
Reviews: