


Installation
We strongly recommend that you install the unit in easily accessible location. So you can later upgrade the
unit or re-program it in case if incorrect programming.
IMPORTANT
i
Installation
Emulation Mode Selection (excluding 2002-2004 SC430)
IMPORTANT
i
5
1 2
ON
1 2
ON
Both switches
“DOWN”
Ignition into
“ACC” or “ON”
position
Both switches
“UP”
Ignition into
“OFF” position
up to 30 sec
Confirmation beep
(Red LED blinks)
Confirmation beep
(Red LED blinks)
up to 10 sec
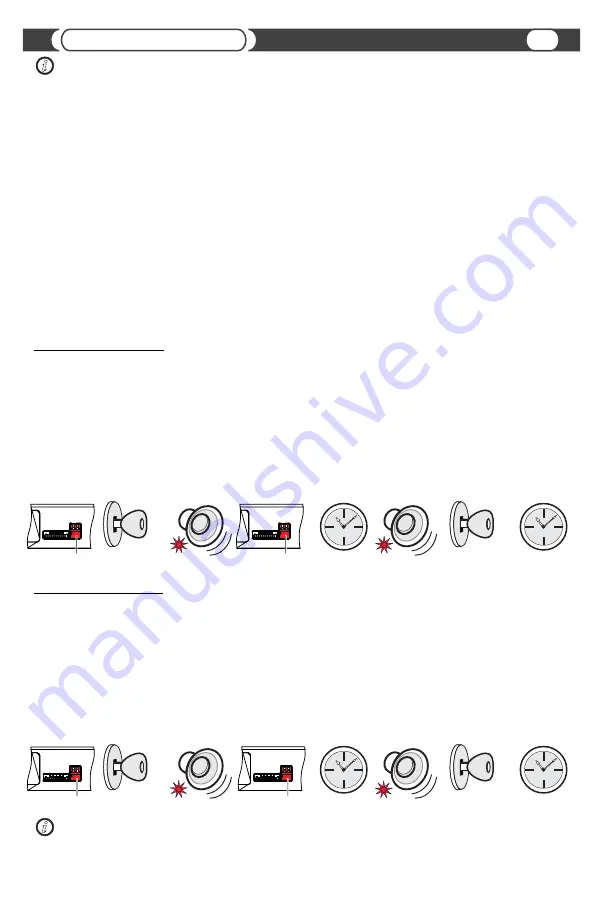
MD Changer Emulation Mode programming steps:
@
Properly install this unit.
@
Put both programming switches in “DOWN” position.
@
Put ignition switch into “ACC” position.
@
Wait for long beep followed by a few short beeps. This take up to one minute.
@
Return programming switches into their default position (both switches “UP”).
Wait up to 30 seconds until confirmation beep.
@
Put ignition switch into the “OFF” position. Wait at least 10 seconds.
@
Put ignition switch into the “ACC” or “ON” position.
@
Check SoundLinQ3 for functionality, especially TEXT capabilities.
CD Changer Emulation Mode programming steps:
@
Properly install this unit.
@
Put “Right” programming switch in the “DOWN” position.
@
Put ignition switch into the “ACC” position.
@
Wait for long beep followed by a few short beeps. This may take up to one minute.
@
Return programming switches into their default position (both switches “UP”).
Wait up to 30 seconds until confirmation beep.
@
Put ignition switch into the“OFF” position. Wait at least 10 seconds.
@
Put ignition switch into the “ACC” or “ON” position.
@
Check SoundLinQ3 for functionality, especially TEXT capabilities.
1 2
ON
1 2
ON
Ignition into
“ACC” or “ON”
position
Both switches
“UP”
Ignition into
“OFF” position
up to 30 sec
Confirmation beep
(Red LED blinks)
Right switch
“DOWN”
Confirmation beep
(Red LED blinks)
up to 10 sec
!
Improper Emulation Mode setting may cause this unit to be unrecognized by head unit.
!
CD or MD Changer Emulation Mode Programming MUST BE DONE in order for the unit to find proper address
location in the vehicle Audio/Video network.
@
Gain access to the back of you vehicle’s Head Unit.
@
Find the same port as our Y-Harness (see
“Connecting SoundLinQ3 to head unit”
)
@
Disconnect the existing connector and plug in our Y-Harness connector into this port, then plug female end of Audio
Harness to the plug in for your factory connector.
Audio harness female connector is not used in some vehicles,
in this case isolate unused plug to prevent accidental shortage to vehicle body.
@
Plug the other end of Audio Harness into designated port on SoundLinQ3.
@
Connect iPod cable as shown in the”Connecting SoundLinQ3” picture.
@
Setup proper Emulation Mode for this unit (see
“Emulation Mode Selection”
)
@
Turn the car on and check SoundLinQ3 functionality and (especially Text capability) before the final assembly.
@
Make sure your iPod has at least two playlists, in order for this unit to operate properly.
@
Please mount this unit in easy accessible location for upgrading and re-programming purposes.
@
Secure the Head Unit in its original position.


